Budddiiiiieeees! Hi hi!
Summer is in full swing around here… complete with swimming lessons, family bike rides, park playdates, and mud fights. If you don’t follow my Instagram stories, YOU SHOULD! @RealityDaydream …we share all the craziness, as well as kitchen updates, behind-the-scenes projects, and the saga of our monarch caterpillars and chrysalises.

I recently got to play around with some new AMAZING tools from my friends at Dremel, and I’m so excited to share the first (of many!) projects with you today! This post is sponsored by Dremel. Thank you for supporting the amazing sponsors that make Reality Daydream possible! This post contains affiliate links.

I’ve seen these cute Moroccan end tables around the WWW and I’ve always thought they are sooooo gorgeous! And when I really bothered to spend more than 2 seconds thinking about it, I realized that it wouldn’t really be that hard to make.
So here we go! Let’s do this!
Supplies for Moroccan End Table
- Enough 1×12″ Pine board to give you (6) 24″ boards
- Dremel MotoSaw
- Drill
- Sandpaper (220 grit)
- Wood Glue
- Circle of Pine
- AirStrike brad nailer
- Primer/Paint (I used this stuff)
I cut my 1×12 into 6 boards that are 24″ in length using my miter saw. (I ended up cutting them again to be 18″ later because the end table was going to be taller than expected. It’s up to you!) Then, using the table saw, the hubs cut the long edges at a 30* angle so that they boards will all fit together as a hexagon.
I HAD a picture of this process, but I can’t find it now! So sorry!
I made myself a template on a piece of cardstock with the Moroccan pattern I had in mind. HERE it is as a free download if you want it!

Line up your template with the edge of your board, and trace out your pattern onto each of the 6 boards with a pencil. You’re ready to cut!

Can we talk about this little gem of a scroll saw for a second? I’m a self-proclaimed scroll saw snob, since it’s one of my favorite tools. I spend so much time scrolling that I’m super picky! However I cringe when I link to my hefty scroll saw, because I genuinely don’t encourage you to spend $900 on a scroll saw until you have a few projects under your belt, and know whether you passionately enjoy it.
And this little MotoSaw is SO PERFECT. It actually attaches to the side of a work bench (or even dining table), and you just scroll away! It’s the perfect way to dip your toes into scroll saw projects if you haven’t already! (PSST be sure to check out all our other scroll saw projects HERE!)

Start with one of your line edges close to your blade (but not touching!) of your MotoSaw, and turn this little baby on and start cutting that board like butter! When I come to one of the corners, I go to the point and beyond it, rounding around back to the line. This allows me to come back later and finish off that point to be perfect.

Work your way all the way to the tip where we drilled a hole.
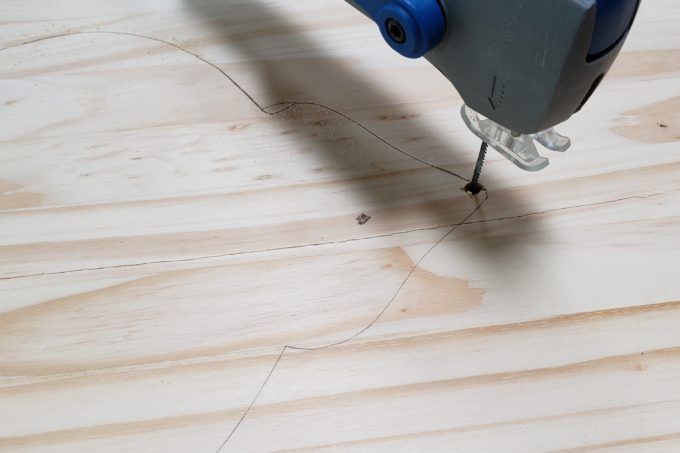
The reason we drilled a hole is so that you can take your blade out at this point.. We need to remove the blade so we can take the board out and start at the other end to meet back at the hole again!

When you reach the hole on the second side, you’re done with that panel and ready to repeat on the 5 remaining panels!
At this point, I could tell that my table was going to be taller and bulkier than I wanted, so I cut a few inches off, and now they’re 18″ long.

Before you assemble, it’s a good idea to put a couple pocket holes in the back top edge of the board so it will be super easy to affix your tabletop when it’s all said and done.
Then you’re ready to glue this bad boy up!

This gluing business is a two-person job, so snag your spouse, your kid, or your awkward neighbor to help you with this part.
Put a bead of glue along one of the angled edges (shown above), and then have your helper-person hold it together with a second panel while you pop in a brad nail with your Air Strike. Make sure that you put it in at such an angle that the brad nail pops through on one of the sides!
I put one in on the lower half, and on on the top half. This is mostly just for holding the piece together while the glue dries.


Once you’ve got all 6 glued and nailed together, use a couple ratchet straps to hold this thing snug while it dries. it’ll close in all the gaps and make it dry extra sturdy and durable.

Let ‘er dry, and then take those suckers off!
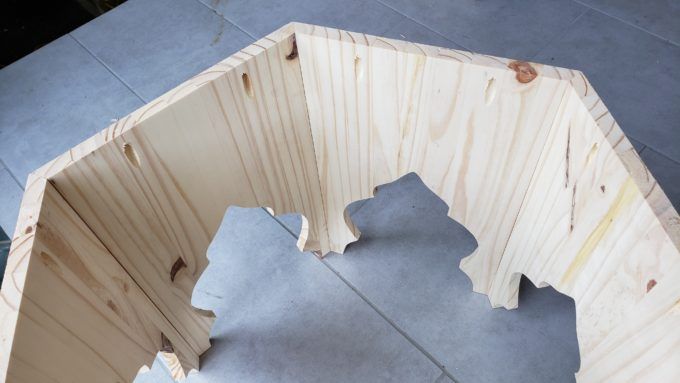
Lay the whole thing upside down onto your round tabletop, and screw it together with your handy pocket holes!


Sand this baby down! (the table, not the child)… I used my random orbital sander for most of it, and used a sheet of 120 for those curves of the Moroccan pattern. But you could do the whole thing hand-sanding if you don’t have one, and it wouldn’t take too long. People DREAD sanding for some reason!
Now let’s paint!

I pondered long and hard on what color to paint or stain this little Moroccan End Table. And usually when that happens, I end up going with white. Hehe!
I figure it’s the perfect base color to repaint it later when I decide exactly what it needs.

Ain’t she pretty?! And the white totally pops against our charcoal sectional from Article. No regrets!

Those two pics above are at a very similar angle because there was really only ONE SPOT in my living room where I could photograph this end table without having exposed/demoed wall in the background at the entrance of the kitchen. I was literally sitting in the fireplace taking those pics.
I hope this project demonstrates how fun and easy it can be to use (the right) power tools. I hope you’ll give the MotoSaw a try!
As always, if you tackle one of our projects or tutorials, be sure to tag us on social media! We’re @RealityDaydream in all the right places. 😉
Bethany
~~~~~~~~~~~~~~~~~~~~~~~~~
Thank you for pinning! <3

Related:
-

We've been needing to update our coffee table situation in the living room for awhile…
-

I have a fun and easy building project for you! And while I do end…
-

I've been needing to figure out a solution for my overwhelming plant propagation situation for…
De que tamaño es el ángulo del corte para darle la forma circular a las Tablas? Gracias, saludos desde chile
Love and how beautiful!!! Makes me want to go back to Morocco!! We had a wonderful honeymoon there ?!!
I saw a complaint on the Dremel site that the saw won’t cut lumber over 1/2″ thick, and the specs say it is for up to 1/2″ stock. You had no trouble with 3/4″ (I x 12) boards? That would be a game changer for sure if you can only cut 1/2″. Love the table. We need a kitchen update!
Such a pretty piece! For a moment I thought the asparagus fern was HUGE, but then realized it was on top of the table 😉
Looks like a fun project & the table top scroll saw – wow – compact with great results
good job!
It honestly reminds me of my sewing machine – presser foot and all. How would it be cutting plexiglass? I’ve had a project stewing just because that stuff is such a pain to cut.
I think that would totally work! I’ve cut plexiglass with my scroll saw before. 🙂