Happy Monday! How’s that for an oxymoron?
Let me tell you how this went… Ring, Ring.
- Nick: Hey Babe, What’s up?
- Beth: Hey I’m at Lowes and I have this project that I want to do.
- Nick: Ok, what is it?
- Beth: I want to build a small ladder shelf to put food on. What do I need to buy?
- Nick: ……. Uhhhh. IDK, just buy a bunch of 1×4’s…
Yup that is pretty much how things go around here. We just roll with it. Upon my arrival home, we started discussing the logistics. I can see things in my mind, but don’t have the engineering mindset to expedite my ideas.
Nick here… so once I had the height and depth I found the length of the Hypotenuse by using Pythagoras theorem(a2 + b2 = c2). Then I found the Angle using the Law of Sine/Cosine. Or if you want a cheat aide. Here is a link.
Beth here… SAY WHA????

Suffice to say, Nick was the brains of this operation. We started by cutting the pieces we need out of 1×4’s. Pictured below are the Front leg, Back leg and rungs.
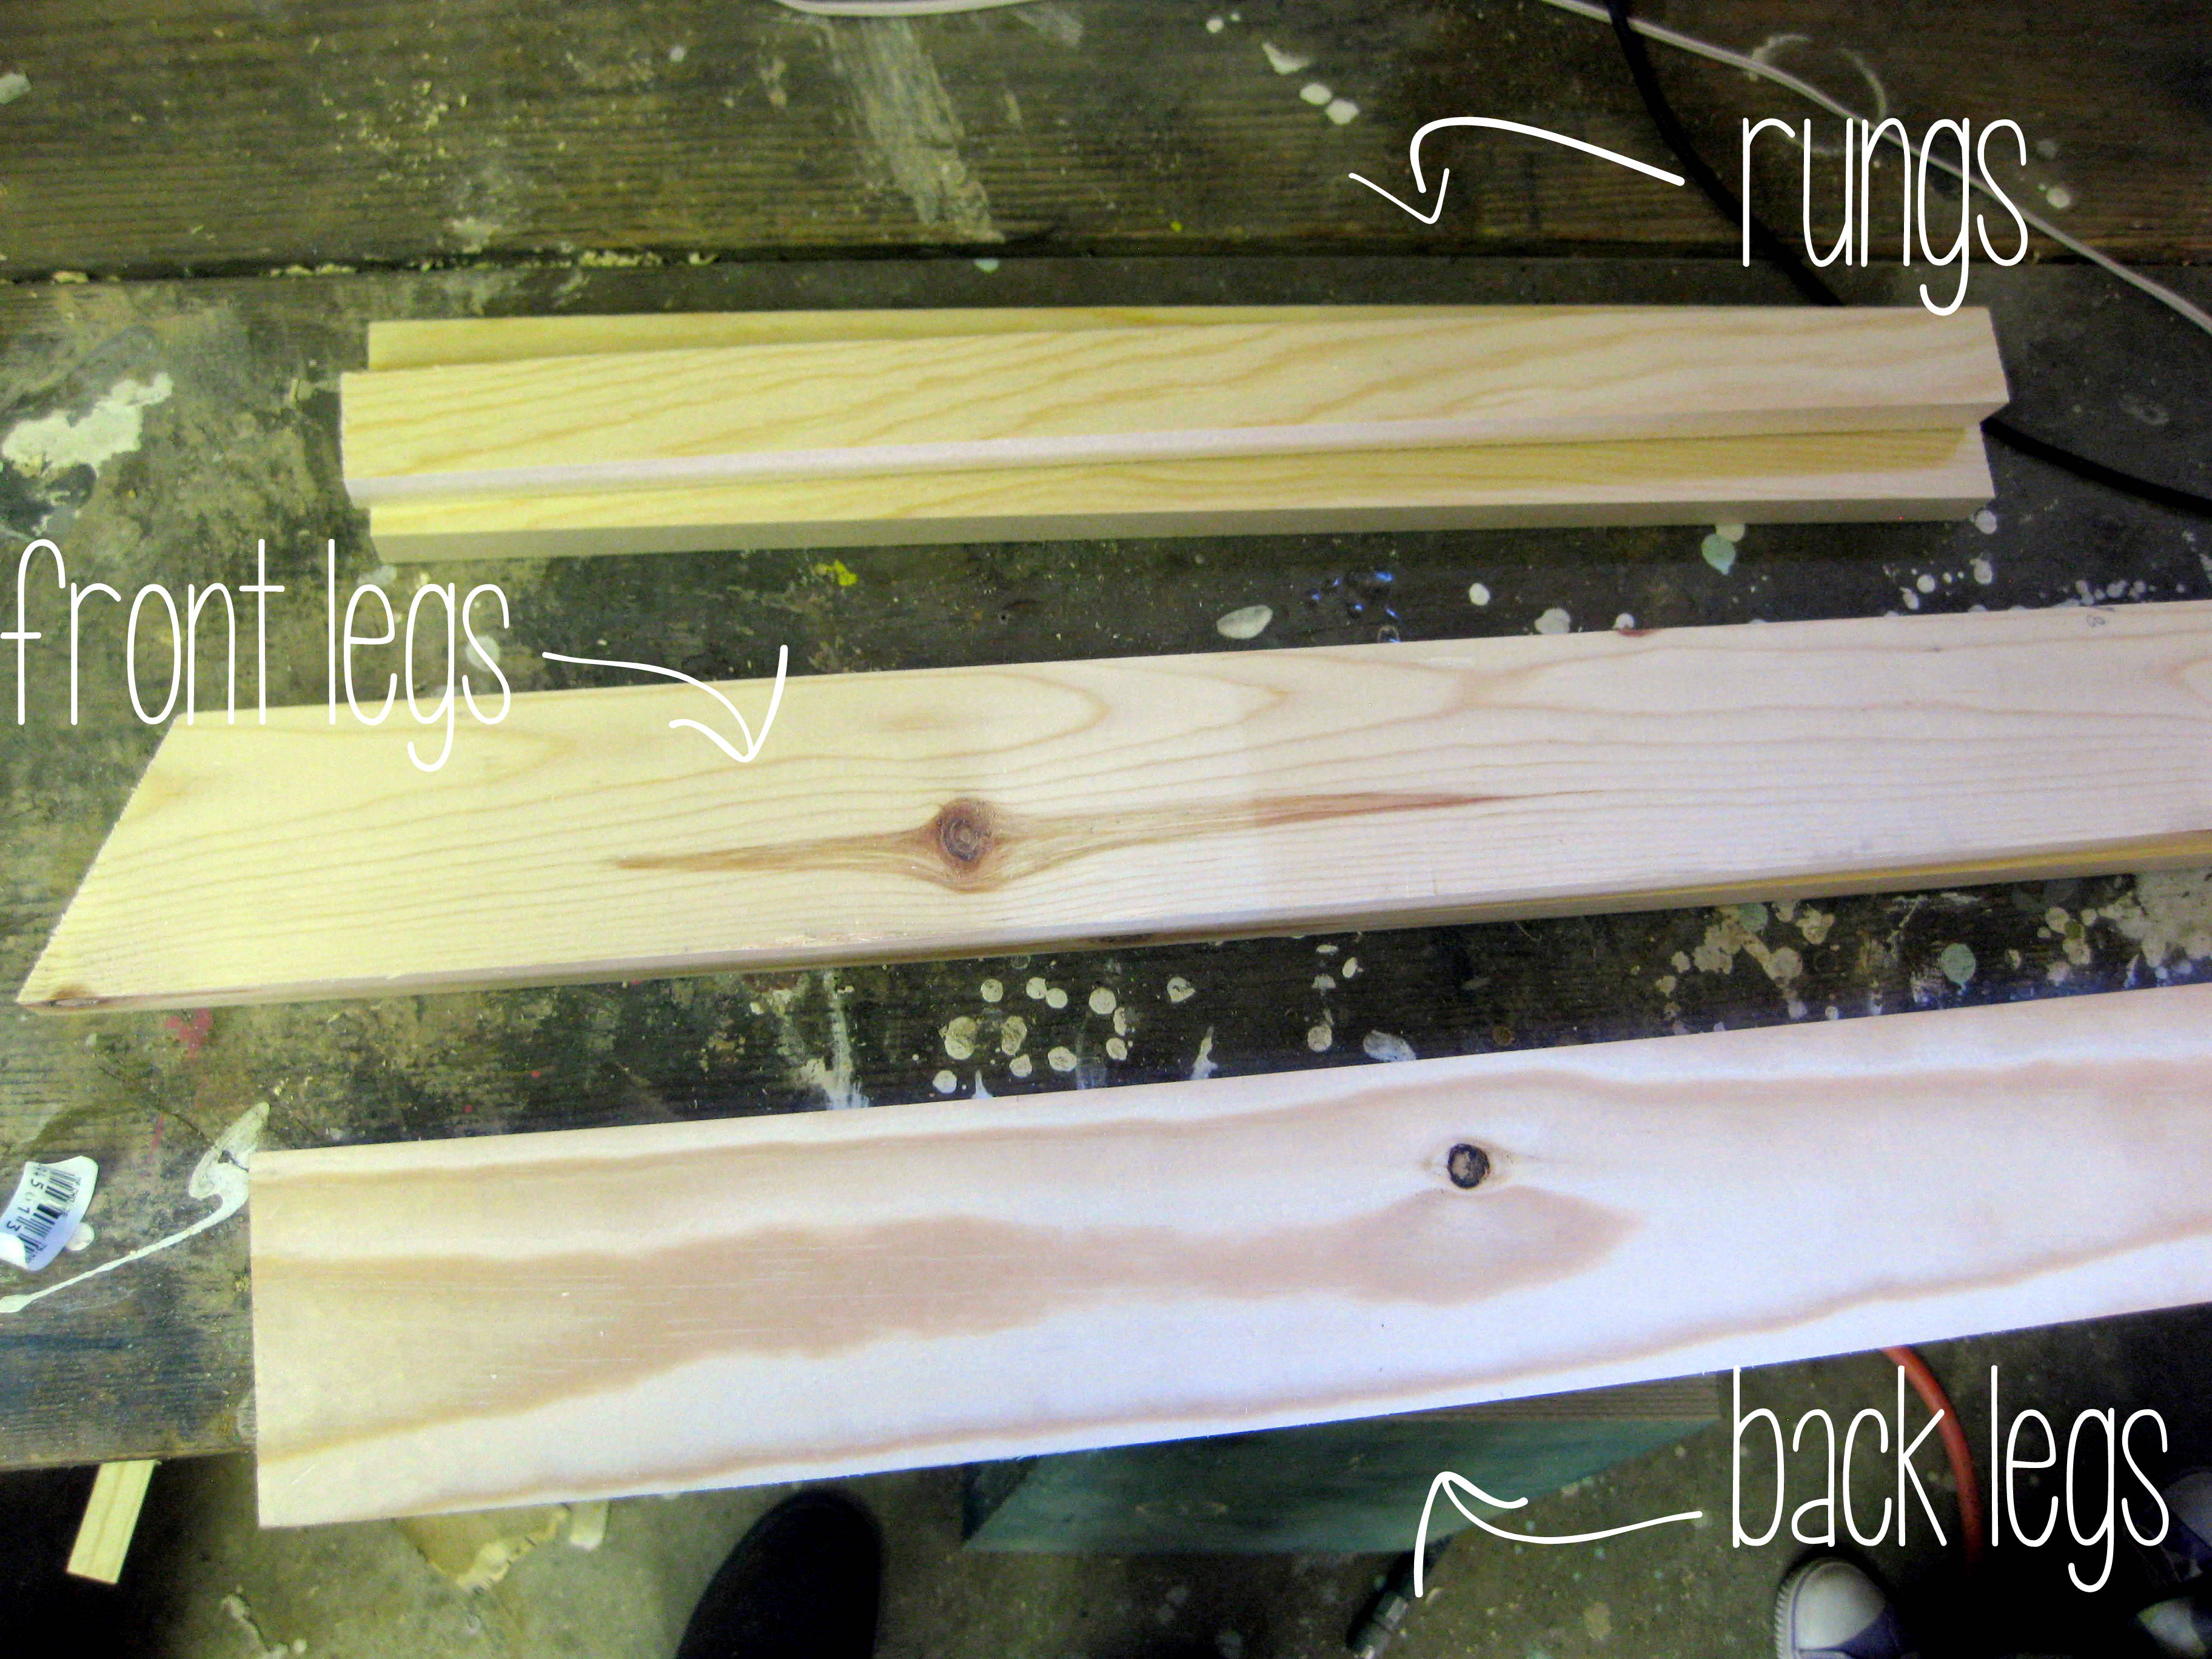
We cut them to length using our Ryobi Miter saw, then we ripped them down on the table saw. We ripped the back legs down to 3” and the Front Legs down to 2 1/4”. Ripping the Front legs to 2 1/4” allows the entire assembly to fold together when not in use. Offering a tidy solution for storage. We ripped the back rungs to 1” and the front rungs at 1” with the blade at a 30* angle (optional).

We then traced a radius (I think we used a lid) on the back leg and cut it using our Ryobi band saw.

Next, using a square, we laid out the back leg and the front leg to the rise and run dimensions we specified; 24” rise and 14” run. and traced the radius onto the top of the front leg. Back to the band saw to cut that radius.
Then we routed the outside radius edge of the back leg and the inside radius edge of the front leg. Using the Kreg jig we drilled pocket holes in the back rungs.

Glue and Screw! The rungs will hold the shelves (we spaced ours 9” apart).

We then clamped the front leg and back leg into position and drilled a hole the diameter of your screw through both legs. We positioned the hole at the center of the front leg (this will allow it to fold up nicely, when not in use).

I then drilled the front leg the diameter of the threaded insert and screwed the threaded insert into the hole using a Allen wrench. We used 1/4-20 screws and inserts.

Once we had the back leg and front leg assembled, we were able to lay out the position of the front rungs. I held a square against the back leg and marked were the front rung would sit.

Then I laid out the 1”x1” rungs and drilled a hole through the front leg and rung. I know this looks like I am about to drill into my hand; but I can assure you I am holding a rung and my hand is in the clear. I probably could/should have used a clamp… Safety First!

Then, just like above, I drilled the rungs the same diameter as the threaded insert… and screwed into place. We also drilled the front legs half way though with a 1/2” drill to allow the head of the screw to sit below the surface of the front leg.

I sanded, primed, and painted all the pieces white, and we assembled everything together, using flat washers anywhere the wood will be pivoting on each other.


When I was at Lowes, I found these cedar shelves that are meant to put on wire closet shelving. They were the perfect size I was looking for, and I knew it would save us some time on building the actual shelves. Because we had 3 different sizes of shelves on our ‘ladder shelf’, two of the 3 needed to be modified a little in order to fit. So we popped one board off the top shelf and glued it to the bottom. The top shelf needed 2 boards, the Middle needed 3 and the bottom 4. We then measured and ripped the shelves to their perfect size using a table saw.

The shelves set perfectly onto each rung! And I love the dual-tone look of the glossy white against the cedar shelves.

And it folds up beautifully for ease of storage!

We do a lot of entertaining, and almost always use our credenza to spread out food buffet-style to keep the actual dinner table uncluttered. This new addition will create even more added space for treats, and looks so classy and custom too! Perfect timing for holiday entertaining if you ask me

I have a feeling I won’t be using the ‘folding’ feature much, because when I’m not using this for entertaining, I’ll likely be utilizing it in the craft room for super cute storage! IN FACT, maybe I’ll have Nick ‘whip up’ a few more for me in his free time (when he’s not sleeping or working 70 hours a week). HA!

My gut tells me I should stop while I’m ahead. Over and out!

Thanks for pinning! <3

Disclosure: we’re SUPER HONORED to have been chosen as a “Lowes Creator”, and were provided with a Lowes gift card to help with the cost of supplies… but as always, all ideas, thoughts and opinions are 100% our own. Because that’s how we roll yo.
Related:
-

Is it too early to call this spring cleaning? The truth is, we've been planning…
Do you have a cut list and directions that can be printed out? I really want to make one or two of these!
Unfortunately no… this post is a couple years old and was before we knew how to use SketchUp to make building plans and such. So sorry!
I’m sorry, we don’t have building plans for this one. This post was written so long ago it was before we knew how to work sketch up.
Can you at least tell me what the angle is that you cut the bottom of the front legs at? I am guessing 30 degrees, but need to be sure. Thanks!!!
I can’t seem to find the tutorial on Lowes website, would you be able to provide cut and material list? How long were each rung?
Would love to BUY one (or two) of these from you instead of building it. I don’t have any of those tools. Any chance you’re selling them now?
Hi Lindsey! Unfortunately we don’t sell these. Many of the items we give tutorials for, we also sell on our Etsy shop, but our shop is closed until further notice because I’m having a baby any day. So sorry!
This is EXACTLY what I need. Do you sell these on your esty page?… (Please say “yes”)
Unfortunately no, but they’re super simple to build! You should go for it!
Please make more & sell! This is exactly what I’ve been wanting!
looks awesome!! I love the contrast.
I just found the hubbs newest project. It would be so helpful when entertaining. I wish I had a few for this weekend (birthday party/bonfire). I’m sure my sister would love this too.
As for the math part…I’m great with algebra, but once you bring in the geometry aspect, I’m lost.
What a creative, clever idea. Great execution as always! You two rock!
You guys are hilarious!! You’re almost as cute as your girls!! (But, seriously, I love the way this project turned out! Unfortunately, there is nobody named Nick living in my house . . .)
I love it! You guys are so handy. I skimmed over all the technical parts but I love the end result!
I would love 1/1000th of your skills. Both of you. Beautiful shelf!
Oh shush Katy! You’re adorable and talented and hilarious!
Ummm…ridiculously cute!!!!!!! Now I need to build one! Perfection!
Thanks Jess! I love it even more than I was planning on! 🙂
This looks like a WONDERFUL product to offer on your etsy page. 😉
Hmmmm… Interesting thought!
This is such an awesome idea!! What I’ amazed by is that there is real life applications of high school math in this blog….that was like a blast from the past and I’m pretty sure this ladder could be a story problem for some poor kid unless they are like Nick and then they will be fine!!
Math-induced-panic-attack-flashback for me!
LOVE this!!!!! I could definitley use this in my kitchen! And, my bedroom, and maybe my bathroom?? wow, you guys need to make more and sell them, or do a giveaway!
Agree!
Great…thanks, cause I needed one more idea for something to build!! Dang it!! I think we may have enough wood in the garage to accomplish this one..hmmmmm….
Do it! Send us pics! 🙂
This is so clever! i think it would be a great seller – I like it better than traditional plate racks/stands – so much potential.
Thank you Cory! We try to think outside the box. 🙂