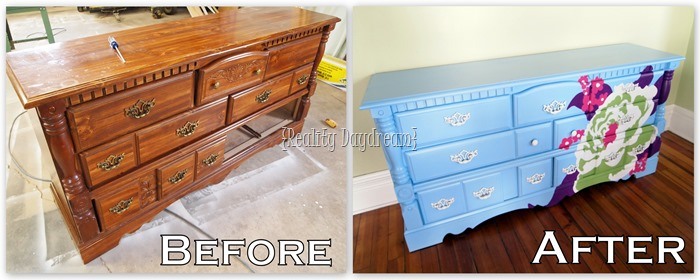
I think it’s safe to say we’ve all seen a dresser that looks like this at the thrift store, craigslist, or yard sales. It’s that token chunky dresser with the orangey wood-tone, 90’s hardware, and dated decorative carving in furniture.

 *This post contains affiliate links*
I’m a big proponent of rescuing dilapidated and/or ugly furniture and giving it new life, as evidenced by our extensive furniture archives. And this one is no exception! This makeover is actually very old news here on the blog (original makeover here). However, we’ve been getting several reader questions about how to fill those out-of-style decorative inlays or ‘carve-outs’ to make it a flat/smooth surface. So I’m going to spill my tips for you today!
How to fill decorative carvings in furniture
- High Performance Wood Filler (we recommend this one)
- Putty Knife
- Sanding Block
- Sandpaper in a variety of grits
- Latex Gloves (or other material)
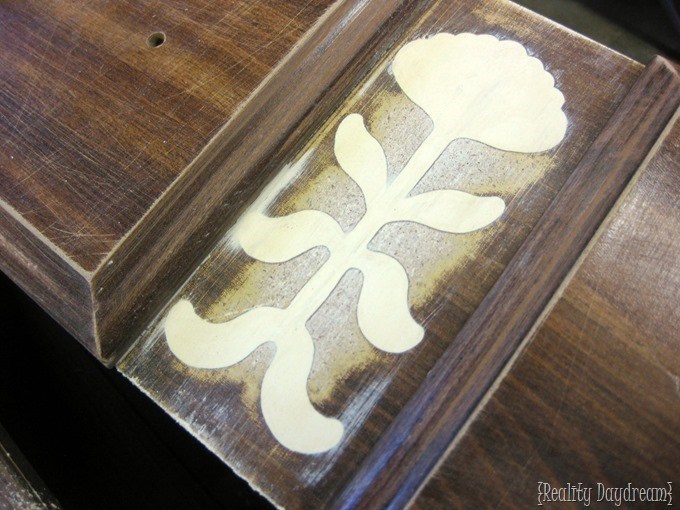
Start by cleaning out any crud that may have built-up in the crevices over the years. Soapy water and an old toothbrush should do the trick. We also sanded down the entire dresser in preparation for painting, but you can save that step for after the carvings are filled. When you’re done cleaning out the gunk, wait until it’s completely dry. Start preparing your wood putty per the package instructions. Begin pressing the putty into the carvings.

Use your putty knife to scrape off the overflow of wood putty and create a smooth surface.

You may find that you need to go back and apply more wood putty in certain places and repeat the putty knife scraping until you have a fully filled and smooth surface.

Now it’s time to sand! Start with a heavy grit sandpaper (like 100 or less) and slap it onto your sanding block. This will aggressively remove excess wood putty and give you a fairly smooth surface. But in order to prepare it for painting, you’ll want to sand with a medium grit (like 150). And then finish off with a low grit (220) to make it SO SMOOTH and ready to be painted!


After you prime (use this stuff!) and paint, you’ll never even know that all those drawers had gaudy carvings in them!!

You’ll have to click over to this post to see the process and tutorial for how I paint this flower onto the dresser (it’s for a changing table in a little girl’s nursery!). This painting technique is easier than it looks! I promise!


Would you believe that’s the same hardware? I just sanded, primed, and painted them (make sure you use oil-based spray primer and spray paint for ultimate durability). And now they look so much more current!

Be sure to check out all the other furniture makeovers we’ve done by clicking the image below!
Thanks for pinning!


Hi I have a Maple colored kitchen table all solid wood and my son had a party and one of his friends scratch some bad word graffiti into the corner of the table and it’s pretty deep How do I fix that to make it like it never happened and still keep the same wood coloring
I would look into Mohawk finishing products. They have fill sticks that you can get to perfectly match the wood, and even have feathering products to where you can replicate the wood grain so it is completely invisible by the time you’re done.
Nice creativity… Decorative carvings are looking very pretty. Carved Wood Furniture plays an important role at home. Thanks for sharing this post.
Very nice article on carved and furniture items. Happy to get your tips for my furniture business. Thanks
beautifully done Thank you for sharing
Thank you Norma!
This is really awesome. We have an entire bedroom set and it is SOLID and I love that it’s strong and not easily destroyed by kids and even the curves but I detest those very un-classy indentation designs (they’re not really even true carvings). The only problem is that I just really love the natural wood look and I can’t think of any way to save the wood look and get rid of those designs . . . . I guess I need to sell it to someone that either likes it as-is or doesn’t mind it painted and just buy me a set that I love without them. 🙁 I love your idea tho.
Jennifer, it the ‘carvings’ are just on the drawers, you could rip off the drawer fronts and replace them with a slab of wood, and stain it a similar color as the rest of the dresser!
I know this is years later but they do sell a stainless wood filler. & apparently all these fillers dry to look like unstained wood. You may be able to get away with removing the stain and restaining the entire piece.
Oooh…could you do a post with ideas for all the things you could do with an overhead projector (if you haven’t done one already). I have one (thanks Craigslist!) and have done a couple projects, but feel like I could be using it more.
That’s such a good idea! I need to do a roundup post with all my projector projects in one place. Thanks for the motivation! In the meantime, all my projector posts are archived in the same place so you can at least go scroll through them for some inspiration. Here’s the link!
https://realitydaydream.com/category/projector-projects/