I know you all are giddy with anticipation to see the new and improved PAINTED backsplash! I’m not into real tile backplashes… because it’s hard to clean, expensive to install, and you have limited color and size options. So I’ve created a faux painting technique to look very similar to porcelain or natural stone tile. Check it out:
This is a ‘before’ shot. The original backsplash is the same color as the walls. (don’t be jealous of all my sweet orange appliances)

First things first, I taped off the backsplash, and painted it white! (in a eggshell finish)

Using 1/4 inch painters tape, I created a grid based on what size tiles I wanted. You can do vertical… or diagonal like I did! If you want to get real fancy, you can do a mosaic over your stove-top or sink (like this!), or go for subway tiles or even brick! Here are some examples we’ve done of Subway Tiles, and Staggered Horizontal).

I chose several colors of acrylic paint for my palette. I wanted a neutral ‘tumbled travertine’ look.


Just try to get a slightly different combination of paints on your brush for each “tile’, and try to be purposefully random!!! That totally makes sense, right?
No need to wait for the paint to dry. You want to remove the tape before it’s too dry to make sure it comes off without peeling back the paint that you just spent so much time on! This part is SOOOO rewarding… INSTANT GRATIFICATION! It’s so fun seeing the final product… it looks so freakin’ REAL!

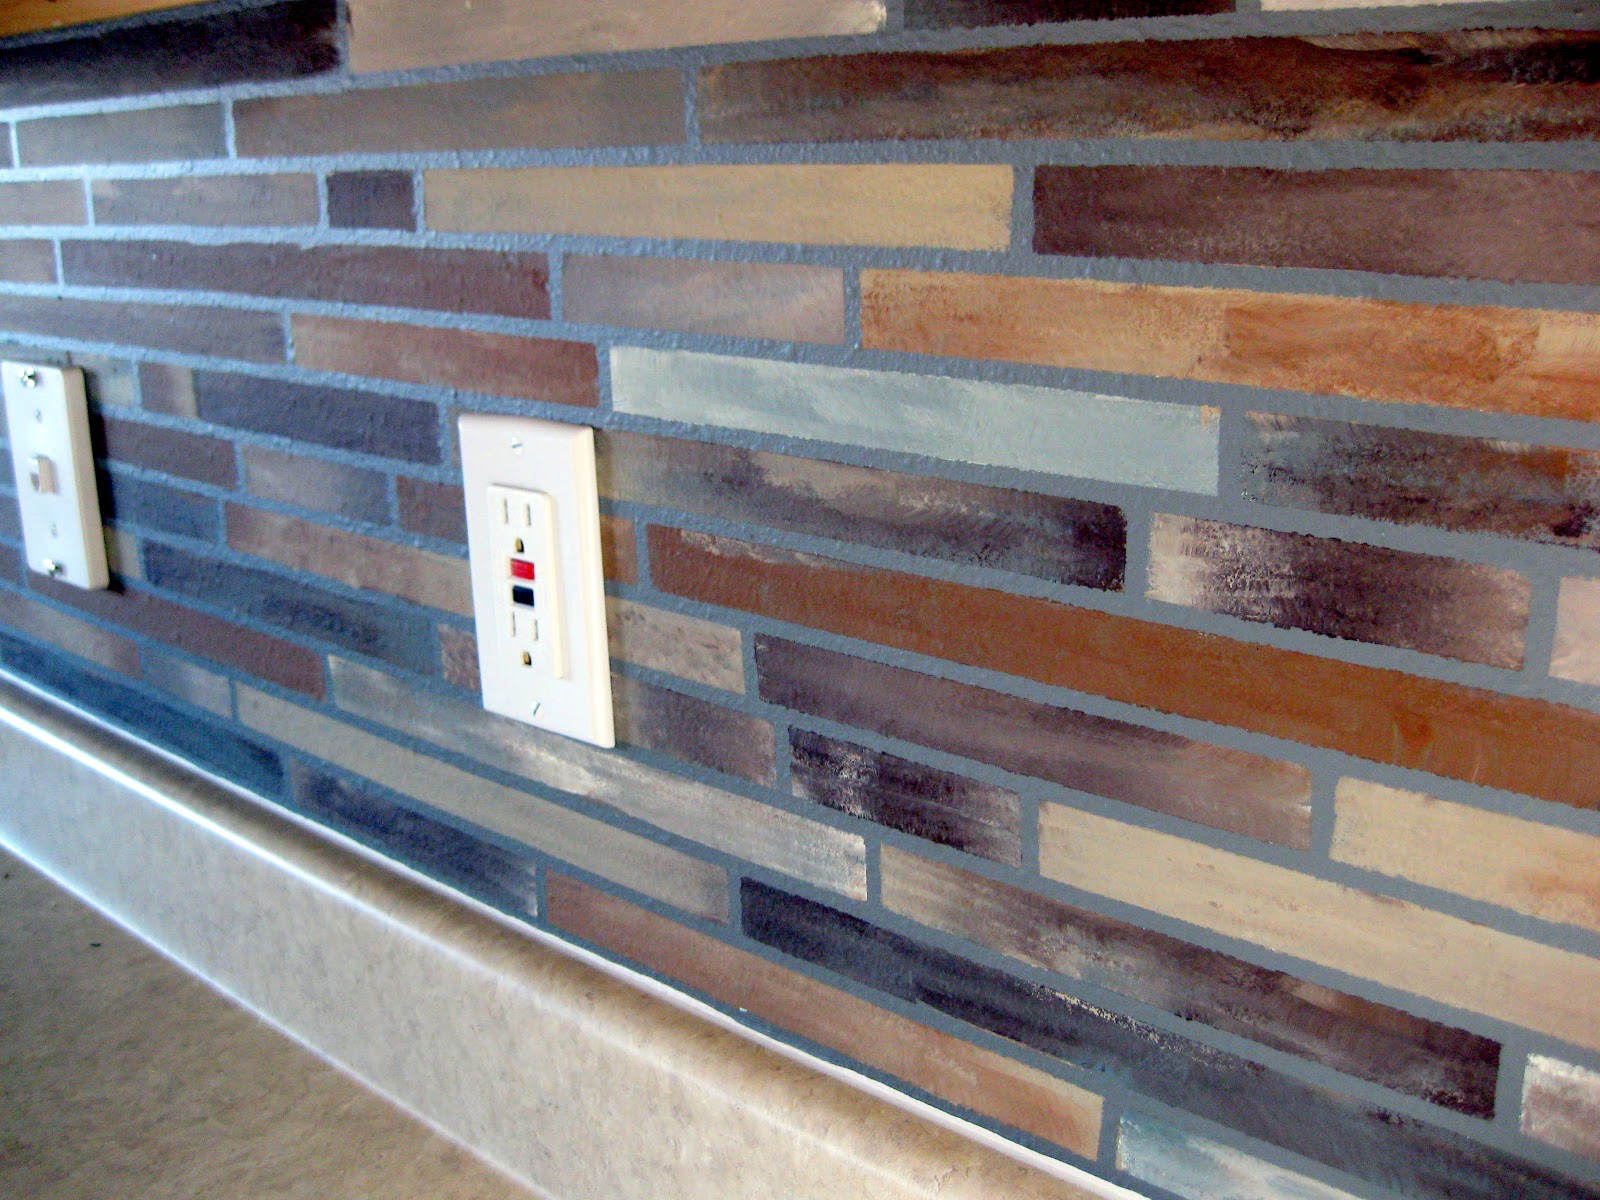
Here’s the finished product!!


Related:
-

I have a fun and easy building project for you! And while I do end…
-

My kids are getting to the age where they want to tape pictures, cards, notes...…
-

I've been needing to figure out a solution for my overwhelming plant propagation situation for…
I am struggling with fake brick in my kitchen, it was there when I bought the house. It’s the only thing I really hate about the kitchen. It’s painted white and I’m tired of it. I don’t know what to do besides painting it white again. It’s put on with real mortar so it would probably damage the plaster and lathe behind it. Do you have any suggestions to make the paint more appealing??
Hi Beth…
I’m currently recovering from a total knee replacement, spending hours entertaining myself with the internet. (What else is one to do with all the snow and sub-zero temperatures her in northwestern Indiana?!) I stumbled across your website this evening and am in total awe! I love your faux-painted backsplashes and am very anxious to put your idea to work in my own kitchen! We moved into this house just five months ago, and with no money in the budget for a true tile backsplash, this fool-the-eye look is perfect! I’m particularly interested in your “old” back splash (the diagonal stone pattern), and was wondering if you would be willing to share the paint colors that you used for your project. There are so many shades of brown, taupe, and tan out there…I wouldn’t know where to begin to choose. Any help that you would be willing to toss my way would be so appreciated! Thank you so much!
Diane, it was so long ago I don’t remember the exact shades. But it truly doesn’t matter as long as you have a cream-colored ivory, and tan/beige, and a chocolatey brown. Obviously you’ll be using tan the most, but mixing in a little cream or brown to add dimension and make the ’tiles’ truly look like tumbled travertine! Here’s the link for that first backsplash. Good luck! Send pics when you’re done!
https://realitydaydream.com/2009/09/home-improvements-backsplash.html
Thanks, Beth! I’m excited to get started! I’ll send pictures of my before and after! Happy Valentine’s Day!
So from what i can tell you do this as a side business too, in 3-4 hours. I just painted my formica backsplash. I lightly sanded it, then did a coat of primer, and then a base of buttercream. I am curious though how you can do the whole process in just a few hours, especially with drying times. I”m pretty sure if I didn’t wait a few days for the base to cure, the taping would pull the paint off in sections? How do you combat that? Thanks, your work is beautiful. I tried a sample of making a “tile look” with just a regular sponge brush like you but failed miserably, so I got one fo those sea foam artistic sponges, and my practice tile looked so must better! 🙂 I will also put a coat or two of poly-urethane over the top when done. I also a few years back painted the formica countertops too, and it’s held up pretty well! Here’s a link: http://livinglifetogetherforever.blogspot.com/2010/11/painted-countertop-unveiling.html
Jamie, if the backsplash isn’t already painted white (or a suitable ‘grout’ color) we have the homeowner paint it in advance so it has time to fully dry and cure. We usually recommend a week in advance… otherwise the tape would pull off the ‘grout’ paint just like you said. We only paint the tiles on, so that’s how we’re able to do it in a couple hours. When I used to paint them without my husband’s help, it took me closer to 4-5 hours. But his measuring/mathematics skillz help the grout-tape to go up real fast! It’s fun! P.S your counters look awesome! Great job!
If I’m using acrylic paints for the long, horizontal “tiles”, do I need to put some kind of protective coating over the painted tiles to protect it from being damaged by water, etc? In other words, how do I make them “washable” without the painted “tiles” getting destroyed?
I recommend using a water-based sealant. This one is our fave! >> https://amzn.to/2tMMRAd
What size squares were these? Did you just blot the paint on vs. strokes of paint?
I love your idea of painting on a back splash to look like tile. We remodeled our kitchen in 2007 and have yet to put a back splash because we don’t want to commit to tile so I love this idea. The problem is that we have textured walls. Won’t the paint bleed thru? Have you done this on textured walls? If so, how did it come out?
Thanks for sharing.
Hello! Good Question! There is always SOME bleed-through with texture. We’ve found that a flat paint as the base color (before you put up the tape grid) helps the tape stick tighter and reduce seepage. Hope this helps! If you give it a go, be sure to send us pictures!!!
I did a concrete floor this way using 1/2 inch tape. I put the tape down first, so when I took it up, the grout was concrete color. Looked like a tile floor.
That sounds AWESOME! We’d love to see pics! (sawdustandembryos@gmail.com)
I love this look! I am practicing on some poster board and really having a hard time making mine look anywhere like yours. Mine keeps turning brown and fuggly. I have gone thru 8 different browns to try to match this look you created. On your paper plate pictured above, I cannot figure out what colors your darker browns are. And is that a yellow?
I cant wait to do it for real on my walls, but I just can’t get it to look real like yours on the test boards.
Could you help me out what those dark colors are?
I can’t wait to show you when I am done!
Thanks for your inspiration!
Sorry it took me so long to reply! We’ve been out of state…
So, I painted this backsplash almost 4 years ago, and I can’t be sure what color those browns are. But we’ve been known to use Apple Barrel ‘Nutmeg’ and ‘Burnt Umber’. On this particular backsplash, I used those light tans and creams primarily, and only used the darker browns to add a little dimension to the tiles here and there and make the tiles look more like stone. You just need to blotch it around until it looks like you want it to! You’ll get a technique down, and it’ll go fast from there!
Hope this helps! Send pics when you’re done!
You inspired me! I did my backsplash this weekend, and it looks awesome! So much work, but I am getting many compliments on it. Thanks for all the instructions and inspiration!
Ooooo send us pictures!!! sawdustandembryos@gmail.com
i am wondering if you have ever just painted the tiles of a backsplash. Our backsplash is already tiled, but it’s very tan/neutral, and i want to spice up our kitchen a bit. can i just paint the tiles (not the grout) and then seal afterwards? they are not a glossy smooth finish, but more of a pitted tile. thoughts?
We’ve never painted over tile, but we totally would if it was in our own kitchen. Obviously we can’t guarantee the outcome, but since your tiles are a dull/porous finish, I imagine it will accept the paint well! Just be sure to prime first.
You’ll have the added benefit of not having to do any math or measuring! Just place the tape where the grooves of the grout already exist! Let us know how it goes. We’re very curious!
Holy Patience Batman !!!! I LOVE IT !!!!
Ok, I am losing it! I am driving myself crazy trying to set up the grid pattern! There has to be any easy way to make the diagonal lines! What is the trick?
Oh man… tell me about it! Diagonal is the hardest. I would totally struggle with that one if I didn’t have Nick-the-math-genius doing all my measuring/figuring.
Send us an email, and I’ll have Nick give you some specific instructions and tips. sawdustandembryos@gmail.com
Looking Awesome!!!! Keep up……………..
I really want to do this but I’ve not been able to find 1/4″ painters tape. Where do you find yours?
You can order it here:
http://www.amazon.com/PAINTERS-MATE-GREEN-TAPE-Wide/dp/B0006ITPMK
I bought some at hobby lobby in the car models section. 🙂
oh wow, you guys did a great job, as usual! This is such a good idea… I may try!
I love the look you have achieved! Because of your level of craftsmanship, this simple painted backs splash looks very sophisticated. Pinning for inspiration!
beautiful job. what would you suggest for a french country or rustic look? thanks btw-small kitchen with dark wood cabinets which MAY become white this spring!
I would stick with neutrals and keep things classic, and it will FEEL french country by the way that you decorate around it. Or may a ‘brick’ look? You really can’t go wrong!
Wonderful! Thank you. I think I just found my next DIY project. Hubby needs to finish a wall first.
Thanks again.
You have inspired me! Do you seal these backsplashes in any way? Especially in areas where is might need a good scrubbing such as behind the range? I’d hate to spend all that time painting only to scrub it off.
Thanks
Francie, we recommend rolling on a clear coat of PolyCrylic or something similar to seal it a few days after you paint it.
Love it! You rock!
It’s love for me!! I’m gonna do it.
I agree- Lovely and inspiring!!! I have a most ugly backsplash….hmmmmnnnn, and I’m in desperate need of a flush mounted headboard… And I can’t think of any room that wouldn’t come alive with tissue paper poof’s, etc, etc!
Lovely and inspiring! Thanks for sharing.
These are awesome. I painted my laminate countertops to look like granite, but haven’t done anything with my backsplash. I guess I have a new weekend project. Did you put any type of clear coating for protecting? I think behind the stove and sink for sure.
Just found your blog from Better After–and I AM IN LOVE with all your back splashes!! You guys are AMAZING!! Love your ideas–and your crazy awesome painting skills! Good luck on your fertility fund!
Checked out the other backsplashes, too. Gorgeous! Do you know of a place in Iowa to learn faux finish painting? Would you be interested in giving a class??? My best to you.
AMAZING!!!!!
today i was thinking: can you do one with faux accent tiles?
So great!! I think the talent comes from your mom!! 🙂
Natalie Joy
Incredible work, Beth!! You have a great talent!
Love it.
Hey lady! How long does this take you? And can I hire you to do ours? We’ve been contemplating tile but you’re right: too expensive and too limited! Let me know!