GUYS, I almost never do this, but I asked a friend of mine if she would want to guest post here on Reality Daydream. She has THE CUTEST Etsy Shop and makes darling felt flowers for little girls’ headbands and home decor pieces. And I knew you guys would love it as much as I do!

Isn’t Samantha’s little daughter (pictured above) the cutest little model? I just want to squeeze her!
TAKE IT AWAY SAMANTHA!
~~~~~~~~~~~~~~~~~~~~~~~~~~~~
Hey! I’m Samantha from The Flowered Forest and I’m so excited to be on Reality Daydream!
Bethany first offered me this amazing opportunity about 3 weeks before Christmas to show off my felt flower skills with The Flowered Forest, and I promptly declined. (Clearly, I’m an amazing businesswoman, never passing up on great opportunities for growth!) But seven months pregnant and overwhelmed with felt flower headband orders (yay!) I was not in the mood to stress about anything else.
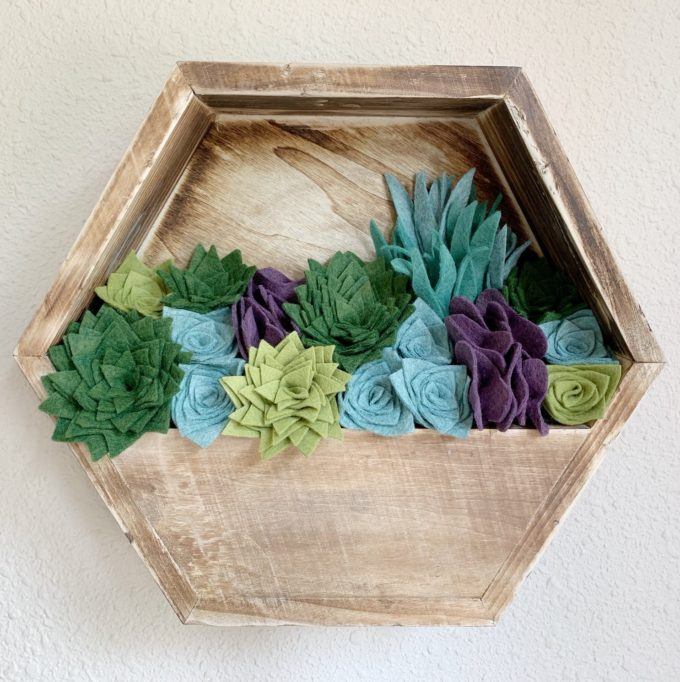
Fast forward through the holidays and the newborn fog, and into my first official line of felt flower home decor pieces, and here we are! Once I started working on these succulents, I knew they’d be the perfect project to share with you! They are easy, quick, and you can use these techniques to make all kinds of flowers by just cutting them a little bit differently.

Materials for Felt Succulent Wall Planter
*this post contains affiliate links*
- Wall planter (I got mine at Hobby Lobby)
- Assorted colors of felt (I used a high quality wool blend felt, it’s stiffer and less fuzzy then the craft store felt, but technically that would work, too.)
- Scissors
- Hot glue gun and glue
- Poly foam
Making the Succulents
There are four different succulents in this planter. You will need to make multiples of each kind to fill your container.

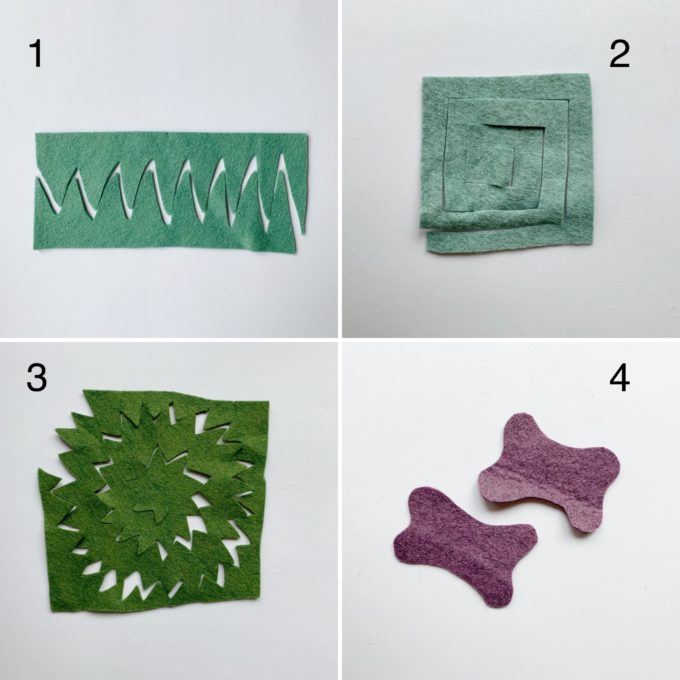
Cut your felt as follows to make the corresponding succulent:
- 3” x 8” rectangle
- 3” x 3” square
- 6” round circle
- Two 1.5” x 3” rectangles
This next part is where all the magic happens…. don’t worry about the details or cutting it perfectly! Just make an attempt to cut them like the pictures below.
Number 3 looks tricky, but it’s just a spiral cut with a zig-zag instead of a plain line. You may choose to draw lines with disappearing ink where you need to cut, but the flowers will look more organic if they aren’t perfectly cut anyways.

Now it’s just rolling them into shape (with the exception of aucculent #4.)
Succulent 1 is the easiest. Once you make your cut, you start at the side with the smaller length cuts and roll it up! (What?! You didn’t notice the cuts gradually got longer from right to left? Oh well- it will still work perfectly fine!!) Hold it all in place with just a drop of hot glue on the edge. Simple, huh?
Succulent 2 and 3 use the same technique, but start at opposite ends. Start Succulent 2 from the inside of the square by holding the center and rolling it up on itself. Work your way around the square, continuing to wrap the felt as you go. You may have to cut off the last ½” or so if it sticks out funny. Use some hot glue to attach the end to the flower.
Start on the outside end of Succulent 3 and roll it around itself just as you did Flower 2. You will have to cut off a weird piece at the end of this flower. Just as before, hot glue the end to hold the whole thing in place.
Succulent 4 is completely different, but really simple. Put a small line of hot glue across the skinny center of the dog-bone shape. Fold it on that line, but at an angle, so the top is scalloped. Holding it in between both of your thumbs and forefingers, pinch the middle on either side of the fold to give it some dimension. You will probably have to hold this a few seconds for the glue to set. Now make a handful more of these and glue them together into whatever shape they’ll make!
Did you follow all of that? I feel like I don’t have enough verbs in my vocabulary to accurately describe what should be happening, so here’s a video!
Planter prep:
Real plants need dirt so planters need a place to hold real dirt. Felt succulents are awesome and don’t need dirt, so we need to fill in the space where the dirt would otherwise go. Cut the Poly Foam to fit inside of your wall planter, angling it so the back sits higher then the front. Regular old scissors work just fine for this. Notice how not-perfect mine is cut? It doesn’t matter, as the next step is to cover the foam in a dark piece of felt with some hot glue so you’ll never see it anyways. Use a dark color so if it ends up being seen in between your succulents, it won’t be as noticeable. Be generous with the hot glue here as it tends to seep down into the foam.

That’s it! Now you get to arrange and rearrange your succulents 852 different times before deciding where they should go and hot gluing them down! (No? Maybe that’s just me…)


You can find me and The Flowered Forest at all the usual places: TheFloweredForest.com Etsy Instagram Facebook
And if you’re in the mood to shop use the code “RealityDaydream” for 10% off you’re whole order at TheFloweredForest.com.
Bethany here again… Isn’t Samantha SO TALENTED! Be sure to check out all the cute things in her shop The Flowered Forest, and follow her on Instagram for lots of cute inspiration!
~~~~~~~~~~~~~~~~~~~
If you love this faux succulent tutorial because (like me) you can’t keep a succulent alive to save your live, check out my Cross-Based Succulent Terrarium Tutorial! These would TOTALLY work with the felt succulents too!

Thanks for pinning!


super cute! Great job!
These succulents are gorgeous! I love how colorful and cheerful they are and I’m sure they brighten the mood of any room you bring them in. Another thing I like about them is that they’re made of felt, just like some of Sukhi rugs, which makes me fall in love with them even more. Thank you, Bethany, for featuring this on your blog, I really enjoyed reading it!