Heyyyyyy dudes! Happy Friday one and all! We survived the week, yeah?!
I’m especially excited for this weekend, because we have nothing planned. Zilch. Those are my favorite of weekends, because I feel like I get to truly unwind and spend time with my family. I used to be such a people person… WHAT HAS HAPPENED TO ME?!
Anywho! I have another fun-slash-simple project today… Contain your excitement!
Ever since we shared the tutorial for our Leather Tufted Ottoman, we’ve had people asking where we got the white/aqua tray.

Well if you look closely, you might recognize the tiles on the base of the tray from the backsplash in our ‘Laundry Suite’. Do ya see it? DO YA?

So by now you’re probably getting the feeling that we DIY’ed this little guy… and you’d be correct. But the beauty of this is that you can use SO MANY DIFFERENT THINGS if you don’t just happen to have gorgeous geometric glass tiles lying around. (this is the tile we used, but we also found this similar tile… and there are just tons of gorgeous iridescent tile here)
Think broken china mosaics or broken mirror (we’re not superstitious around here)… or you could use pennies, cut up credit cards, colorful beads, buttons, bottle caps… just whatever ok?
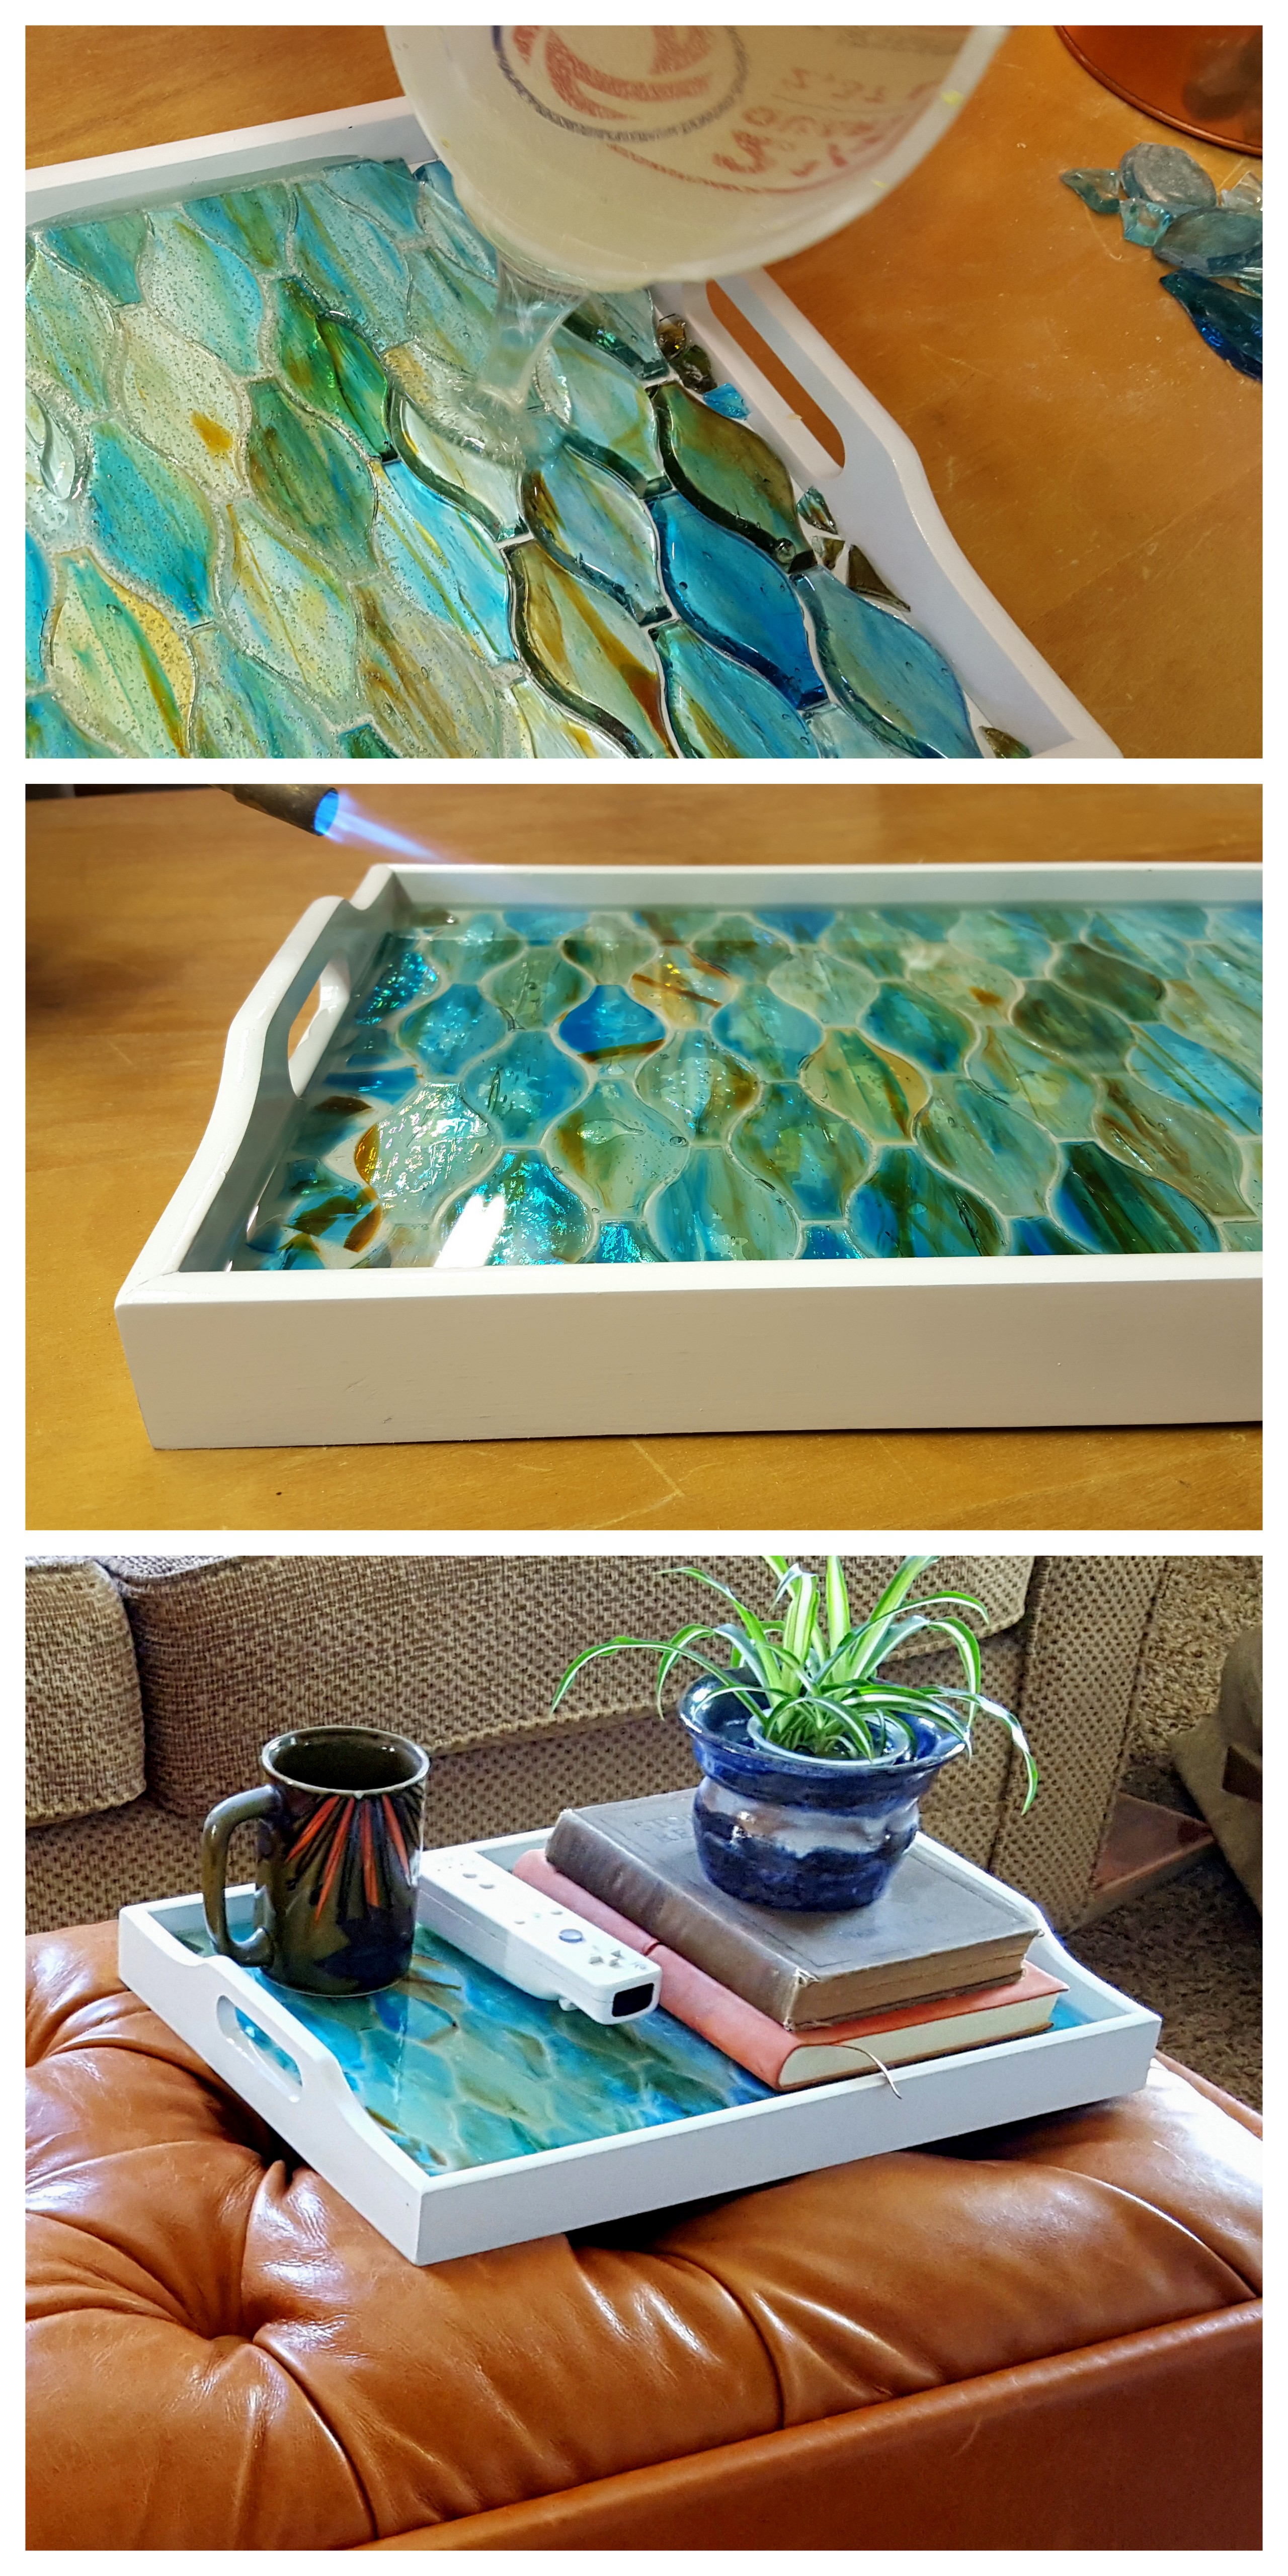
So let’s do this. I found this tray at a yard sale for $2. I was a little annoyed because I felt like $2 bucks was a little high. Don’t you think this should be about 25 cents?

But it was just the right size for what I needed, so I just went for it. I didn’t even try to bargain.
I like cats and all, but the intense stare of this particular kitty cat made me a leeetle bit uncomfortable. So I wasted no time painting the whole thing WHITE.

Much better I declare!
After my paint was good and dry, I started laying out my tiles one at a time. If you’re using something that’s fairly light, you’ll want to glue them down so they don’t float when you pour on the epoxy.

I was lucky enough to have some ‘half tiles’ for the top and bottom edge that were leftover from our backsplash installation when we had a wet saw, but I still ended up having to break some tiles with a hammer for those outside edges.

If you’re breaking tiles, glass, mirror, or china of any kind, BE SURE to put a cloth on top so little shards don’t come flying up and hit you in the facial region.
Now for the fun part! EPOXY baby! A lot of people are intimidated by the idea of using epoxy, but I’m here today to set your mind at ease. Just mix the two parts, and pour on. THAT IS ALL. (here is the stuff we use)

Once you’ve poured enough epoxy to completely immerse your tiles (or whatever you’re using), you’ll notice that there are tons of bubbles. This means it’s time to embrace your pyromaniac side and pull out your blow torch.

Now I’ve heard that a blow dryer (for your hair) would work for this too, but I’ve never tried it and can’t vouch for it’s effectiveness. But I can say… if you want your husband to ‘get involved’ in your projects, tell him you need him to MAN THE BLOW TORCH.

I would venture to say that… to your husband… using a blow torch would fall under the same ‘fun category’ as:
- Shooting off rockets
- Playing with fireworks
- Target shooting
- Eating a steak
- Flying a model airplane
- Riding a motorcycle
- Having sex
… (changed my mind about that last one)
OK let’s get back on track here. So the blow torch will make the bubbles disappear like magic. But once you’ve got them all, you’ll still want to check back in a half hour or so to see if any new bubbles have emerged. And then another half hour after that.
I’m not sure about exactly how many hours before it’s officially dry. But we poured our epoxy in the evening, and by morning it was a smooth candy coat. So awesome!

I love that this tray adds a little burst of color to my otherwise fairly neutral living room, AND it’s functional in that we can keep our remotes and a cup of coffee there. Because deeply tufted leather ottomans are not recommended for being an appropriate place to set a hot cup of joe otherwise.

Have you made a mosaic before? If so what was your ‘tesserae’ of choice? I think my personal fave was when we used broken colored mason jars to make a mosaic backsplash in our upstairs bathroom. It was a ton of work, but SO WORTH IT!
Hope you guys have an inspired weekend! Go forth and be creative!

*this post contains affiliate links
Related:
-

I have a fun and easy building project for you! And while I do end…
-

I've had this idea in the back of my mind for quite awhile... why not…
-

We love the original wood of our library, and wanted to find a desk that…
Question did you tray have glass in it originally and if yes did you take it our or just paint it
No, it was just wood.
Wonderful plate! At the point when I originally saw your page, I thought it said, “Inventiveness Daycare” (I pondered internally Oh better believe it, I’m there!) rather than Creativity Day Dream.” LOL!
Love this idea. My dad used to do beautiful stained glass work. And after he passed, I saved all of his leftover glass because some day (when I have more time) I plan to do stained glass myself. After seeing your idea, I now want to try making some trays using his old glass. But I definitely don’t have a blow torch. Can I use a hair dryer on high heat? Am I just doing that to blow away the bubbles?
Thank you for sharing.
I’ve been looking for help to use broken china dishes my Mom gave me.
By the time I got them, I wasn’t a complete set. However, it was just the right amount for a household of two.
We moved recently and the box was dropped.
My husband was heart broken. I wasn’t. There was still at least one of the cups and a saucer for me to use. I can remember my Mom sitting at the table drinking black from that cup; it was always being refilled.
Since we didn’t use them often, I had wanted to do a mosaic with them but I didn’t have the heart to break them.
Now I can do it and this way it can see and use them everyday.
We have a vintage side table with a lip. It’s perfect for this project.
In previous searches I kept coming across folks using cement for mosaic. I knew there was something else out there.
I am new to actually doing something with Pinterest ideas; I’ve been searching and pinning for years?
I’m excited to do this!
I will start with a small vintage desk drawer I found to use as a tray for hubby on top of his dresser. I’m hoping to find black and red something to use on his.
I love this! Please send pictures!
We have started a monthly project club. Thought this would be pretty and useful. If we purchase a wooden tray that is unfinished, do we need to paint tray first then use the Rust-Oleum product you showed or we can go straight to the Rust-Oleum to paint trays white?
How long does it take to dry?
Dryers we will use.
Will the epoxy be ok if we use colored half marbles, half circle glass, small mosaic tiles (where do we get these), etc?
Thank you in advance for your kind attention,
Susan Newman
No need to paint before using RustOleum! But it wouldn’t hurt to sand the tray first to give the paint some ‘tooth’ to hold onto. I would let it dry overnight before going on to the next step. You can use ANYTHING as your mosaic, and just pour the epoxy over it!
Dear Bethany, I love your explanations, it’s very clear and give me the hope that I can do nice things like you!
Congratulations !
Best regards,
Christine Bobillier
Geneva, Switzerland
Love!! I have done a kitchen backsplash with broken ceramics (2 cplirs, broken by me, hammer-style) loved it AND many mosaic table tops. My fave bring an antique piano bench top now used as outdoor gazeebo table….great cause it has storage right!?
I love that your backsplash is made with broken ceramics!
Could this method be used on a table top?
Absolutely! You’ll just want to make sure it’s a table with a ‘lip’ around the edges to hold the epoxy in after you pour it over your mosaic. Or you could try putting a strip of veneer edge-banding around the edge to act as a lip. Hope this helps! Let me know how it turns out!
I was wondering if you have ever tried to make a mosaic tile shelf without gluing the tiles to something else?
No I haven’t tried that. In theory you would need to glue them down since you’re adding epoxy, but the idea is to keep the tiles or ‘tessare’ in place so it doesn’t move around when you’re pouring the thick epoxy on.
I work with that epoxy all the time on my crafts, and I can tell you that a hairdryer or heat gun work very well, too. No husband required.
The tray is beautiful. Love it.
Hehe that’s good to know!
I love this. Great idea. Can you tell me where you got your tiles? I can’t find anything like this where I live. Thank you in advance.
Annette
Hey Annette! Here’s the link for that tile!
http://fave.co/2rIHVgq
Beautiful tray! When I first saw your page, I thought it said, “Creativity Daycare” (I thought to myself Oh yeah, I’m there!) instead of Creativity Day Dream.” LOL!
Teehee! <3
so pretty! im surprised the epoxy isn’t flammable. how heavy is the tray?
It actually is pretty heavy between the weight of the glass tiles and the thick coat of epoxy.
Hey Beth and Nick!! … long time reader, brand new subscriber here, LOL!! I don’t know why I have waited so long??? anyway, I was hoping you might tell me about how much epoxy it takes to cover this size area? I don’t want to get started and not have enough…right?
p.s. I have SO many of your tutorials pinned to try on my own, I have a major blog crush…you guys are totally, amazingly creative and your projects always raise the DIY bar, for sure!!!
p.p.s. I got no man, so guess who gets to run the fire torch? me, me, me!! on the flip side, that also means Item #7 on your list is not happening here either, bummer.
Very cool! I’ve been wanting one of those combination torch/solder guns. Now I have a reason. Ha ha ha
Interesting – I have a bag of seaglass I discovered when I was cleaning out our junk room the other day. I have put it on a shelf looking for something nice to do with it. i wonder if something like this would be a nice idea 🙂
oh & I love kitties… but that was a tad creepy. 😉
OOOOOOOOOOOH LOVE IT! love the checklist too – hahahahahaa. I like that you have 1 spot for the remote so it doesn’t get lost- a perfect caddy too for nailpolish & stuff 😉
LOL on your list of fun guy things!
I started laughing out loud at work when I got to where you crossed out “Having Sex”. I think it depends on who you are asking. Your young yet; I am sure that still works well for you!!! Some of us old people might prefer the blowtorch!!!
Love! WAAAAAAAYYYYYYY better than the cat.