The world of blogging is a weird one, but I’m so grateful for the friendships I’ve made over the years through this endeavor.
I’ve had the honor of meeting and hanging our with Liz Marie a few times over the years, and she is SUCH a gem of a human being. I’ve followed her infertility journey for so long, and have been so deeply invested in her story.

So when Liz and Jose announced that they had adopted a sweet newborn baby boy recently, I wanted to make something for them to congratulate them. It’s how I show love, ok?

They named their itty bitty Copeland Beau, and I’m OBSESSED with his name. I love a unique name so…. 😉
I knew I wanted to make something using his name. And I wanted it to be a thing that’s both useful and pretty. So I decided on a puzzle with Cope’s name! That way he can play with it as a puzzle, or they can use it as decor in his nursery!
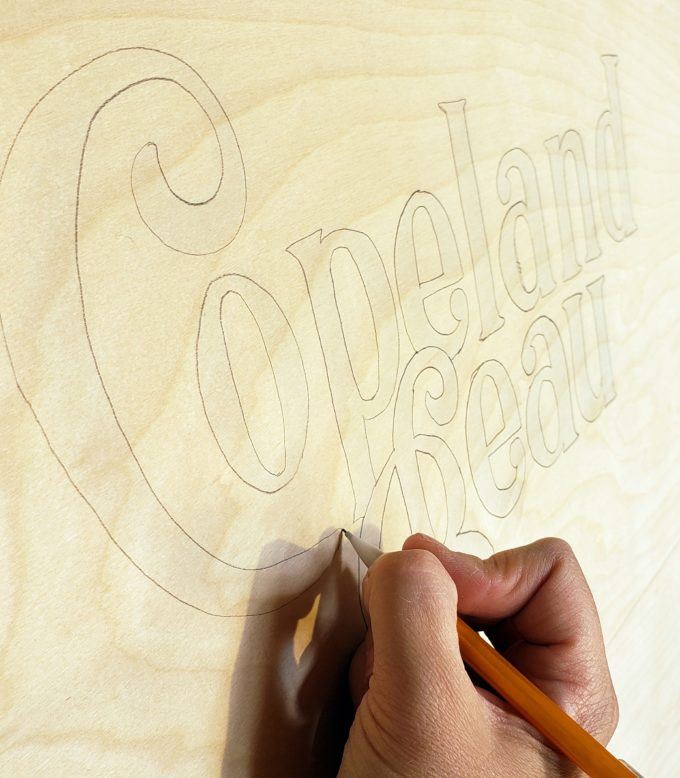
But let me back up! I decided to use a unique font instead of your basic children’s name puzzles you see around the interwebs. You can be really create with this and truly make it a piece of art! I used PicMonkey to place my letters just how I wanted them, then printed it onto a transparency.

I projected the image onto a piece of Baltic birch plywood with a 1/2″ thickness, and traced Copeland Beau with a pencil onto my board.

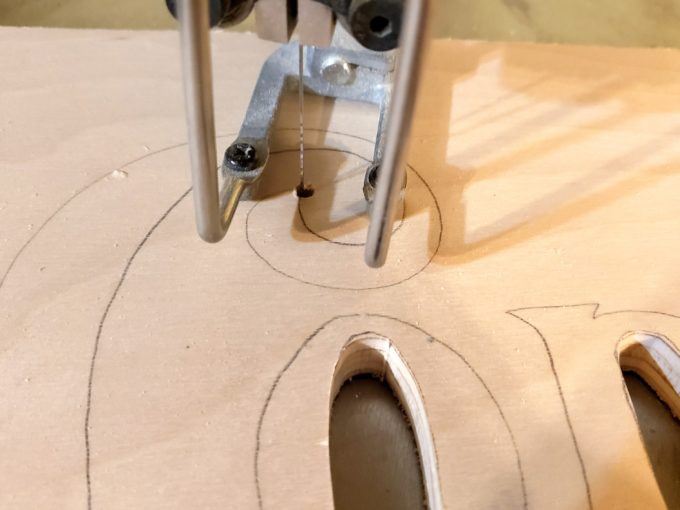
Next, I used a sharpie to mark all the places where I will need to drill a hole for the scroll saw blade to feed through.

Drill using a bit that’s large enough to feed your blade through.

I always recommend scrolling out the delicate/tricky parts first, because you don’t want to save those for last and have something break on you. (but even if it does, you can fix it!)


Once I had all the insides of the letters cut out, I started cutting out each letter, one by one.
This next part is kind of hard to explain, but stay with me… Since this is a puzzle, we’re keeping both the letters AND the wood that surrounds the letters. This is contrary to every single other scroll saw project I’ve shared.
You’re going to drill ONE hole next to ONE letter, and all the rest of the letters will have to be connected. I just chose the ‘C’ because I felt like there was a good inconspicuous spot to have a little extra space.
After you cut out your first letter (I used my bigger JET scroll saw for this project), you’re going to find a spot where it’s the least distance to the next letter.

You’re going to scroll right on over to that next letter, even though it just feels SO WRONG.
*spoiler alert* we’re going to fill those cracks with wood putty and you’ll never see them!

Continue on, letter by letter!

… until you’ve got them all cut out!

If you look closely at the pic above, all the letters are connected by a tiny slice where the blade had to pass through. Do you see it?
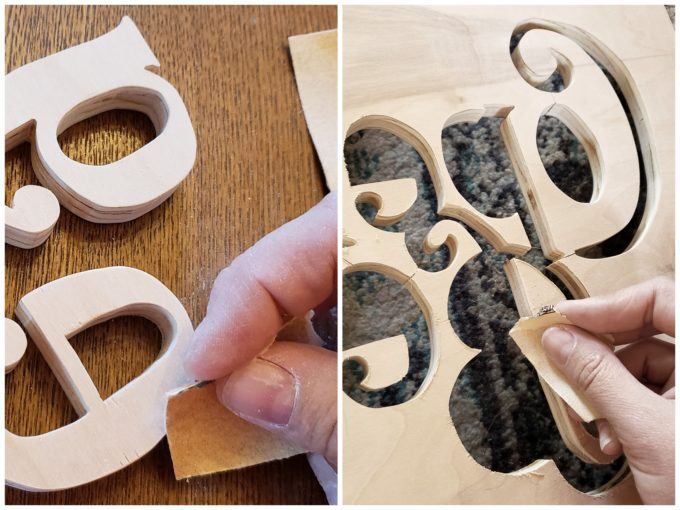
Now we need to gently sand down all the letters, AND the outer puzzle board. I just tear off a little piece of 220 grit sandpaper and hand-sand those edges to get the fuzziness off. You might also want to take an orbital sander to the flat surface of the puzzle board.
Use a 1/4″ board cut to the same dimensions to be the backer board of your puzzle. Put the puzzle board on top of the backer board and trace where the letters are on the outer edges so you know how far you need to paint.

The reason you don’t want to paint the whole backer board white is because when you glue the two better, it will stick better if it’s wood to wood rather than wood to glue. Make sense?

Then we’ll apply glue to the back of the puzzle board, making sure to get some on those delicate pieces…

…and press it down onto the backer board, lining the edges just perfectly!
I put a few quarts of paint on to add some pressure while it was drying.

I used some wood putty to fill in those tiny cracks. The pic below is after wood putty but before sanding… so you can see it’s a little chunky. Just sand it smooth, and you can’t even see those cracks anymore!

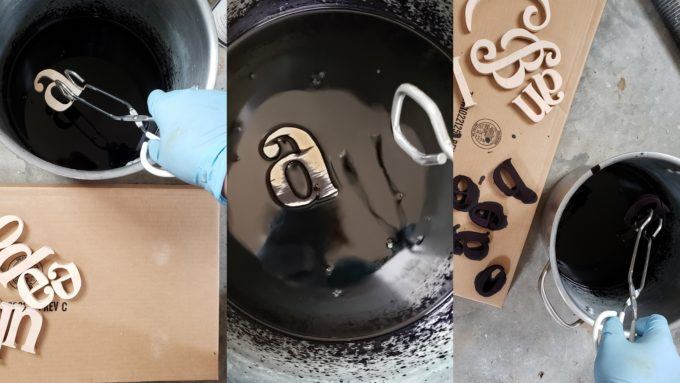
Now it’s time to do something about those letters! I decided I wanted them to be black, but I didn’t want to paint them because that would add thickness to them and make them not go as smoothly into the puzzle. So I decided to use Behlen Alcohol Dye! This stuff doesn’t raise the grain at all, and it’s SO pigmented. And it dries immediately, so that’s a bonus.
I rounded the edges of the puzzle board with my scroll saw, and sprayed down the puzzle board with a sealant. But after doing that, I had to hand-sand the letters down a little more so they would fit better into the puzzle. I wanted them to loosely just slide in and fall out.

I love how it turned out SO MUCH!

And I’m so glad that it turned out functional AND beautiful. I hope baby Cope loves it, and that his mama and daddy are blessed by this.
Cypress helped with sanding the letters, and announced that she wants a puzzle with her name on it. So maybe I’ll have to make that happen. These are so fun and easy to make! I’m thinking baby shower gift EVERY TIME!
Be sure to check out my other scroll saw projects HERE!
~Bethany
~~~~~~~~~~~~~~~~~~~~~
Be sure to check out our master list of DIY Handmade Gift Ideas!

Thanks for pinning!

Related:
-

I have a fun and easy building project for you! And while I do end…
-

We're in the dog days of summer, and it seems like my kids are always…
-

Making a cutting board almost seems like a right of passage into the world of…
Hi , first off, I love your page. You remind me of my Mom when I was growing up. She was a free spirit and wanted to show us everything about nature, crafts, music and life. Thank you for bringing back those wonderful childhood memories.
I wanted to ask you if you had a video of how you made those leaf shaped trivets that you had in your kitchen drawer?
Thank you,
Sarah Davis
Aww you’re so sweet! And here’s a link to the tutorial for the leaf trivets!
https://realitydaydream.com/diy-botanical-trivets-with-free-scroll-saw-patterns/
Once again you nailed it! It’s absolutely beautiful, great job!
Very nice – you have a gift with the scroll saw!