I’m going to teach you how to PAINT your backsplash to look like actual tile! There are SO many possibilities… with pattern, color combination, etc. This is a great option of you’re not ready to commit to the permanency of tile (or the cost, or messy installation).

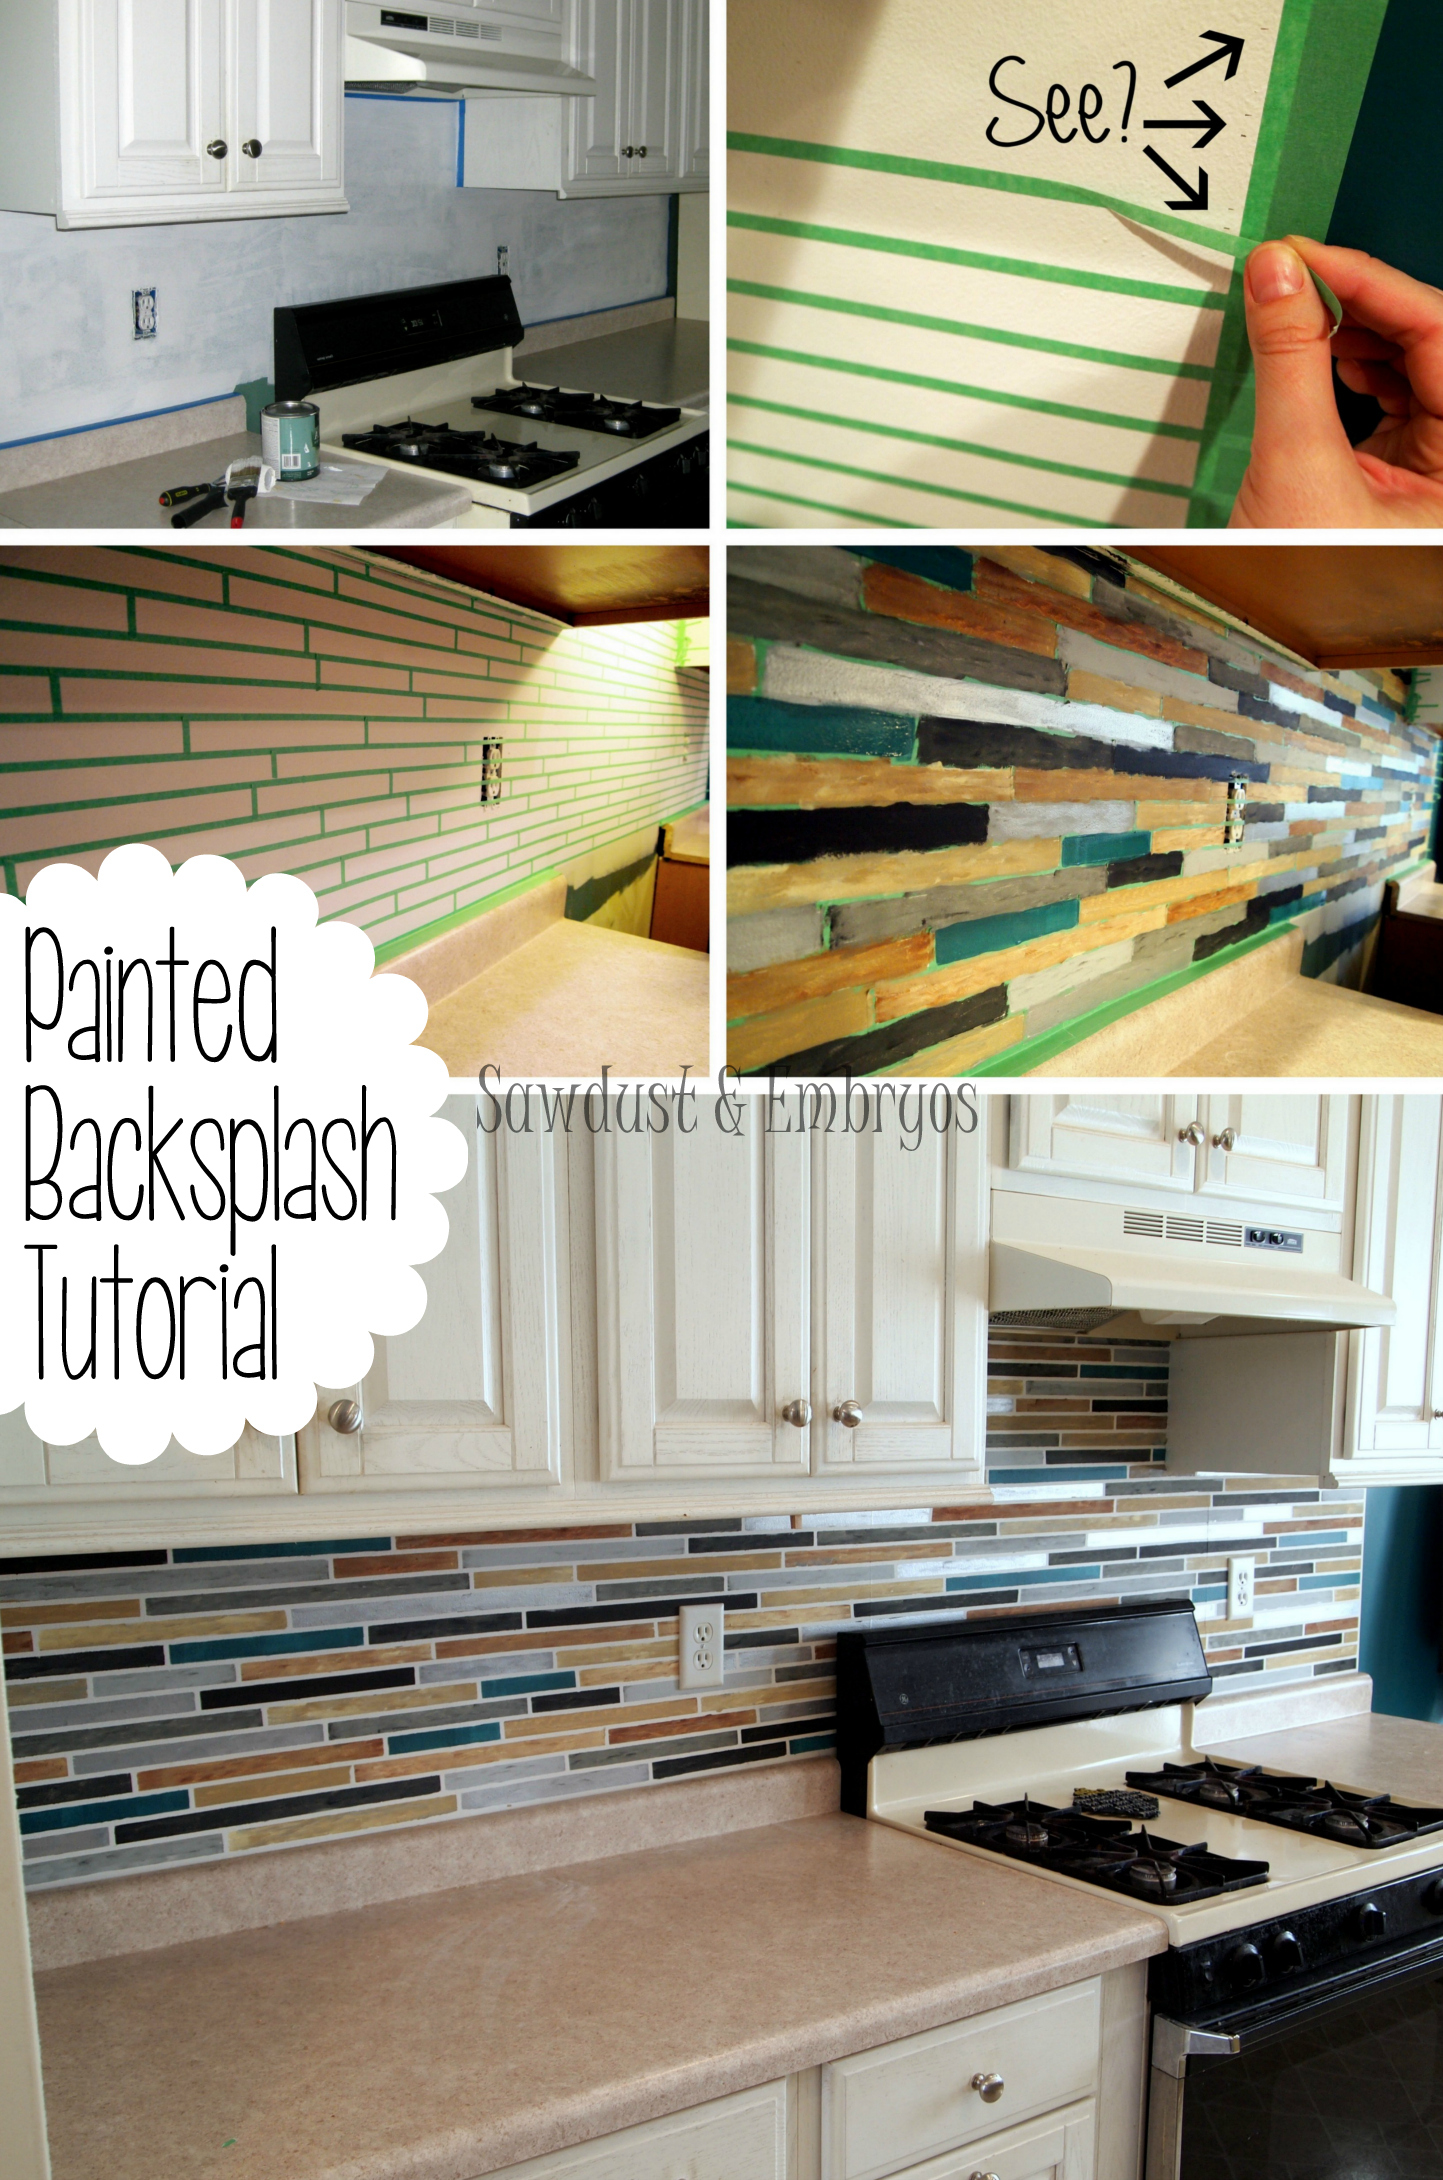
I decided to paint over our backsplash (that I painted the very first week we lived in this house). This is what it looked like the first time I painted it to look like a tile backsplash:

It’s served us well for several years, and I liked how classic and neutral it was. But since we paint so many awesome backsplashes, I’ve been feeling like ours is pretty darn boring and plain for my current taste. It was kinda sad painting over all that work, but it was time for a change.

This post contains affiliate links.
Now that I had this beautiful blank slate, I had to decide what to do! So many options!!

I’ve been loving the long/skinny staggered horizontal like Brenda’s backsplash, so Nick did some measuring and mathematics, and gave me some tape markers on the ruler to use for my markings. This is 1/4″ Painters Tape.

So every couple feet, I would lightly put little penciled markings to direct my taping efforts. (you can get the 1/4″ tape HERE)
")

Taping…
Takes…
FOREVER.
But it’s so worth it, my dear friends! Don’t be discouraged!

Next, I very randomly put little short pieces of painters tape here and there, making various sizes of long/horizontal ‘tiles’. The less you think, the better! (my kind of project!)

Now for the fun part! I wanted very contrasting colors, so I did some light(ish) natural ‘travertine’-looking tiles. I decided to throw in some solid colors that would look like ‘glass’ tiles… so I went with solid black, metallic silver, and dark teal (using some leftover wall color). These were a combination of acrylic craft paints, and latex wall paint. As long as they’re all water based, you can mix and match!
This is what it looked like after painting and BEFORE we removed the tape…

And AFTER:

I love the unexpected shimmer of the metallic ‘tiles’.

I know I’m taking a break from turquoise, but we had leftover wall paint (Pittsburgh Paints ‘Deep Emerald’), and it just felt right, ok? I’m not one to waste paint.

Yes, I truly keep a mug of paint brushes on the back of my stove. They get used enough that it’s just convenient to have them out and available. And I decided they’re pretty!

Before/After pic:

It’s just a little more edgy and unique, and I like that.

There are still some things I would change about my kitchen… but building appliances from scratch isn’t one of Nick’s many talents. I wouldn’t hate it if Kenmore contacted us and wanted to sponsor our blog and give us a few ‘samples’. Heh heh…
P.S… if you’d like to see the technique we used to achieve the glossy swirls on the wall, click here! It’s by far our most popular post of all time!
And here’s a ‘PIN-able’ pic for your pinning pleasure!

*this post contains affiliate links
Related:
-

Got a hole in your wall that you wish wasn't there? We do! When we…
-

I've had this idea in the back of my mind for quite awhile... why not…
-

We love the original wood of our library, and wanted to find a desk that…
Without any doubt, this is an amazing faux hand-painted backsplash and it’s from Sawdust and Embryos. I’m so glad Beth from Sawdust and Embryos posted an awesome faux tile tutorial.
How do you decide on the paint? Are you blending more than one color or using just one?
I usually use a combo of shades of paint, based on what I want my backsplash to look like. And for each ’tile’ you paint, blotch on a slightly different combination of paints than the tiles around it! I go into more detail on this in this post>> https://realitydaydream.com/diy-painted-backsplash-slate-subway-tile/
Question… We did this in our kitchen. It turned out well except over the sink. When we pulled the tape off, the paint came with it. Any suggestions for stenciling over a kitchen sink?
Hello, I know this is an old post, but I love this and am considering doing something like this to mine. But I have textured walls. How do you think that would work or look?
This will absolutely work on textured walls! You might have a little bleed through, but we just embrace the imperfections until it’s really globby in some places, and then we go back in with a craft paint brush and the ‘grout color’ of paint and touch up. Hope this helps! Send me pics when you’re done! beth@realitydaydream.com
Even Better! Tiles have texture. I painted faux back splash that looked and felt so real. Much nicer than what I’ve seen above! My work got on HGTV’s website! Wish I could post a before and after photo! I’m an artist and decorator.
What is the brand of the skinny tape you used for the tile grout lines. Where is it available to purchase?
Thanks
This is the 1/4″ tape I use! (affiliate)>> http://amzn.to/2vl3CVy
Thank you thank you thank you!!! I just did this in my kitchen add it has changed the complete look. Everyone who sees it is amazed and cant believe it is painted! And cant believe I had the patience to do it. Ha ha. Wish i could include a picture of the before and after.
Val that’s so exciting! I HAVE to see it! Email me pics at beth@realitydaydream.com
It is beautiful! What a genius idea!
Did you apply a clear coat to protect the paint?
Oh, ok, thank you. I thought from your directions you had more tiles that revealed glass like illusions…?
Confused…acrylic and latex paints will not give the illusion of glass alone…so what product
did you use to create the glass look? Thank you much.
Hi Donna! Sorry for the confusion. I can’t believe I forgot to add a link for the silver I used in this backsplash. It’s a little tub of metallic silver by RustOleum. Here’s an amazon link (affiliate) http://amzn.to/1oJfj01 …I’ll update the post so others know too. Thanks for letting me know!
I’m confused… did you use paints or tiles?
Only paint on the wall! No tile!
Wow, I just love the transformation! Your kitchen has a new modern twist to it. I imagine you had to clean the original tiles first before priming it, right? I’m also glad there are so many comments to questions/answers. This helps answer any questions we may have not already thought about before venturing on a project like this.
Wow, I just love the transformation! Your kitchen has a new modern twist to it. I imagine you had to clean the original tiles first before priming it, right? I’m also glad there are so many comments to questions/answers. This helps answer any questions we may have not already thought about before venturing on a project like this.
How easy is that to paint over. I am a renter and so I would have to cover it up later on. Would the acrylic paint cause any problems?
Lindsay, I’ve painted my backsplash in two of my apartments! The first one, the landlord loved it and asked me to leave it. The second one I didn’t bother asking… I just painted white over it and it covered great! I would prime first just to cover as much as possible before hitting it with white. It’s a small price to pay for LOVING your kitchen while you’re there. 🙂 Send pics when you’re done!!
Answer to a question I saw below- I read that to keep your paint from seeping paint lines paint the edge with modpodge. It’s completely clear and it will seep and can’t be seen. Oh my goodness! You just answered so many questions I’ve had the past couple months in one tutorial. I bought a 85 Solitaire for little of nothing last year and have been working to slowly redo. There is no physically redoing, moving walls, etc. It’s a clean (scour and scour and bleach) project. I started with the rough replacements (siding-windows-doors, begging help off family and friends) and finally moving into the more technical area of painting and texturing (by hand- if you’ve done it please post a tutorial, I’ve taken “character” to a whole new level.) I have yet to find a tile backsplash I like, but I want one soooo bad! I am so excited to try this. I always thought those long skinny tiles were ugly, but the way you did that is just gorgeous. I’m pretty sure I have to do my backsplash like this now!
Where did you find painters tape this small. I can’t find it anywhere
Sometimes you can find it at the big home improvement stores. But we purchase ours on Amazon. Here’s the link!
http://www.amazon.com/TAPE-SPECIALTIES-15006-60-Yard-Painters/dp/B0006ITPMK/ref=sr_1_2?ie=UTF8&qid=1426507567&sr=8-2&keywords=1%2F4+inch+painters+tape
Very nice work, how did you texture the paint? …thanks
This. Is. GENIUS! But idk how I could keep myself from going crazy doing this! I would get way too obsessed with the straightness of the tape. You did an amazing job! I absolutely love this!!
I didn’t have time to read all the comments, sorry if you already answered this. Where did you find the thin green tape ? I can’t find it anywhere. Also do you recommend anything other then latex paint ?
We found 1/4″ tape at Menards
We order our 1/4″ painters tape here:
http://www.amazon.com/TAPE-SPECIALTIES-15006-60-Yard-Painters/dp/B0006ITPMK/ref=sr_1_2?ie=UTF8&qid=1422906126&sr=8-2&keywords=1%2F4+inch+painters+tape
But every once in awhile we see it in stock at our local home improvement store.
Oh! And we primarily use acrylic paint, but occasionally throw in some latex paint or metallic paint… as long as it’s all water based.
Does it have to be painted over tile or can it just be painted over a white wall?
Oh yes! This is just painted over plain wall! There is NO tile involved at all 🙂
I’m sorry, but people really need to actually read the article. She states that it was just a painted wall.
Awesome job! And I love that your kitchen is different and you use some things that are what you have for now– like the appliances. That’s real life and you make it look great!
Thank you! We hate our appliances, but we live with them for now since new appliances aren’t in out budget. 🙂
You do good work, but I have to say, I have never liked those long, thin, horizontal tiles that seams to be the fad today. I actually LOVE the style of the way your back-splash looked before you did this. Sorry.
Sorry, but you’re living in the past, man! 🙂
Fabulous effect and I smiled when I saw/read the mug of paint brushes. We actually keep a mug in our kitchen too! 🙂 (Mostly for the kids to do their water coloring and tempera painting there at the table…)
I was wondering how it holds up behind a stove. Dose the grease accumulate and does washing remove the paint any?
We find that you can easily wipe it down with soap and water just like you would your previously painted wall. Ours doesn’t get very greasy at all, but if yours does and it really builds up, I would be careful not to scrub it with one of those green scrubbies or anything very abrasive. Our backsplash has been painted for many years now, and it literally looks exactly the same as the day we painted it. If you go for it, send us pics!!
I very occasionally wipe down the wall behind the stove with soap and water, and have never had any problems at all. It literally looks just like it did after we painted it! If you’re one to really scrub at your walls or use an abrasive brillo pad or something like that, I would definitely seal it with a clear water-based poly. Good luck!
I attempted this backsplash, and it came out amazing but the metallic paints I used came up with the tape so I need to go in and repaint those squares individually. do you have recommendation for a better metallic paint? Maybe I am using a bad quality? It is so close to looking perfect !
I’m sorry to hear that! SOmetimes those metallic paints can be a pain. We use metallics from Rustoleum’s line… they come in tiny little pots of paint. I’ll have to double check on the actual name of the product. We got ours at our local home improvement store (Menards).
Try taking off the tape immediately after painting… don’t wait until it dries. It won’t bleed if you use a super thin coat.
I just stumbled onto your site, correctly on foot stayed behind while the other kept walking…lol…I do ADORE that tile/paint look. Very Impressed!! You do have a very unique kitchen. Which is also really unique considering most kitchen are just square and boring like mines.
Do y’all have any plans for the island? I’m one who loves style & color and that island looks out of place. Just my opinion. Curious what y’all have plans for it.
Hi Beth!! I am new to the blog via Apartment Therapy and have spent far too much time while at work on it already. 🙂 Love it!
Question: I am dead set on attempting your back splash in my own rented apt. kitchen. Any tips on choosing paint colors? Like how many? My kitchen walls are white with chartreuse green and red accents, so I picked a coralish red, a light green, gold and white, (not as christmasy as it sounds- I hope!) but fear I need a few more neutral colors. Also, should I skip purchasing the paint at Home Depot since and move to a crafts store? Your advice is appreciated!
I would work in some neutral tan/brown/cream tiles to ground it a little bit. I think it makes the backsplash look more like real tile. But it’s totally up to you! I love the colors you chose! And YES… you can/should totally just use craft acrylic paint. Cheap and looks amazing. Send us pics when you’re done!!
Thank you Beth!! Definitely love how much yours looks like real tile, so I will take your advice and add some creams. I ordered the tape from Amazon today and will be sure to send pics one accomplished. I am really hoping that is soon!
We’re in the process of repainting our kitchen and I stumbled onto your blog at just the right time. Love the backsplash! I definitely want to try doing this too. Thanks for the amazing idea!!
I would love it if you either added an album of just your painted backsplashes to the blog, to this tutorial, to Facebook or a whole new blog entry. I’ve told numerous people about it and it’s kinda rough to round up a good sampling of the backsplashes you’ve done to show them examples, plus I think it would blow you guys away to see them all together. If you already have this, I do apologize. I haven’t seen it (and I have actually looked….some….. I didn’t waste a whole day or anything, but…) on the blog or FB. Love the blog btw and look forward to your posts! 🙂
Hey Casey! That’s a good idea. We do have a lot of them laid out on our SEbacksplash website, but not here on our blog. Here’s that link if you’re interested.
http://www.sebacksplash.com/p/archives.html
And thanks for sharing with your friends! We’ll definitely consider doing a post with a bunch of our backsplash examples!
Thanks! Sadly, it never occurred to me to check that out. This is the only blog I follow so I’m apparently suffering from tunnel vision. *sheepish look*
I just wanted to say thank you for the inspiration. Here is my blog of my kitchen transformation.
http://myreallifeparenting.blogspot.com/2014/05/how-to-paint-backsplash.html
WOW!!!!! I Just found your website via Apartment Therapy. I just wanted to say Thank you, from what I’ve seen so far, I know I will be visiting often!
Thanks for sharing!
Veronica
PS: as far as answer to 1 of the comments RE: Painting over laminate, their are a few different ways, the easiest can be purchased at Home Depot or Lowe’s in a Kit.
Hi Veronica! Welcome to our blog, and thanks for commenting! And thank you for the info on painting over laminate! 🙂
Wow! You could have fooled me! I thought for sure that was a tile backsplash. Amazing job!
Love it! You are so talented! Very artistic….teal and orange are two of my fav colors! I think your island would look great painted white to match your cupboards!
Thank you Brenda! I agree something needs to be done about the island… I just can’t decide! White is definitely an option!
Such an awesome technique! I have loved this look in tile and you have put it in reach financially! Thank you thank you thank you!!!
You’re welcome! If you decide to try it, be sure to send us pictures! Can’t wait to see yours!
Well this is pretty much the coolest thing ever! You guys are pretty amazing and talented. I love how this turned out. PS I’m so glad I randomly started talking to you at Snap about progesterone shots!! haha It was pretty great meeting you. I hope you’re doing well! 🙂
Alli, you are the cutest! I’m so glad we met too!
Great job, I’m a renter and have been trying to figure out how to paint a backsplash. Thanks for the idea
Awesome! Be sure to send us pics when you’re done! Can’t wait to see how yours turns out!
I like using paint to decorate myself. This is a great idea for a small kitchen. Really makes a statement. wondering how it looks close up? It looks great from further away in the photo…
I’m not nervous about the taping, but any advice on how to get such great dimension in the “tile” colors? I foresee a weekend project coming up and I’m nervous my tiles will look dull and basic! Can’t wait to try this! 🙂 wish you lived closer!
Amy, there’s really no trick do it. If you’re using a sponge brush and get at least two shades of paint on it at a time, just blotch it on! We don’t use any special technique or anything. Try to make some ’tiles’ blotchier than others… and some almost solid. The variety of textures will make your backsplash look even more real! Most importantly, send us pics when you’re done! GOOD LUCK!
Wow!!! That was definitly worth it!! Great job! You can be proud
Thanks for showing
cunitia
Lovely job. I think you could do the whole kitchen island to match! As if you haven’t enough to do!!
I just found your site and I am a new bloglovin’ follower! I love this amazing backsplash – I too have a teal kitchen and I LOVE it – can’t wait to check out the rest of your blog!
Hello there! My husband and I recently re did our counter top and were looking into tiling our backsplash. After searching for tile and not finding anything we thought about a cheaper route and found your blog! So thankful we landed on it. I’m a big DIY’er and stumbled across your website and so glad I did. This past weekend we painted the “grout” base color and successfully taped all the lines. Boy were you right that it took a long time but so worth it. Just the tape on the wall gives you an idea of what it’s going to look like and we couldn’t be more excited. I will say that we ordered the 1/4″ painter tape from a local Grainger store. It was so weird though because I noticed after I finished taping that the beginning of the roll was thicker than the tape at the end of the roll. It’s not noticeable but I can see it. It must be the way they cut the tape but it’s definitely thinner towards the end but it’s a gradual change. We taped off the pieces last night and tonight we plan on starting the tile pieces! Can’t wait. We love your backsplash. Thanks for the inspiration!
Yay so exciting! Be sure to send pics when you’re done!
I’m taping now. My eyes are burning:) Thank you for such a wonderful idea!! I’m excited, this will make such a difference in my kitchen! Sooooo cool…. & cheap:):)
OMG, I LOVE this project, and I think I may give it a try! Our kitchen is in need of some love. What kind of paint did you use? Basic wall paint? What about the metallic? I was thinking acrylic, but I don’t know if that will work out on the wall? Love your blog!
Jess we just used acrylic! We’ve used basic latex wall paint before too… So either way. Be sure to send us pics when you’re done!!
Hey there! I am having a heck of a time finding 1/4″ painters tape. Where did you get yours!?
We order ours here!
http://www.amazon.com/TAPE-SPECIALTIES-15006-60-Yard-Painters/dp/B0006ITPMK/ref=sr_1_7?ie=UTF8&qid=1386175919&sr=8-7&keywords=masking+tape+1%2F4+inch
Thank you!! Ps- I didn’t get a notification that you had replied to my comment, I just came back to check on it…
Just wondering if you have ever tried to get a “raised” affect by using wall spackle? I am thinking of doing this for a few of the ‘stones.” I would have to be careful and wipe away excess on the tape beforehand, though. If you have tried it and it didn’t work, please let me know!
Love, love, love this painted backsplash.
Linda, unfortunately we don’t have any experience using spackle to create a raised effect, but in theory it makes sense! Just make sure you remove the tape before the spackle has too much time to dry. If you give it a go, be sure to send pictures and let us know how it worked out!
i am so excited about trying this project, but I am a little scared about picking colors. For the colors that you chose for your kitchen, did you blend them together or did you just do one color per square? How would you recommend choosing colors? Should they all be in the same color family? Should you mix them before painting the wall?
Natalie, you can pretty much choose whatever colors you want! Unless I’m doing a bright color (to look like a ‘glass’ tile), I usually make each tile primarily neutrals tan/cream/brown, with an occasional pop of color. I recommend taping off a grid on cardboard and practicing. It’s just something you have to get a feel for and decide what you like. Good luck! Send pics when you’re done!
Love it n going to try it on our new house when we move next month, but going to try doing it vertically! What kind of paint do you paint it w? And do you put a clear coat or anything over it? So awesome!!!
Where dfo I see pics of the other backsplash you’ve done?
Tiff, we use simple acrylic craft paint! But you can use latex paint too. We do recommend sealing the backsplash a few days later with a clear poly. We use Minwax Polycrylic. Hope this helps. Send pics when you’re done!!
Love this idea. Can’t wait to try it!
Do you think I could use some leftover satin and semi-gloss paint instead of acrylic craft paint? If I used that would I need to by the polycrylic top coat on?
You can absolutely use latex wall paint! I would still seal it though just to add that extra durability. You be sure to send pics when you’re done!!
Sorry, I just saw your whole explanation on the S/E page!
Okay, I have a question. I’ve just looked at many of your backsplashes, which look cool and all, but I don’t understand a basic premise here.
Why do you paint it to LOOK LIKE tiles instead of just INSTALLING tiles? Tiles can be wiped clean (oil, spaghetti sauce,etc.) while paint…not as much.
Is it because
a) it is easier to do than tiling? Or cheaper?
b) you can paint over the old design when you tile of the one you spent hours and hours on
c) you have more design choices than with tiles
d) something else.
I just don’t get why.
Indecision, ability to change if you hate what you thought you’d love, or styles (or your mind) changes, cost, and ease of cleaning. My backsplash choice would be those beautiful tumbled stones, but I can imagine cleaning them!
Hi! I love this tutorial. I ended up using 2″ diamonds and cutting the 1/4″ tape to 1/8″ (actually found the tape at Menard’s, a store in the Midwest). Ours turned out really well! I had to repair the drywall before hand though, so it took a little longer than I would have liked, but totally worth it. Best comment on the backsplash so far was when a person was visiting our house said, “I’ll let you get back to that.” (I was almost finished!) (me)I don’t have too much more to do, it took forever to tape and paint though. “That’s paint?!” It rocked =) Thanks!
https://www.facebook.com/photo.php?fbid=625054818496&l=21b870793c
https://www.facebook.com/photo.php?fbid=625110831246&l=537ac925b9
https://www.facebook.com/photo.php?fbid=625110836236&l=9e180fd6b6
Wow Jessica!!! That turned out AMAZING! And that’s a huge kitchen! Isn’t it fun to see people’s reaction when they realize it’s paint?
Thank you =) It is really fun to see people’s reaction. My mother-in-law came over and stopped me mid-sentence to say, “Can we go see the kitchen now?” It cracked me up. It is a big kitchen… it took longer to do than I thought with the drywall repairs I had to do, the layers of primer, and summer activities with my daughter.
Heather, chalkboard paint is going to really show grease stains and splatters. I think it would look really cool, but I’m not sure about how well it would clean up. We’ve used chalkboard paint a few times, but not in a frequently-used area like that… so it’s really hard to advise you one way or another. Please do let us know if you give it a try and what kind of experience you have with it!
Thank you for the inspiration for my back splash. I have a quick question. I want to paint the portion of the wall behind the range with chalkboard paint. Do you have any experience with chalkboard paint? I have used it on small projects but not a large one. My other concern is splatters on the chalkboard paint from the range. Would you advise using it there?
Thank you for your blog and your story is inspiring. Thanks for any advice!
I just finished my own painted backsplash inspired by this post! I love it! Thank you for sharing!
Here’s a link to the post http://myslush.blogspot.com/2013/06/painted-backsplash-diy.html
Oh, and one other, How long did you wait until you applied it to the new backslash?
Thank you!!!!
Jen
Hi Beth!
I JUST finished my backsplash and I love love it! Thank you for being so helpful for all us newbies!
A couple questions, if you dont mind. I bought the PolyCrylic like you said. I bought semi-gloss, is that what you use? They had matte, semi-gloss, and gloss. Didn’t know which would look more real, so i went with the one in the middle. What do you use?
Question 2: It seems very runny when I shake it in the can, almost like water. How do you apply it? Does it run the colors that I just painted?
3: How many coats do you use? This will be in my kitchen behind the stove and sink so I splatter. I want to make sure it is durable so I can wipe it to clean it.
I can’t thank you enough for being so inspiring and helpful!
THANKS!
Jen
Hey Jen! The sheen of the PolyCrylic doesn’t matter that much. The glossy one is the most ‘wipeable and durable’ just because it’s glossy… but it doesn’t look as real. So I would have gone with the semi-gloss too.
It is pretty runny. I think the back of the can says to stir instead of shaking, so that might pick up some residue at the bottom and make it a LITTLE thicker. Just pour some into a paint tray and roll it on with a paint roller. If you drip… it’s water based, so it’s easy to clean up with soap and water. And you really only need to do one coat.
I usually recommend waiting a couple days after painting the backsplash to seal it. That gives the paint time to fully cure.
Hope this helps!! Send pics when you’re done!
Thank you so much!!
Jen
Your backsplash turned out great, so beautiful! I’ve got this linked to my backsplashes post too today!
LOVE THIS!!!! I’m remodeling our RV, and I want to do a tile backsplash, but I’m worried about the grout cracking while it bumps around. THIS is perfect!!!
What’s your technique with the paint? Are you mixing different colors on the tiles, or is the realistic look just from the sponge brush?
So awesome! Can’t wait to try this tonight!!
We just squirted a couple different colors of paint on a paper plate and blotched our sponge brush into it and blotted it onto the wall! There isn’t really any technique to it. It’s fun and easy! Send pics when you’re done!
In Anagalas Home love those colors and would be a great idea for my mobile home
Hi i would like to know what colors you used in
Did you have to sand down the old paint so you wouldn’t have ridges? I painted my backsplash last year (inspired by you of course!) and just wondered if you had to do any special prep work before painting over it.
thanks!
-andi
Hi Andi! There weresn’t really any ridges from the previous pattern… perhaps because we just didn’t put the paint on very thick? If you have ridges, I would just sand ‘er down with 220 before priming.
I’m doing a plain black or plain white backsplash soon. Wish my cooking skills would spare the dainty painted ones.
This looks amazing. thanks for sharing.
oh, boy. I just painted over my first attempt at a painted backsplash. As in taped, painted, peeled the tape, watched all my silver tiles come off with the tape, saw a LOT of bleedthrough, tried to fix it, realized that I had played through 3 records and had “fixed” only one line of tile….and then painted over the whole thing with KILZ. I’m not sure what the problem is..Oil-based primer? Too much paint on each tile (I used a brush, not a sponge, and went pretty heavy, especially with the failed silver.) Could it be our taping method? My husband picked up the 1/4in tape locally, but only had experience using it in an automotive setting. He suggested, given that our wall is old and uneven, that I anchor the tape on one end of a stretch, measure an even height at the other end, and stretch the tape across to make it appear perfectly straight. The taping went much quicker this way, and actually looked a lot better than my measuring out every 6 inches. But I wonder if it affected the adhesion. Doesn’t seem likely, since that’s the method used to tape off striping on cars….but cars are a lot smoother than a kitchen wall. He’s retaping it today while i’m at work. I plan to try again, with a more “stenciling-inspired” approach (less paint, sponge application instead of brush, layers if needed for depth, but very light on each layer. Any thought, suggestions…pity? Pulling out the KILZ was a bummer, but there was no rescuing it and I wasn’t going to use polycrylic on a wall I wasn’t satisfied with–that stuff be spendy.
Wow Sierra, that’s a major bummer! I’m sorry it’s not working out right! Globbing too much paint on could DEFINITELY be one of the reasons. We use a sponge brush and just blotch the paint on. I can’t vouch for any tape by the one we use, but it sounds like it should be working better than that. What you could try is… AFTER taping, paint the whole thing white first. That way any paint that seeps under will be white and won’t show anyway. Then paint your tiles after that. Does that make sense? The white paint will seal the tape down too, and you should have a perfectly crisp line. As for removing tape, we start taking it off as soon as we’re finished painting. If the paint dries completely, it will peel off when you pull off your tape. That might be what happened with your silver paint. Sorry you’re having SO many problems. Feel free to ask ANY more questions you might have. And be sure to send us pictures when you’re done!!
I had the same troubles. After taping, then 3 hours of painting (using our interior gloss latex colors that match the house), and then another 2 hours trying to get the tape off, I have soooooooooooooo many bleed thru areas I don’t know where to start, or if I should even try to color the “grout” lines again.
I love the idea (I did the mosaic long tile style), but I’m at a loss as to what to do next.
Help? Yikes!
Oh nooooo Jennifer. I don’t know why this is happening! We’e painted hundreds of backsplashes and not had this problem. Do you know what sheen your previous backsplash is (the grout)? We find that the more glossy the base coat is, the more bleed-through there is. So we always recommend flat or eggshell paint.
What you could do to try and fix this is to take one of the longer sponge brushes (4 inches or so) and just blot it along the grout lines with the grout paint to paint over the seepage. Because these brushes are long and straight, it makes it pretty easy to touch up the grout line. Since it’s your whole backsplash, it might take some patience. But after all the work you’ve put into it, I would think it would be worth it! For the tinier vertical lines, you could just use a small craft brush.
I’m so sorry that this is happening to you! Are you in Iowa? Maybe I could come help you. 🙂
Let me know how it turns out.
Ohhhhh lordy I wish you lived near me! I’m actually in dry Las Vegas, NV. The hardest part and the big trouble I’m having is the walls here are very textured. Im so envious of flat smooth walls right now!!! So I’m looking up ways to keep the colors from bleeding thru the tape lines. I’ve heard everything from skimming drywall and water to make layers of flat to the wall, to using caulk on top of the painters tape.But I refuse to give up and I will find a way!! !
Jennifer, let me know if you skim coat your walls, how that works. Our walls are (too) textured, too. If you have a swamp cooler, you might paint and peel the tape off during a time when your house is the most humid (relatively speaking) so it doesn’t dry TOO fast! The dry air might mean you need to work more quickly.
Albuquerque Jen
Hey A.J.– I probably won’t do the skimming. I’m going to try the lazy version of clear caulking on the painters tape and also the rubbing a putty knife or plastic tinting wedge on the tape as well. We’ll see how that goes? But thank you for your suggestion!
OH! One more big thing.
When do you recommend peeling the tape? While it’s still wet or after it dries?
Thanks for any input. I shoulda taken pictures.
This comment has been removed by the author.
Beth, THANK YOU for posting this! I just did something like this in our bathroom from stumbling onto your site and I LOVE it! But it’s soooo much work, lol. I wish I could’ve just paid for you to come do it. /facepalm
http://theninjaherself.wordpress.com/2013/03/09/sneak-peek-our-bathroom-redo/
Oh man… that looks AWESOME. I know it’s a lot of work, but isn’t it sooooo worth it? I’m glad you listened to your hubby and kept chugging along until it was finished. It’s the BEST feeling pulling the tape off, right?! You should be proud!
ok. so i painted my backsplash last weekend. It’s a huge improvement but I don’t think I am in love with my color choices. I will live with a bit and see how I feel. Question is: did you seal yours at all? I am worried about splatters and splashes wrecking all that work.
Also, found the tape locally at Grainger.
Hey Michelle! Sorry your not loving your color choice. You could try taping around those individual tiles you don’t care for and redoing them?
We do recommend sealing your backsplash with a clear coat of PolyCrylic for added durability.
Any tips for painting over a laminate backsplash? Wondering if the paint will stick?
Unfortunately we don’t have any experience with laminate. You could try it, but I would sand it real good and prime first for maximum adhesion. If you try it, let us know how it turns out!!
Do you have to clear coat over it?
Martha, yes we forgot to mention that! We do recommend rolling on a clear coat of PolyCrylic for durability.
Did u use acrylic paint for this? If not what do you recommend?
We just use simple acrylic craft paint. Works like a charm!
Awesome! Love the look. Don’t have the patience to do it though. Also, I need a backsplash.
It is absolutely brilliant!! How many colours do you suggest and what is the “sheen” to them.
You can use as few or as many colors as you want! We usually use a handful of neutrals (5 or 6) plus whatever accent colors you’re throwing in. For the tiles that are meant to look like ‘stone’ we use a flat paint. And for the solid color tiles that are meant to look like ‘glass’ we use high gloss. Hope this helps! Send us pics when you’re done!
Beth, I love your painted backsplash! What I’m wondering is how you kept the different sheens (gloss for “glass”, flat for “grout” and “stone”) if you coated it all with polycrylic afterwards. Doesn’t the sealer have a sheen of its own?
And I know you said you’ve done this on textured walls, but would it be better (say, if I’m doing subway tiles) if I smoothed out the texture? Maybe with wall mud?
Thanks!
Jen, we recommend sealing the backsplashes for durability purposes, but you’re right… when you seal it it makes the whole backsplash one sheen. 99% of the backsplashes we paint are the ‘stone’ look that has the matte finish, so in this case we recommend either flat or egg shell sealer. Since this particular backslash is OURS, and it has a combo of ‘glass’ and ‘stone’-looking tiles, we chose not to seal it and just don’t scrub it down with a brillo pad. The paint has held up nicely without a sealer. We just added that into the post to cover ourselves in case someone had a problem with it flaking off.
As far as textured walls with subway tile… I don’t think you’ll even notice. But if you’re going for a glossy/smooth subway tile, you might want to put a skim-coat of wall mud on to make it look more like genuinely smooth tile.
Hope this helps! Let me know if you have any other questions!
I love the way your “tile” turned out! I myself did a complete faux kitchen, complete with faux shaker style cabinets (I added flat trim to frame out the existing basic MDF cabinets), faux granite painted countertops (not from a kit either!), and faux subway tile backsplash (I did the same technique you did, except I mudded over the tape, pulled up the tape and shaped each “tile” before they dried. Then I painted each one and sealed with polycrylic.) http://www.facebook.com/photo.php?fbid=753884732459&set=a.661616588559.2135691.66802967&type=3&theater
Tosha! I wish I could click on your link… it says ‘invalid’… your kitchen sounds AMAZING! Do you have a blog? I’d love to see how you went about the 3D subway tile!
That is GORGEOUS – I am amazed! You’ve inspired me to do my own kitchen!
You totally inspired me super talented lady! So, I tried my hand at painting my own backsplash (I did a penny tile version!). It’s not as awesome as yours, but I’m inspired to keep trying these “daring” paint projects now, so thank you! I may change mine to what you just did here. 🙂
Please check it out if you get the chance:
http://www.makingitworthy.com/2013/02/my-painted-penny-tile-backsplash.html
Wow Valerie… that’s incredible!! Don’t you dare paint over that!
Looks amazing – just like real tile! You are super talented!!!!
Your kitchen is sexy! I’m digging that orange Kichenaid! I have borin…I mean…..gift from my husband…black. 🙂
OMG! I love that new backsplash. I am working on our kitchen. Everything in it is just yuck. Poor quality cabinets, walls, trim. I just painted, but there’s faux brick under the cabinets and around the two windows. I plan to rip that off and put some kind of backsplash. I really don’t feel like I know what to do, but the kitchen is starting so badly I really don’t feel it could be worse. I’m thinking the wall is going to be super bad behind the faux brick or I would try this method. LOVE!
Lisa, could you just tape off the ‘grout’ of the faux brick and paint right over? It couldn’t hurt to try, right? Whatever you decide, send us pics!!
Wow! That looks incredible!
Have you thought about doing some type of your cool painting tricks to the back of your sink/bar area? It looks like plywood in your pics….just begging for your attention!
The island is painted an olive-beige color, and coordinates with a stencil in the pantry… I actually love the color! But I could see how it would look like plywood in pictures. 🙂 I’ve thought about doing a patterned treatment of some kind to it, but I think it would be too busy.
Holy Shitballs that looks amazing!
I LOVE it!!!
I was ready to hate it on principle for covering up that beautiful tile. But. It’s amazing. Good job. 🙂
Wow! It is beautiful! From your before and after pictures, the paint warmed up the color of your counter top also! Can’t wait to see the arches. I am sure they are awesome too!
wow, thats all just paint???? Thats amazing. I am pretty sure I wouldnt have the patience to tape that much, or have the brains to keep it so straight. That is one awesome effort. I’m just going to go back and stare at the photo for a while longer….
Britt @ Creating Space for Five
Favorite project yet!!
I love it! YOu have inspired me, several months ago, to try to do a painted backsplash. But I cannot find painter’s tape that narrow. I even looked online. Where do you get it? I saw another tutorial where they used the thin painters tape and it pulled the paint right off with it when removed, and it was still wet. So I got afraid. What I did was to paint the whole backsplash a glossy white, because I want it to look like white subway tile with grey grout. Next, I am going to use regular frog tape to tape off the grout lines. Wish me luck!
NIcki, we mentioned earlier in the comment section that we get our 1/4″ painters tape from Amazon. Here’s the link:
http://www.amazon.com/PAINTERS-MATE-GREEN-TAPE-Wide/dp/B0006ITPMK
It will actually work better if your backsplash is painted using an eggshell or flat sheen. Otherwise you might have a hard time with the tape sticky to the glossy surface.
Send us pics when you’re done!!
Beautiful job !!! I am definitely going to do this in my kitchen. I was wondering did you put anything over the colors like a polyurethane clear gloss to protect it ? Also my wall is not even should i find the center and work from the center out? I have 6 colors i’m thinking of using do you think that is too much 4 are neutral 2 are more accent colors? Any suggestions would be greatly appreciated.
We seal it with water-based poly. Minwax has one called PolyCrylic. 6 colors sounds perfect! Be sure to send us pictures when you’re done!!
Thank you so much i will use poly crylic. Did you lightly sand and use more than 1 coat?
Just one coat.. And no sanding!
Thanks so much! I already painted it a high gloss, oh no! Now I am even more worried. I thought it would look better that way because subway tiles are shiny. Seriously, I think I have looked at every backsplash you have painted, well, the ones I could find.
LOVE!
Wow! It looks sooo good!
That’s probably my favorite backsplash you have done! I love the super long skinny tiles.
I am totally amazed! It looks like real tile and all that taping! You must have much more patience than me! 🙂
Only two to describe it. LOVE IT!
You did an amazing job. My breath hitched when the AFTER picture scrolled up. Thank you so much for sharing.
OMGosh, this looks absolutely awesome!
I like it!
where the heck did you find painters tape that skinny? did you have to cut the roll yourself?
1/4″ painters tape right here on Amazon!
http://www.amazon.com/PAINTERS-MATE-GREEN-TAPE-Wide/dp/B0006ITPMK
thank you! 🙂 looks like i’ve got a new weekend project! we’ve been trying to think of a cheap solution to a tiled backsplash for a while now.
It’s like your kitchen went from, “you look nice” to “you look hot!”
Awesome job guys!
I LOVE it! I especially love the color choices you made with the pop of orange
Love this! It is such a huge difference and it looks fantastic!
Looks awesome, Beth! I love your choice of colors. Your artistic talent just blows me away! Good job!
Crystal
I love it! Your artistic abilities blow me away. I’m glad you kept teal in the mixture. It’s really cohesive with your walls. And your orange appliances pop very nicely. It matches your personal style much better. I’m pretty dang excited to see dem arches. Woot.
so pretty.. and goes with your teal really nicely.
Have you ever tried to paint over formica/laminate? If so, do you have some tips/hints.
I should have read your post above. Sorry for the repeat question.