If you’ve followed our kitchen build closely, then you might remember that we had an ENORMOUS pine tree taken down in the backyard in preparation to dig the foundation for the kitchen. Also, it was insanely close to our house, and a miracle that the roots weren’t pushing against the foundation of the existing house.

So it came down. Timberrrrrr!

Our friend George Vondriska saw our Instagram Stories that showed the roots of the tree sticking out after the foundation had been dug, and DM’d us about how awesome it would be to TURN THE ROOT ON THE LATHE! Such a brilliant idea! And it got my mind swirling with curiosity of what the wood grain of a root would be like. I must know!
That log he’s cutting below isn’t just a log! It’s an enormous root!
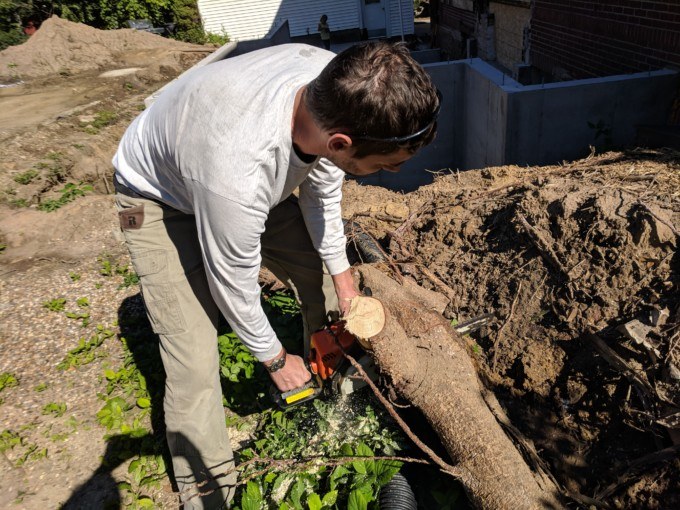

We hacked that thing down to a little bit larger than what we wanted our tumbler. And we embraced the curves and imperfections of it. Pop that sucker on the lathe!

You might be thinking… ‘How are you gonna make a tumbler out of wood, let alone a root?’
Well, dear friend, ya need this kit…

*This post is sponsored by Rockler. Thank you for supporting the fabulous brands that make Reality Daydream possible! This post contains affiliate links.*
One of the things I love about Rockler is their clear and concise instructions. This is our rendition of the tumbler build, but you can rest assured that any kit you get will have clear easy to follow instructions. So, if you find this post at all lacking, you can pick it up from the instructions with the product!
Let’s get into it shall we?
Material
- One turning blank (or in our case, root) roughly 4″ in diameter and 8″ long.
- Stainless steel travel mug kit
- Epoxy
- Mica Powder
- cellophane
- Sand Paper
Tools
- Lathe
- Carbide round
- Mini Carbide Square
- Round scraper
- 2 1/8 Forstner bit
- 2 7/8 Forstner Bit
- Parting tool
![]()
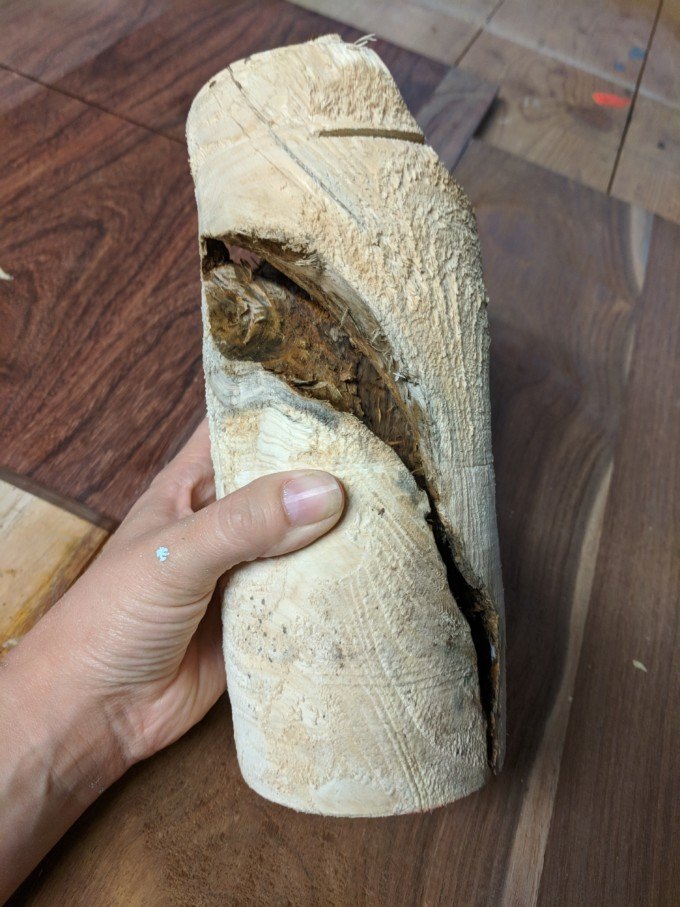
We popped our root on the lathe and started roughing it down. Once we got our root mostly round, about 4 1/2″ in diameter, we noticed that the root had actually encapsulated a lot of mud in ridges and cracks we hadn’t noticed before. We were almost at a loss, thinking there was no way it was going to work… when we had a light bulb moment. It would actually be pretty awesome if we replaced the mud with epoxy creating a sort cool effect like all the river tables we have been seeing around the interwebs!
We got busy removing all the mud and bark from those ridges and valleys. The pic below cracks me up, because the first thing I notice is the toddler in the background cutting her pants with scissors.

Now that our root is free of mud, we wrapped it with cellophane and packaging tape. We wrapped one end of the root in cellophane, and then taped the rest of the wall along the length of the root. We should have brought the cellophane all the way up the edges, because we had some major leakage. Learn from our mistakes!
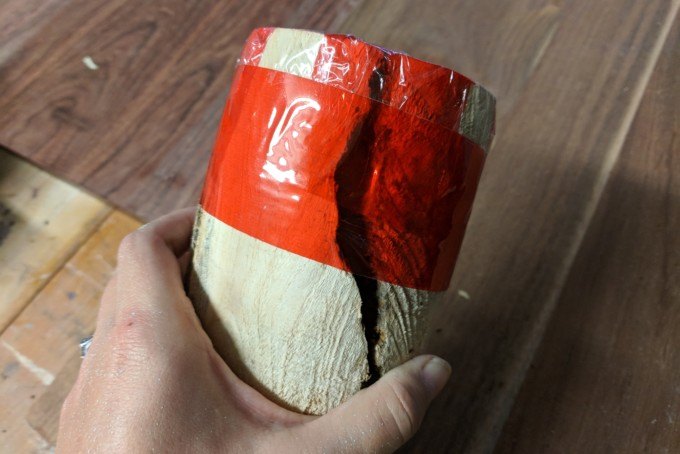
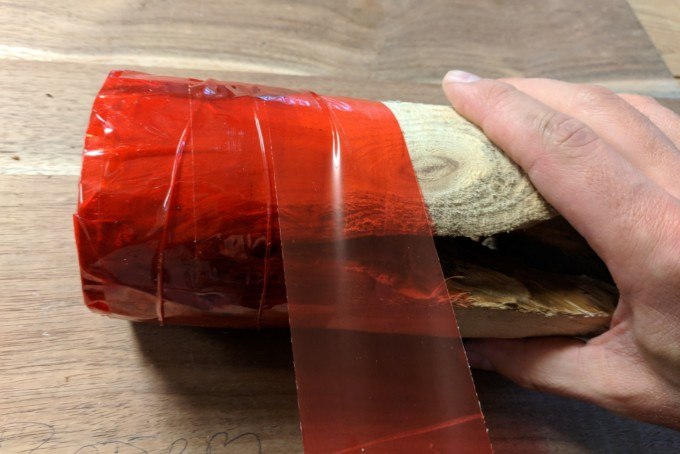
We put the root into a container so it wouldn’t tip over and whipped up some epoxy and added some mica powder!
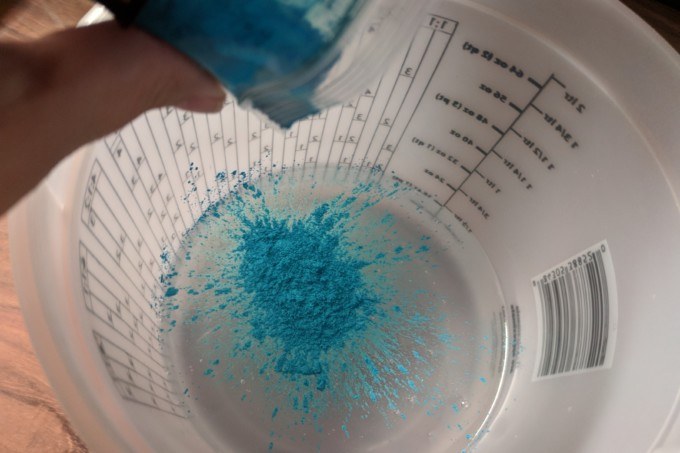


The next morning we were bummed to find that the epoxy had found tiny holes in our tape situation and about 1/4 of it had leaked out. So in true Reality Daydream fashion, we dug around the shop for some left over epoxy, whipped it up, and re-poured. We decided to leave it clear and let me tell you the results were breathtaking. It’s hard to see the clear epoxy in these next few pics, but just hang tight.
The tape was not coming off, so we just started turning it on the lathe like a boss.

Turning one end flat, while making provisions for the lathe chuck.

Once chucked, we roughed it down to the general shape leaving about a 1/4″ above the finished dimensions.


Then we started coring out the center. I used a stepped process using a 1″, 1 3/8″, 1 3/4″, 2″ and 2 1/8″ Forstner bit, drilling them as deep as the blank would allow (about 2 1/2) before stepping up to the next size.

The Rockler instructions recommend using a 2 7/8″ forstner bit and counter-boring to a depth of 1 1/4″. Here is a link for that forstner bit if you would like it. However, like many things that we work on, we didn’t want to take the time to go to the store for a new bit and frankly didn’t want to drop the cash. So we improvised. We used our turning tool and roughed it out to 2 7/8″ diameter at a depth of 1 1/4″ it will look like this.

We then continued the coring process until we reached a depth of 6″ with our 2 1/8″ drill bit. This provides you with the necessary angle needed for the tumbler insert.

This process likely took the most time. Be patient and don’t force the tumbler insert. For this we used a round carbide and a round scraper. The scraper was nice because it didn’t tend to catch as much. Another thing to note is that we placed the tool rest inside the tumbler and as close to the work as possible. This also helped the process.

Once the insert fits without binding, we used the square carbide tool and created a recess 3/8″ down, allowing the rolled section of the tumbler to slide down over the blank.

Then we used our lathe tools to finish shaping the outside of the tumbler.

Woohoooo! We have something the resembles a tumbler! With the insert removed, we sanded that sucker down. Unfortunately some of the grain tore while we were turning. Call it inexperience or dull tools… probably a combination of both. To rectify this, we started with an aggressive 80 grit, and worked our way through 220 grit sandpaper.


We applied a water based finish and let it cure. Doing so raised the grain (making it rough) so once cured, we sanded again, 220 – 600 grit. Then using a parting tool we cut that sucker free!

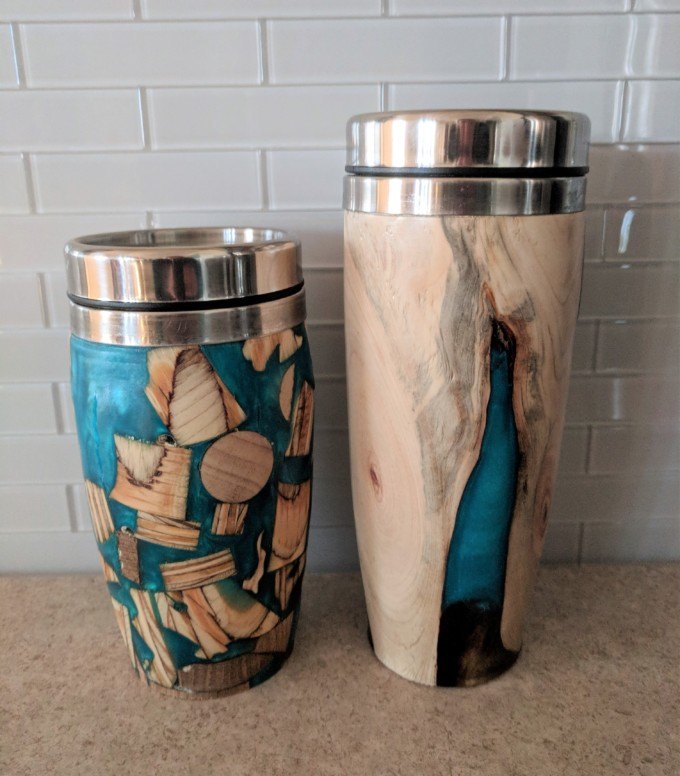
The finished result… simply stunning!

Isn’t that wood grain so weird and awesome?
Oh, and did I mention that we made a second tumbler with little chunks of scrap plywood from the floor of our garage? We weren’t going to let any of that expensive Ecopoxy go to waste!
Obviously we’re obsessed with how this turned out. And we love that it game from a very old tree root from our own yard! That should almost fall under the sentimental category. 😉

You should know by now that we get a kick out of trying new things, and putting unique twists on our ideas, and this one WE NAILED!
We’ll definitely be hand-washing these. And we’re not sure how these will fare with time with expanding and contracting of wood. But we’ll keep you updated!
~Nick and Bethany
~~~~~~~~~~~~~~~~~~~~~~~~~~~~~~~
Thanks for pinning!

Related:
-

I have a fun and easy building project for you! And while I do end…
-

Making a cutting board almost seems like a right of passage into the world of…
-

If you follow us on the 'gram, you know I've been stripping the finish off…
Beautiful tumbler
AWESOME!! Love to see all the steps on how it was made. Am not able to anything like tat myself, but I love to watch others . Thank you so much for sharing with us.
You’re so creative! I love your crafts so much!
I would love to know if you sell these? If so, how much?
Hey Chelsea, unfortunately we’re not selling these. Just sharing a tutorial so that others can make one. 🙁
Those are so awesome and creative!! I never would have thought of it. I am completely WOW’ed!
As a VERY long-time lurker, I love having witnessed the evolving sophistication and mastery of increasingly challenging techniques on display here. This project is a great example of how far you’ve both come. Kudos!
You’re so kind! Thank you for lurking for so long! 😉
That’s absolutely beautiful.
Thanks Jean! <3
Wow, how cool is that! Beautiful!
Thanks Julie! <3
Looks like a ton of work but wow what a result!
Yeah there were a lot of steps. But it was SO fun to make!
This just blows me away! You two are pretty fearless when it comes to trying new things. All I can say is wow! What a beautiful keepsake from an old tree root!
Thanks Renee! 😉 We love trying new things!
Came out GORGEOUS!!!! R
Thank you! We love it!