Soooo, ok. The thought of reupholstering anything makes me want to curl up in the fetal position and chant The Lord’s Prayer. But with a couple of tiny people in the house, and brightly colored food flying through the air, I was beginning to realize that my lovely off-white fabric on the dining chairs wouldn’t be off-white for long, and I needed to take action. Like yesterday.

Every so often, I strike gold on craigslist (I know many of you think that I have such good luck with scoring great finds on craigslist, but that’s a falsity. I only find stuff because I look often, and browse through hundreds if not thousands of items before I find ONE that I like!) So I stumbled upon this amazing fabric, and knew immediately that it HAD TO BE MINE. I wasted no time in swiping up this Asian poppy print. It’s beautiful. It’s orange. It’s everything I’ve ever dreamed of in a fabric.
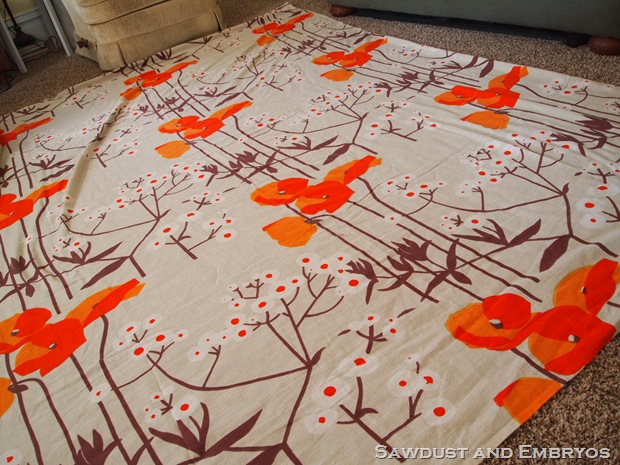
My first thought was to use it to make curtains for the living room. But I decided that, while there’s just enough for two windows, I felt like our large-ish bay window in the living room needed more than just a regular size curtain panels. So my second thought was to use it to reupholster the dining chairs!
I removed all the seats. It seemed logical.

Making sure that I had plenty of fabric to wrap around the edges and staple, I cut 28″ squares (8 total for our 8 chairs), and had the perfect amount of fabric!

And using my upholstery staple gun, just put a staple every couple inches… pulling tight with each addition!


LOVING IT!

But we didn’t stop there, because simply upholstering in new fabric doesn’t fix the problem of flying food (even though the food is often orange in color). So we bought 3.5 yards of this clear plastic vinyl.

This step was harder than the fabric step, because it was hard to pull the plastic tight on the corners without leaving weird wrinkles that stick out. But finally I finished all 8 and get ’em screwed back on the chairs! Phew!


We’re one step closer to baby-proofing this old house! I love that it’s wipe-able, stain resistant, and has a beautiful unique pattern! AND, 10 years down the road when I think it’s ugly… my lovely off-white fabric is still underneath and easily accessible! And hopefully then we won’t have food flying through the air. Wishful thinking? Perhaps.

But for now I think it’s purrrrrty too. And it makes me feel joyful!
~Bethany
*this post contains affiliate links
Related:
-

I have a fun and easy building project for you! And while I do end…
-

My kids are getting to the age where they want to tape pictures, cards, notes...…
-

I've been needing to figure out a solution for my overwhelming plant propagation situation for…
I’ve been trying to track down this material for months – where did you find it ?
I found it at Walmart in the fabric section by the plastic-y tablecloth fabric.
♥ the chairs! Am doing mine in a very pale orange/apricot solid so w/ 6 grandchildren, vinyl is a must have! I found affordable clear vinyl on HGTV Fabric (http://www.onlinefabricstore.net) but……. not sure if 10 gauge is the right weight/thickness for both ease application and durability – what gauge have y’all been using and recommend?
Hey Beth,
So glad I found your post, I’ve been thinking about doing the same with our chairs since we have three little kids but all the vinyl covered chairs I’ve seen have scary wrinkles that don’t make it look good. Any tips for getting the corners right or did you just wrangle them into submission? Also, how are they holding up? My other concern was that the plastic might tear after a bit. Thanks for any feedback you can give!
Hi there, I love the look of those chairs. Any chance you have a link to where you got the clear plastic thing? I’ve been looking all over for it and can’t seem to find this or at least an affordable option!
Thanks!
Debbie, we bought the plastic at Walmart in their fabric section. It was on rolls and the lady cut it for us on the fabric counter. I don’t see it sold online at Walmart.com, so maybe just check in-store? It’s been several years, so I’m not really sure.
Thank you! We love it too! Unfortunately we found it on craigslist, so we have no idea where it was originally purchased. I kept my eye on craigslist for a loooooooong time before I finally found one I liked. If you keep at it, you’ll find one too! I’m sure of it!
Good luck!
Oh i love this,but what i really love is your dining set,been shopping around,would you pleeeease tell me where you got it????i would be sooo happy.thanks and awesome job.will def do it with my LO growing and running around…
Do you have any more info on where to get the fabric listed in this post? I tried to link back to the owner’s project and the link didn’t work. I love the fabric and would love to know where to get it if it’s still available.
PotchMcClosk… we purchased the fabric on craigslist, and the previous owner told us it was a tapestry she bought at Urban Outfitters a long time ago. I’ve since searched for it (because I LOVE it too!) and it must be discontinued. I’m not sure why that link is broken, I’ll look into it though…
I LOVE it! Such a great idea. Our dining room chairs actually have ‘straw woven’ seats. Its hard to read that without thinking..ew…80’s, but they are Pier 1 (we bought used off Craiglist) so they can’t be so bad right?
I have a question though! How did you secure the cushions back on the chair?
I have done the same thing with my kitchen chairs, and the plastic lasted almost 10 years before I had to replace them. Just wish I had a better staple gun when I had done it, as it took FOREVER to staple, then pound with a hammer. I LOVE the coffee table with the stencil idea. I have an old coffee table that would look so nice if I just refinished it. But I’m kind of scared to start. But you inspired me.
That fabric is UH-mazing! Lucky gal you are! I have a lime green zebra print on my dining chairs that I threaten my 10 year old step-daughter over haha. Maybe I should just put plastic on them like you did…maybe one day when my infertility issues are solved and I have my own babes.
Just found you at All Things Thrifty…new follower 🙂
Haute To Sew
love the fabric! these look awesome!
Once again, you UH-Maze me! Im doing an arm chair right now and ive hit a brick wall-boo! But you got me thinking about it again, thanks!
~Aleasha
Bethany, you may want to check out something called Heat N Bond iron-on vinyl. It’s much thinner and just bonds to the fabric so that it’s more supple for corners. It’s great for outdoor tablecloths so that you can pick your favorite fabric without the limits of vinyl tablecloth patterns.
That fabric is soo pretty, nice job Bethany! I can’t wait to sit on them 🙂
That print is amazing. And the plastic thing is a genius idea. Love it!
WOW!! Really, really great fabric. That is a one in a million find.
Is it vintage?? Just awesome. & Great job on the upholstery.
Those turned out amazing! What a great find on craigslist!
My nickname is Poppy and my favorite color is orange so I *love* that fabric. I wanted to paint my kitchen orange but the DH veto’ed it.
Wow!!! Loving the chairs!
Bonus because orange is my favorite color, so I think I’m slightly biased. 🙂
Love it! Your stuff is always great. 🙂 But now, a question…did you make or buy the vase on the table? It’s a great centerpiece!!
Thanks Alyssa! I love that vase too! I wish I could say I made it. It was a bridal shower gift from my coworkers when I worked at an interior design store. They knew how I loved paisley print! 🙂
Just found you through All Things Thrifty, your coffee table….AMAZING! You have mad skills! : ) These chairs are super cute too. Love your fabric choice. Your newest follower, and can’t wait to see more more MORE!
Smiles!
Sammy ~ Renew Redo
So, I found you through All Things Thrifty, and have now spent the past HOUR clicking around here! And to think, I was going to get something done today. Anyway, love the blog, love that you’re a fellow old-house lover and central Iowan, and I love how these chairs are functional and pretty!
Ya know – I usually hate the look of plastic covered seat cushions, but you’ve made this super swanky! They look great. Further proof that baby-proofing doesn’t have to take away from your general style.