• Home
  • About
  • Tutorials
  • Recipes
  • Furniture
  • Contact
    • Contact
    • Infertility
    • Disclosure
    • Privacy Policy
  • Shop
    • Facebook
    • Instagram
    • Pinterest

Reality Daydream

The Dream is Free, The Hustle Sold Separately

  • Home
  • About
  • Tutorials
  • Recipes
  • Furniture
  • Contact
    • Contact
    • Infertility
    • Disclosure
    • Privacy Policy
  • Shop

Living Room Update – The Ceiling

November 11, 2019 by Bethany Sy

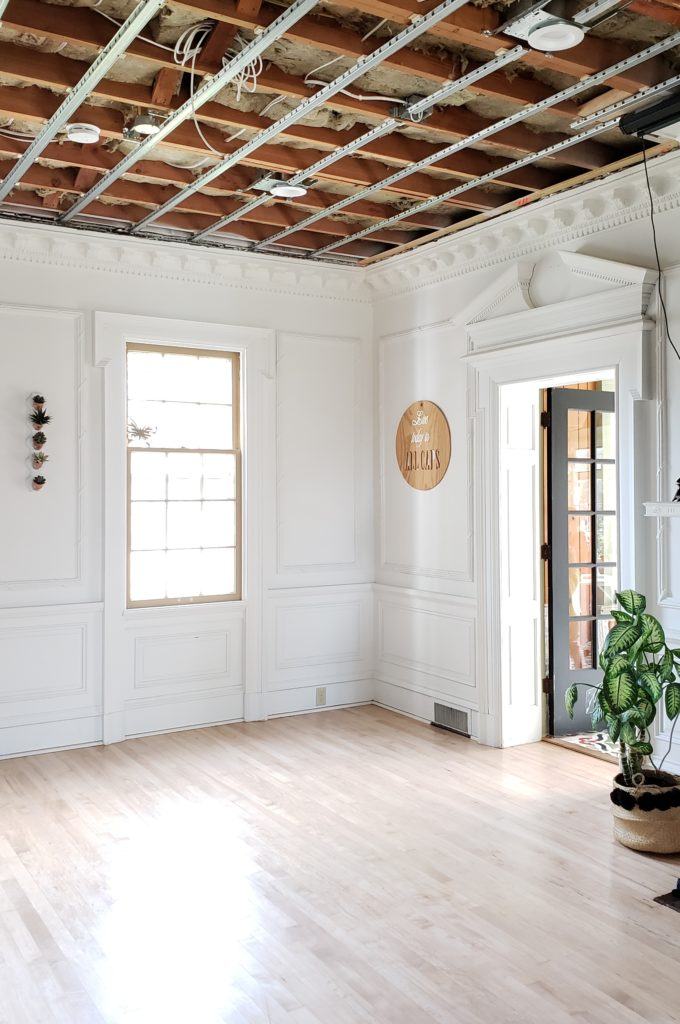
Ever since the very first day we stepped into this house (and fell in love with it), the living room ceiling was… nonexistent. Open floor joists, exposed wiring, and I-beams.

We have put our touch on this room AS MUCH AS WE POSSIBLY COULD, and yet…

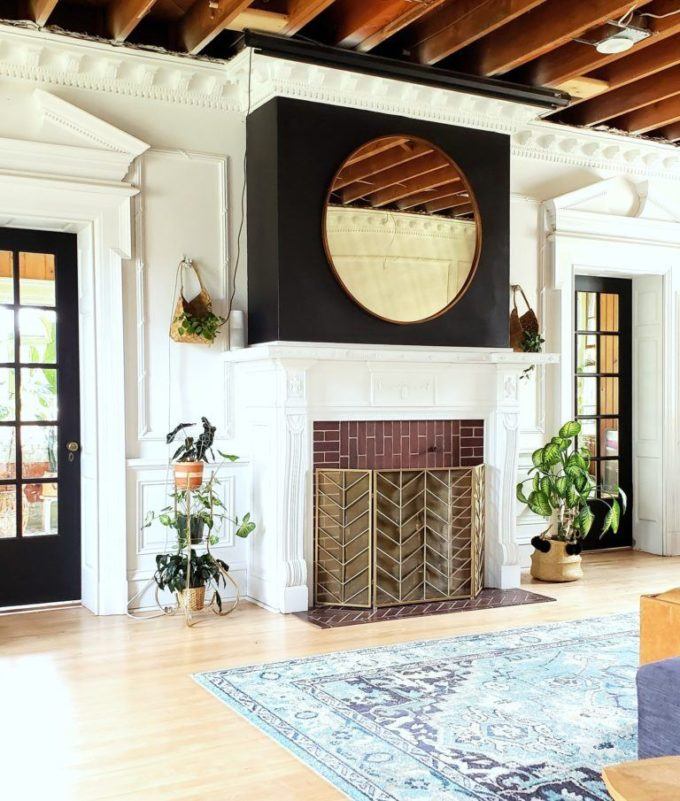
Rumor around the neighborhood is that the ceiling fell in on the previous owners. YIKES. I hope no one got hurt! It doesn’t surprise me though, because the plaster ceilings in the entryway and dining room are a little droopy.

ADD IT TO THE LIST.

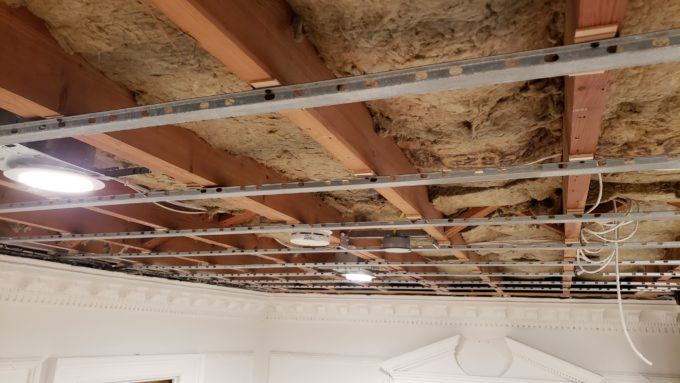
We’ve been a busy little bees… running wire, adding insulation (Rockwool), and Resilient Channel… which is not only a noise reducer, it also helped us level the ceiling so it would line up perfectly with the plaster crown molding.

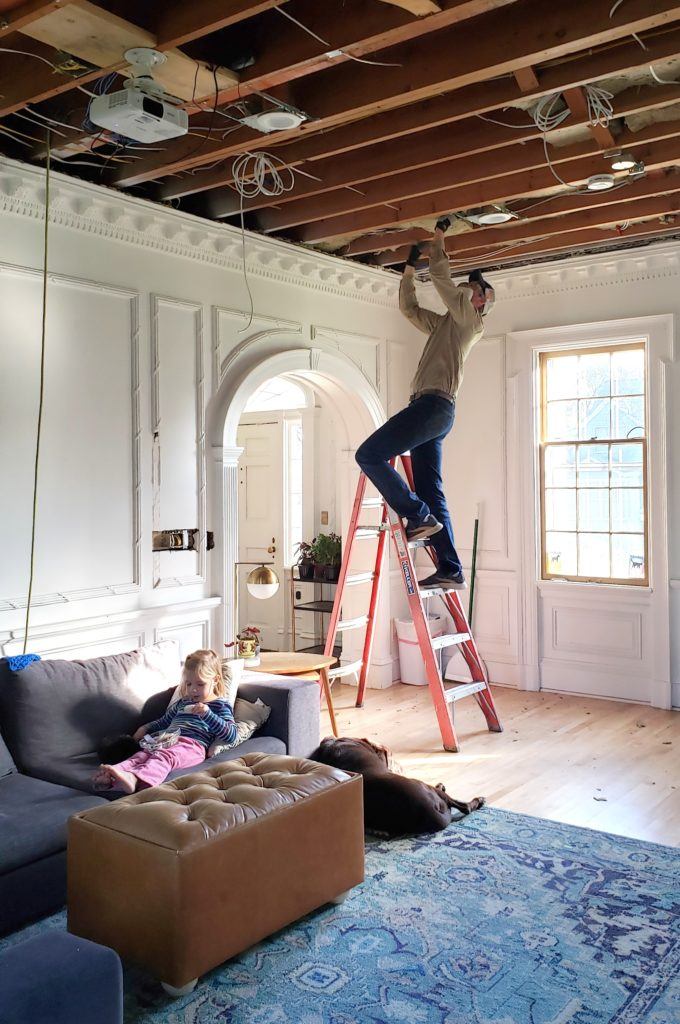
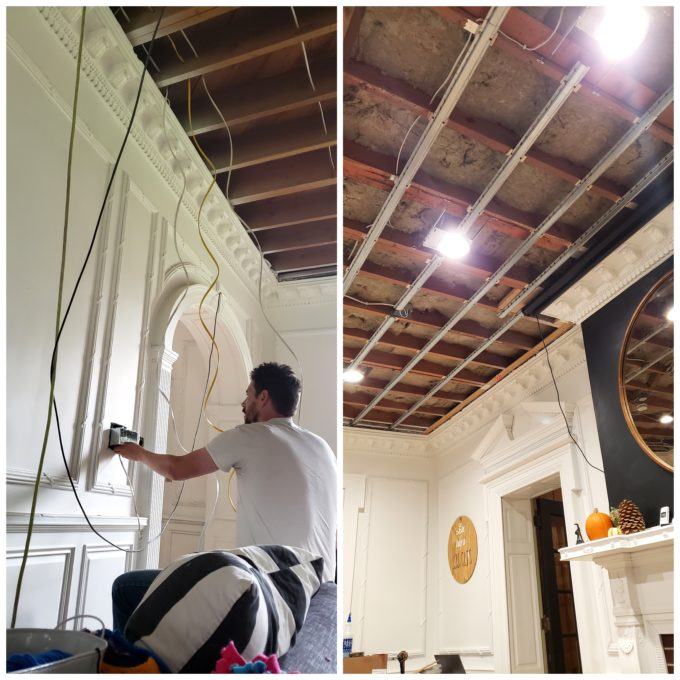
The Resilient Channel are these metal things that go the opposite direction of the floor joists.

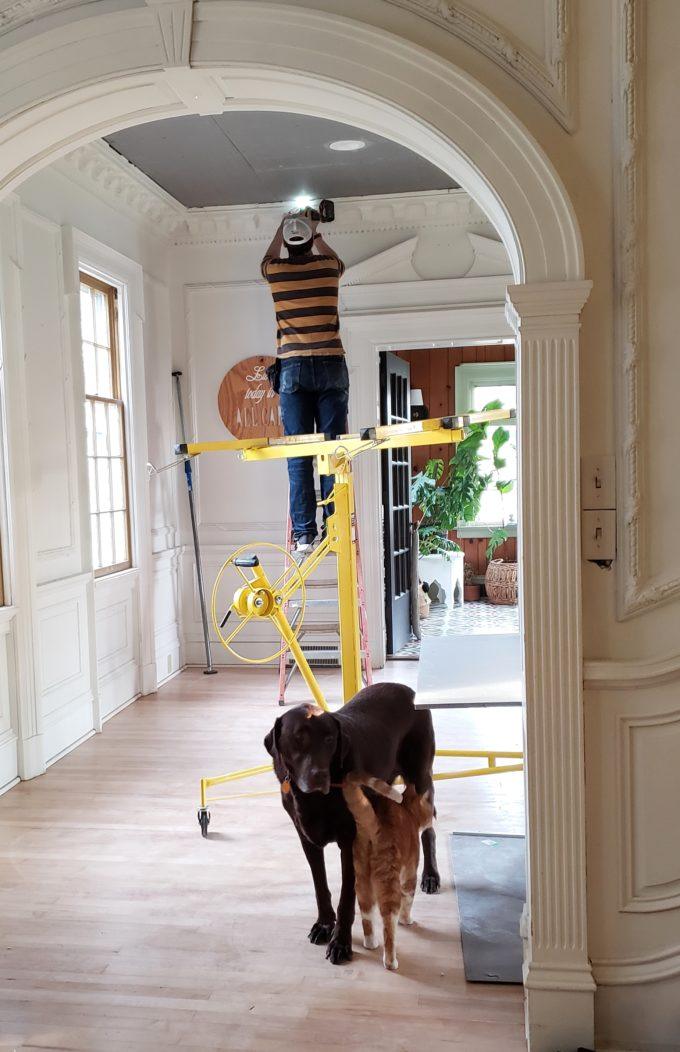
At this point we’re ready for drywall!

We used a plaster-based drywall, to keep with the historic ‘plaster theme’ of all the walls and ceilings in our house. I have to admit I was a little disappointed when I saw that it was gray. I was SO EXCITED to finally be able to see what a white ceiling would look like… after living with the dreary brown exposed wood for so long.

But still exciting nonetheless! It definitely give an entirely different feeling to the room. And the gray is kinda growing on me. Haha!

We’re going to have a dude come and professionally plaster/skim coat the ceiling and give it a smooth transition to the original plaster crown molding. But unfortunately he can’t make it for a few more weeks. So we’re embracing the 10 million screws for now. It’s still SUCH an upgrade from what we were dealing with before!

A few months ago, I found my DREAM ceiling fans. They weren’t frumpy and ‘traditional’ like so many boring ceiling fans. The brand is Quorum, and I was so excited when they were interested in partnering with us for this project!!

You KNOW I wasn’t going to wait till the ceiling was finished to put these babies up. I just had to see them in place!

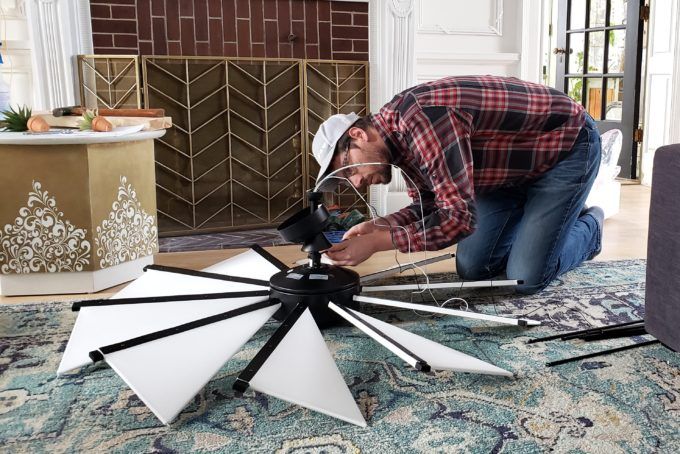
We got two of the 52″ Mykonos fans, one for each side of this long/narrow room. These babies are sturdy and well-made! And I love that they make such a statement.

I MEAN…

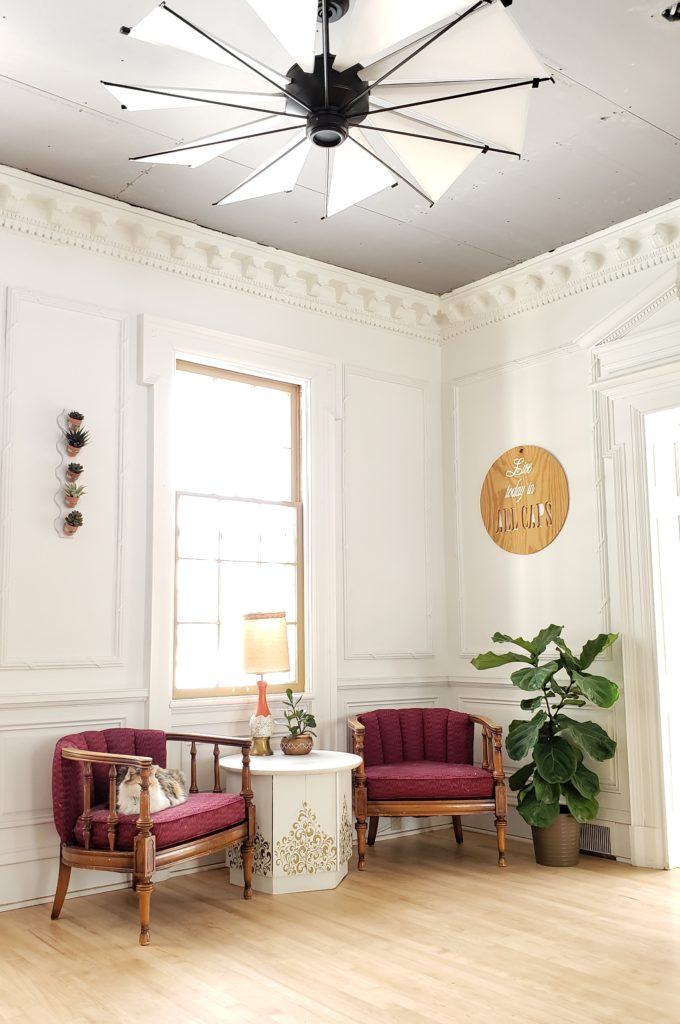
I’m not at the point where I can do a true living room ‘reveal’ yet, so I’m just going to leave you with those teasers above. And once we get the ceiling truly finished, We’ll share the whole thing!!

Stand by!

~Bethany

Related:

  • Master Bathroom Update

    If you've been following along on the 'gram or Youtube, you know we've been turning…

  • Veggie Garden Update (and why we love our weed trimmer!)

    If you follow our adventures on Instagram (we're @RealityDaydream!), you know we pulled the trigger…

  • Plaster-Hardened Fabric Planters

    I've had this idea in the back of my mind for quite awhile... why not…

About Bethany Sy

Nick and Bethany Sy are the creative free-spirits behind DIY/Lifestyle blog, Reality Daydream. They recently purchased a historic mansion and have been documenting the ups and downs of renovation and making this home their own... all while sharing tips and tutorials along the way! When they found themselves in the trenches of infertility, they started a journey that would prove to be their most important DIY project ever, and have 3 beautiful girls to show for it. <3

« Repurposed Vintage Hankies
DIY Wine and Stemware Rack Tutorial »

Comments

  1. 3

    renee' says

    November 13, 2019 at 7:06 pm

    Those fans remind me of a Dutch Windmill! I should know – I have a 1,ooo of them around where I live in NW Iowa! LOL! Great job on the ceiling- I bet it is warmer in there as well.

    Reply
  2. 4

    mary says

    November 12, 2019 at 7:17 pm

    looking good you two workoholics 🙂

    Reply
  3. 5

    Guerrina says

    November 11, 2019 at 11:15 pm

    Kudos to Nick for all the work on the ceiling! The fans are gorgeous!

    Reply

Leave a Reply Cancel reply

Your email address will not be published. Required fields are marked *

  • Facebook
  • Instagram
  • Pinterest
  • RSS
  • YouTube
We are Nick and Bethany! Welcome to our blog, Reality Daydream where we share our DIY adventures!

realitydaydream

This is our go-to summer lunch right now! We call This is our go-to summer lunch right now! We call them “pizza pockets”, but it’s basically a quesadilla made in the toaster. You could use ANY toppings! 🙌
You can’t go wrong with BUBBLES! This is linke You can’t go wrong with BUBBLES! 

This is linked in my profile as “Bubble Gun”!
Patio lights are non-negotiable! They make all the Patio lights are non-negotiable! They make all the difference. 🙌 And when you don’t have something to hang them from, use this whiskey barrel trick!

Oh, and SOLAR LIGHTS! 💡 #needisaymore 

All the details and product links are on our blog! www.RealityDaydream.com 🎉
Shall we call these cookies & cream pancakes? 🙌 Shall we call these cookies & cream pancakes? 🙌

I was pretty proud of this idea when it came into my head, but they were EVEN YUMMIER than I expected! Kid and adult approved!

And since there’s no syrup needed, they’re basically healthier than regular pancakes, right? RIGHT?! 👊
Load More Follow on Instagram
View of our entryway of our historic mansion that we're slowly renovating and making our own.
Click here for lots of art projects using only wood stain on furniture!!
Please feel free to share or pin my posts! You're welcome to use ONE of my images (no collages or pinnables) with a link back to the corresponding post. Please do not edit or crop that single image in any way. Improper use of my photos, ideas or words is a violation of copyright. Thank you!

Categories

Attention: Almost any do-it-yourself project involves risk of some sort. Your tools, materials, and skills will vary, as will the conditions at your project site. Reality Daydream has made every effort to be complete and accurate in the instructions of the plans on this website. Reality Daydream will not assume any responsibility or liability for damages or losses sustained or incurred in the course of your project or in the use of the item you create. Always follow the manufacturer’s operating instructions in the use of tools, check and follow your local building codes, and observe all commonly accepted safety precautions.


Copyright © 2023 · Modern Blogger Pro On Genesis Framework · Customizations by Sweet Theory Designs · Privacy Policy · Log in