As it turns out, we’re not the only ones that live in a house with unfortunate and tiny bedrooms with ill-placed windows. We get questions all the time about how we MADE IT WORK with our headboard in front of a window, and still have curtains and everything looking nice and put together. Today I’m going to show ya!

this post contains affiliate links
When we built our own upholstered headboard, we chose to build it to be wall-mounted. We obtained Flushmount hardware here. SO SMART for this application! Can be easily removed whenever!

This allows us to easily install our headboard on any wall, or wherever we install the other side of the flushmount. With this in mind, we screwed two 2×4’s (the same height as our headboard…in this case 30”) into the wall on either side of our window.

Then we screwed the opposite sides of the flushmounts onto the 2×4’s at our desired height. We only screwed on one side, because we decided it would be the most stable having been screwed into the center of the 2×4 as opposed to all 4 screws being very near the edge, and potentially ripping free. If we had put more thought into it, we may have installed two 2×4’s next to each other. But maybe not too!

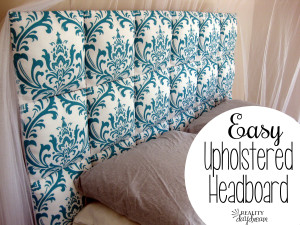
This allowed us to swiftly slide our headboard into place in front of the window!
")
And we had 4 inches of clearance to hang our curtains!

We purposefully measured out the 2×4’s to end up on the far outsides of the headboard, allowing us to install our curtain rod as wide as possible… giving the illusion of a more grand and wide window! (Headboard fabric here… they don’t carry the same color anymore, but this is the same print!)
 (2)")
There you have it! A perfect fix to a widespread problem! WHO KNEW that putting your headboard in front of a window could be so gorgeous!
It’s totally secure, and it looks as chic as ever! AND, with your bed in front of a window, you don’t have to worry about finding a vintage starburst mirror to hang over your bed so you can fit in with the Jones’! Am I right? Of course I’m right.

To see how we made our beaded swag lamps, click HERE.
To learn what our wall color is, click HERE.
To see how we tore apart a desk and created two night stands, click HERE.
To see how we built our own upholstered no-sew headboard, click HERE.
To see how we made lace stencil curtains out of painters dropcloth (for $3 a panel!), click HERE.
If you don’t already, be sure to subscribe to this here blog via email …and join us on Facebook, Pinterest and Instagram as well!
Thanks for following along, friends!

Head on over to get all the details on how to build this suuuuuper simple upholstered headboard. It’s the easiest in blogland! PINKY PROMISE!
*this post contains affiliate links
Related:
-

Hey buddies! Nick here! It's been almost 4 years since we purchased this home. And…
-

If you've been following along on the 'gram or Youtube, you know we've been turning…
-

WHAT A JOURNEY! What a labor of love! What a pain in the booty! I…
Install the curtains as if the window is centered and keep the wall covered by the curtain.
We have the same issue with a small space to put our queen bed with a window but the window is off centered. Im not a fan of the type of headboard you made. I like more rustic style. How would I make it look more centered. I cant move the bed at all.
JoAnn
PUTTING SOMETHING LIKE THAT PERMANTENTLY ACROSS A WINDOW LOOKS LIKE A FIRE HAZARD TO ME.
Thrilled to find this solution for my daughter’s room! Also saw your headboard that I’m
looking forward to doing with my daughter. Looks like great teen/mom activity! My question is about headboard functionality–it looks great but does stuffing hold up to normal leaning against watching tv etc? Yours is the only headboard I’m seeing without foam as part of the build but does it actually work with daily use and leaning against?? Or more for looks? Thanks for great how to’s. New to site and excited to try some!
Yes it holds up well! and is comfy to lean against! Although it’s not as ‘cushy’ and soft as if it was tufted foam. 😉
Understood. Just didn’t want to see stuffing in each square settle and sag to the bottom like a bad bra day ;^)
Bahahahaha! Laughing tears over here! 😉 Nope in 4 years, the stuffing hasn’t settled at all.
What if your window is bigger than your bed? I’d REALLY like to rearrange my master bedroom with the bed in the window, but we currently have a queen size bed with no headboard (ordering one soon though… just found one I LOVE on amazon!). Our window is slightly bigger than our bed… any solutions for that?
One option would be to make your headboard bigger than your bed. This could be a really ‘grand’ and awesome look!
I have a couple of questions. In our bedroom we also have a window behind our king size bed. It is a standard size window and looks really small compared to our bed. Our ceilings are slanted down because we have a cape cod style house….and the window isn’t even centered to the wall. Ugh. It is an ugly site! I tried a “wall” of curtains as a headboard, but it just doesn’t look right. I would love any suggestions you have of a way to get our bed wall looking better! If you like, I could send a photo of the wall to you. Thank you so much!! ~ Penny
THESE* LAMPS*! Wherever did you find them and how much did they cost?
The brassy parts of these lamps were old antique swag lamps that were passed down to us. We ditched the globes that they came with, and added the beading. So sorry I don’t have a source for you to go purchase them yourself. Here’s the link to that post if you’re interested: https://realitydaydream.com/2011/10/shes-got-swag.html
Did you jus use really long screws to attach the 2x4s to the wall?
Oops we must have forgotten to mention that part! We used a Kreg Jig to create pocket-holes so the screws didn’t end up having to go through the entire board. Hope this helps!
I have been thinking of how to do this in our bedroom. Making it wall mounted is a perfect solution! And you don’t have to use as much material for the curtains since they don’t have to reach the floor. Bonus!
I am having this exact issue and have been contemplating this idea…happy to see the finished project before I attempt it myself!!
Very smart fix to a very annoying problem. Way to be creative!
This is wonderful! I especially like the way your room looks at night. Elegant! 🙂
I don’t think my comment posted. However, I said that I thought the headboard made your window and room look larger. I like it.
-Deborah