Wowzer… whatta morning.
We got up at 6. I washed sippy cups and got their milks ready while Nick emptied the dishwasher. Babes woke up at 6:30, and drank their milk while Nick and I sipped our coffee and gazed lovingly into each other’s bloodshot eyes. Nick gives all of us girls kisses and is out the door at 7. Babes read books and play catch with the ball, and then go down for naps at 7:30 (I’ve been trying to get rid of this strange early-morning nap, but today I had to manipulate their naps cause we had morning plans). Then I showered, blogged, woke the girls up, got them dressed/diapered, and headed out the door for our Mommy-Group-Playdate-type thing at 8:45. That lasted till 11:30, at which point I packed the girls up, stopped at Sherwin Williams to pick up a couple quarts of paint and a jug of mineral spirits, stopped into Aldi for some milk and fruit, and headed home. Just in time for the girls to have lunch, me to eat an oatmeal cream pie, put them down for their second nap, and then… naturally… write another blog post.
Hmm, totally wasn’t planning on giving you a play-by-play of my morning, but there you have it. You’re welcome!
Most days are the complete opposite of this, so I kinda welcome the chaos every once in awhile. Not more than once a week though. Every other day, I prefer to be in my pajamas with a paintbrush in my hand.
So this morning, I promised to reveal what’s hiding inside my AMAZING WHITEWASHED/GLAZED SECRETARY DESK!!!!!!!!!!!!!! Can I be honest for a moment? WAIT! This is my blog! And I’m always honest! (even when it’s not appropriate)… Yeah, so the inside of this secretary is what really makes my skirt fly up. And I’m a pretty modest girl, so it takes a lot for me to let my skirt be anywhere but covering my girl-parts.
Wha?
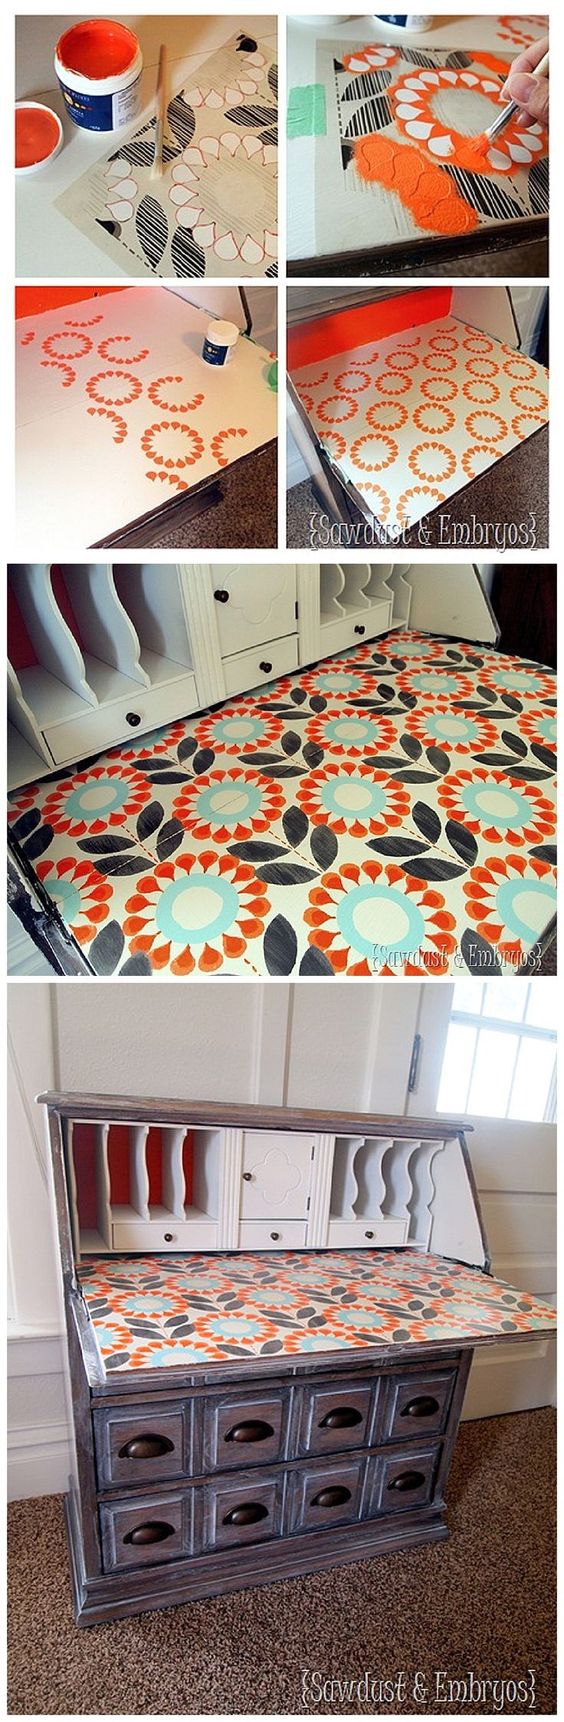
I started by having Nick un-adhere the inner compartment-thingy (technical term!), spread it all out in the garage, primed and painted WHITE.
 |
 |
At this point, it looked like this:

I decided to pull the cubbies back out and paint the back wall bright orange so that it would subtly pop through and add some depth. I was pretty sloppy with the edges, because I knew with the little cubbies in there, none of it will ever show. Captain lazy, right here.

And here’s the fun part… remember this print by Rachel Cave?
")
Sooo… I love it, right? And I decided to make it into a stencil.

The thing about stencils is, the design or pattern has to be such that none of the parts touch each other, because otherwise the stencil would just fall apart. Plus, it’s very difficult to have multiple colors within a stencil. This can make for some very limited stencil selection. BUT, being a lover of patterns, I found a way around this little snafu.
I made THREE DIFFERENT STENCILS for this one pattern (using the techniques from my stencil-making tutorial) so that I could have this exact design!!!!!
This is a groundbreaking day in my life.
Stencil #1


Once I finished with my first stencil and let it dry, I went at it with the next stencil (the leaves).
Stencil #2

And finally, the last stencil has the center circle, and the smaller teardrop that goes inside the larger orange teardrop petal.
Stencil #3


It’s hard to see it all coming together with all these different stencils and colors going on. But when I was done? SOOO worth it.

I can’t tell you how much I love this. Isn’t it so ME?

I just hand-painted on those little dotted flower stems… super easy. And there were definitely touch-ups (as with ANY stencil job). But for the most part, this job was PURE JOY. I enjoyed every second of it.

Do you think you’ll give this “Multi-Stenciling” a try? It’s so easy! All you need is a steady hand and a little patience… a few shots of whisky wouldn’t hurt either. But make sure your kids are in bed.
Here it is with all my junk on it.

This crisp white inside and funky bright pattern is the perfect complement to the whitewash-glazed exterior.

It’s my absolute favorite piece of furniture we’ve ever done. And it’s MINE! Do you approve?

Thank you Mrs. Evenhouse! I love this piece of furniture you gave me!!!!
Now, the girls are still sleeping… so I’m going to kick back and read through my new IKEA magazine on the front porch! PERFECT WEATHER TODAY!! Can I get an amen?

Thanks for pinning!
Very clever! New to your blog- found you via the old name. Hope you keep doing projects and tutorials.
You have so much patience and determination. What a pleasant surprise to open your Secretary and have this beautiful design looking at you. I love the work that you and your husband do. I plan on trying out some of your tutorials in the near future. Can’t wait for my next email, so I can check out what you guys have done next.
I wanted to share a project you inspired. I found this piece at Goodwill for $35 and was looking around online for inspiration. I landed on your secretary and fell in love! I wasn’t as brave as you with the stenciling so I went to Spoonflower.com and bought wallpaper samples from the same artist–that was a hard choice! I completely destroyed the little shelves inside trying to get them out so I had to completely rebuild them (that was kind of a nightmare). Anyway, I love your style and randomly end up on your site all the time. Thanks for sharing your stuff with us (next up, painting the kitchen floor with your “slate” technique. Wish me luck!) https://www.facebook.com/ablairsmith/posts/10207122690561721
Anyone ever tell you that you are a genius??? Well they were right, … sigh … if only I had your talent… Rome…. Paris…. lol
I recently purchased a secretary desk and wanted to know how did your husband remove the organizer inside the desk? I see that there are two tiny little nails, but I can’t figure out how to remove them without damaging the wood, especially in such a small space. BTW, I love your stenciling!
We had trouble with that TOO Laura! If I remember correctly, we ended up finding that it was stapled in from the back, so we pried those staples out and were able to remove the shelving. I hope that works for you!
Wow. Wow. Wow. I love it. Darnit. Can you like come to my house and do something cool with my desk? lol
I love the pattern! you do really great job! I fell in love with your blog and had to read from the beginning.
Oh my gosh that is perfect. i am not sure if mine would come out or not. I will have to check
This is gorgeous! I love your glazing technique too! So much prettier than all of the “distressed” furniture out there.
How you find time to do all of this is beyond me… 🙂
WHAT a transformation! Love this piece! You did an excellent job 🙂
this is AMAZING! i love the inside and i love the outside!
Like Stefy, I just discovered your blog a couple of weeks ago, and decided to go back and read it from the beginning. You’re a great writer . . . and an INCREDIBLE “transformer”! Love your new secretary desk. The outcome of your layered stenciling is amazingly awesome!
Envious,
Suzie in Oklahoma
Yay! Looks great Beth! Mom loves it too 🙂
How did you paint the inside of the cubbies? Rather, how would you do it if you didn’t have your paint sprayer? I have something similar I want to paint, but I can’t figure out how I’ll possibly get a smooth finish on the cubbies. Or even how to remove them!
Good question Sarah! I actually used Kilz spray-primer, and a can of white Krylon on this… no need for a paint gun! I was able to get a good smooth/even coat without any drips, so you should totally tackle it!
The HARD part was definitely removing the cubbies. They were attached with small staples or brad nails on the back side, and my smokin-hot man-child had to painstakingly remove each one with a needle nose pliers. SO worth it though… easy for ME to say, right? HA!
Good luck! Send us pics when you’re done!
Ditto, LaDonna. Very, very!
OH my GOODNESS. that is STUNNING! I love that the stencil is kind of retro looking too. The white and the pattern go so well together. Such a fun little surprise when you open the desk!
I absolutely love everysinglething about this project!! SO my style!
Incredible!!
This is my favorite thing I’ve seen you do too! 🙂
I’m starting today! I love all your work and your blog (I just saw it whole without stopping!), because I see a hard working family and it shows in every post to your daughters that you love so much!
See you here! XOXO =)
There are just no words to describe how awesome this piece is! I LOVE it!!! Just totally awesome!!
AMEN! Masterpiece..Love It!!
Girl, you’re crazy to have tried and awesome because you knocked that pattern out. Love, love, love it.
You are invited to a week long visit for a revamping of my tired home also. I promise I will feed you well! That is INCREDIBLE!!!
Feel free to come live in my house in Canada and re-do EVERY piece of crappy furniture I own… seriously.. all yours!
AMAZINGLY BEAUTIFUL!!!
OH MY WORD! This is absolutely incredible! I recently found an old desk thingy similar to this one, and was thinking of painting it, but I can’t really afford paint at the moment. Congratulations on a lovely piece! Glad to hear this one’s a keeper 🙂
I wholeheartedly agree with Melissa. You have outdone yourself. LOVE!!!
Love it! Did you do any wax or polyurethane treatment over the pattern to protect it?
We plan to apply Polycrylic SOON to seal things up. That thing’s heavy though… so we’re waiting till we’re polying another piece before dragging it out to the garage.
I could not love this anymore. You have amazing taste!