It’s safe to say that at all times we’re in the middle of a handful of small-ish projects, as well as focusing on the slow makeover of ONE ROOM. And that room right now is the Master Bedroom… AKA the most neglected room in the house.

This post contains affiliate links.
Several weeks ago I shared an intro to this room transformation and how we painted the walls WHITE and were toying with painting the chunky trim a color rather than white for a change. That’s still the plan, but the trim is still white. I wanted to wait until the room comes together a little more to see if I can get away with something bold, or if I should stick with something more subdued. So the jury is still out on trim color.

BUT!
Other fun things have been happening in this room!
IF you consider scraping popcorn ceilings fun.

See those pasty white arms? That’s icky ceiling dust. This is SUCH a dirty job, and I was so grateful that my generous and giant husband allowed me to exploit his tallness. I would have been teetering on the top of a ladder, but he got away with a stepstool. Don’t worry, I made sure it was well worth it for him. (after he showered of course)
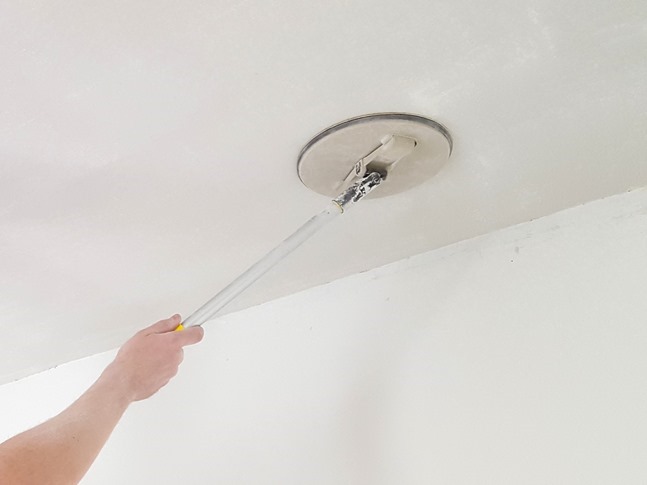
That tool is called a Ceiling Texture Scraper and is insanely handy… especially since there’s a spot to hook on a garbage bag that catches the vast majority of nastiness. You’ll definitely want the extender pole though (here) to save your arms. Just scrape away after wetting the ceiling with a pump garden sprayer a bit to soften the nasties. Be sure to have your popcorn ceiling inspected by an EPA approved contractor to check for asbestos before ‘breaking ground’
Around the light fixture, you can just use a putty knife to scrape up right around the edges. If you’re going to change out the light fixture anyway (or if you’re more thorough than we are) it would help to have a cleaner line around the base of the fixture. But we’re going to have a ceiling medallion eventually, so it wasn’t important to us.
After the ceiling has been scraped, it will be relatively smooth, but still needs to be sanded (and in some cases repaired here and there with joint compound) . Nick has this paddle sander from all of his drywalling adventures, and it works perfectly for this too. Even fits on the extender pole!

Nick did two skim coats and sanded between each, then we primed and painted white! It was amazing to realize how much lighter and brighter the room felt with out those teeny bumps casting shadows on each other and causing the ceiling to look dull and gray.
We’ve since put up some chunky crown molding, and I’ll be sharing pictures and a tutorial next week hopefully. I need some time to clean up the nastiness. I’ve vacuumed and scrubbed but it still seems like all that dust is in every nook and cranny. Ew!

In the meantime, I’ll leave you with some pics that I’m using as inspiration for the ‘vibe’ I want in our bedroom. Think bright whites, creams, texture, and pops of color with a bohemian feel. Plus LOTS of plants.
So dreamy right?! I can’t wait to keep sharing the process with you and see this room makeover come to life! Stay tuned!
~P.S. if you want to get an email every time I publish a new post (typically 2-3 times a week), click here to subscribe so you won’t miss a thing!

I saw a cool tutorial where a guy taped a scraper to the nozzle of a shop vac hose and all the detritus of the scraping went down the hose. He did a room in minutes! Now I need a shop vac!
PS: Don’t tell Nick!
I don’t know that I’ve ever commented on the blog, which feels weird because of being in our Facebook group together.
I’m right with you on hating painting walls and on the master bedroom being the most neglected room in the house. I would love to go with whites and creams in our master bedroom, but we have a black dog who insists on sleeping with us. Right now we have light blue sheets and they look so disgusting seconds after I put them on. Sigh. A girl can dream.
Hehe Lorena! I’m glad you commented here! 🙂 I can see how black dog hair wouldn’t mix well with whites and creams in your bedroom LOL!
We did ours and in record time. We took a garden sprayer. Filled it with water and sprayed the ceiling. Then let it sit for about 10 minutes and the popcorn texture scraped off with ease. We covered the floors with a plastic drop cloth so that anything the bag on the scraper missed landed on the plastic drop cloth. Easy peasy.
Yes! And it makes such a difference in a room doesn’t it?! So worth it. 🙂