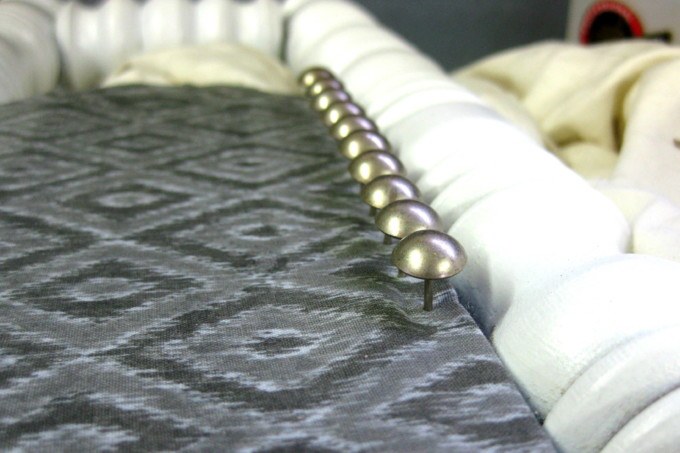
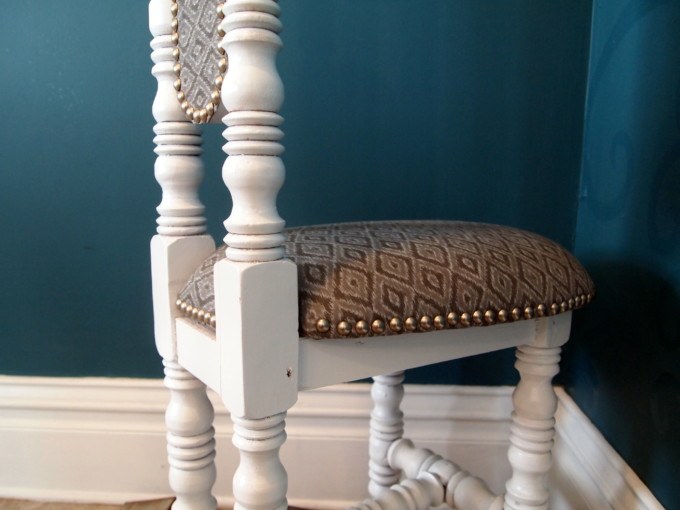
Howdy friends! You know we have lots of experience with different furniture painting and finishing techniques. But today, we’re going to talk about upholstery! And specifically, learning how to apply UPHOLSTERY TACKS! It can be so hard to get upholstery tacks or nail head trim in a straight line.
Let’s chat about some different methods and tips and tricks for making it happen!

*This post contains affiliate links. We receive a small commission for items purchased at no extra cost to you. I am in no way affiliated with these brands. Just love em is all*
Applying Upholstery Tacks
Tools and supplies:
1. Choose an upholstery tack and supplies for your project!
We’ve found that there are tonnnnnns of options out there when it comes to choosing upholstery tacks and furniture tack for your project. We’re talking pewter, crystal, antique brass, silver… literally anything you can think of is available out there. There are a million options on Amazon alone!
While there are a wide variety of finishes and sizes for individual nails, you don’t have as much option when it comes to nailhead trim. But you might find it easier to apply, so don’t disregard it!
The upholstery tacks we chose are similar to these.

We’ll get into more tools you can use for applying upholstery tacks, but one you’re going to want FOR SURE is one of these hammers that are meant specifically for this application or a rubber mallet.
2. Spacing your Upholstery Tacks
For the purpose of this post, we’re going to focus on upholstery tacks rather than also diving into nailhead trim as well. We’ll save that for another post!
Spacing is so important when it comes to applying your upholstery tacks! And spacing will vary depending on the project and the look you’re going for. To get an idea of the spacing you want, try practicing with a piece of paper or felt and push several of the upholstery tacks through in a row to find out what look you’re going for and the corresponding spacing.
With this knowledge, make a mark on a measuring tape so you can be consistent with your spacing. Go ahead and mark out where all your upholstery tacks will go on your piece using the mark on your measuring tape.
3. Inserting the upholstery tacks!
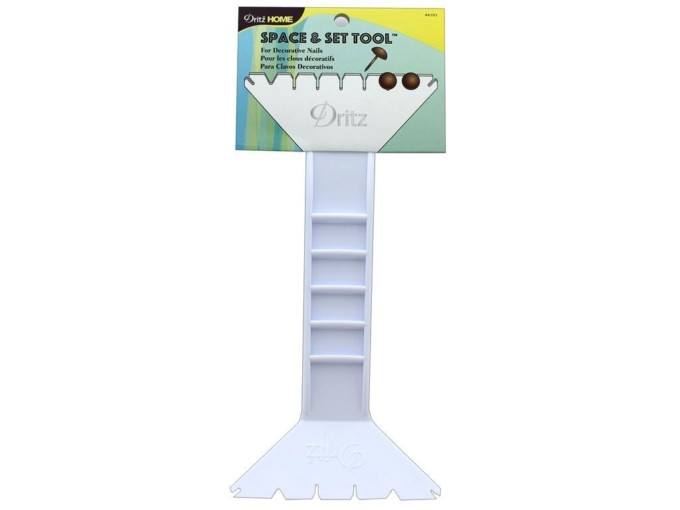
They make these amazing tools called Spacing Guides that not only help you get your spacing perfect, but they also help you hold your nails in place while tapping them with your tack hammer to get them started.
If you’re not using a spacing guide, one tip I found very helpful is to use an awl to punch a small hole where each upholstery tack will go. This will help hold your tack into place when you’re nailing it in. Check out this video tutorial for more details on using it.
If you’re not using one of those spacer tools, use a needle nose pliers to hold your upholstery tacks in place while you give a couple gentle blows with your tack hammer. The pliers keep your fingers safe, and help you stabilize and hold the upholstery tack straight while you’re pounding it in. Once it’s in far enough, you can stop holding it with the pliers and just pound it in the rest of the way.
It’s important to step back from your work every now and again and make sure everything is looking good and appropriately lined up. One upholstery tack that’s not quite right will stick out like a sore thumb!

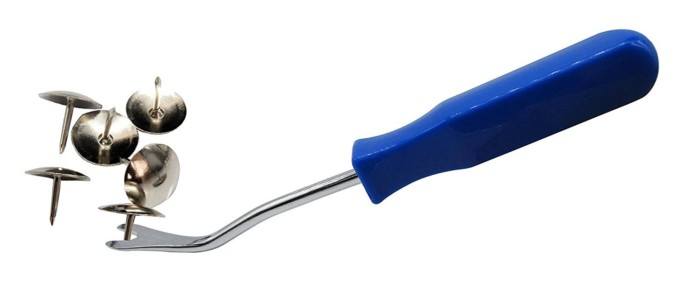
If you make a mistake, there’s a brilliant tool that makes it so easy to remove the tacks.
4. Troubleshooting
Occasionally you’ll have some problems with upholstery tacks bending when you’re pounding them in, which is soooooo frustrating! This happens when you’re dealing with very hard woods. My best advice for this is to use a small drill bit to pre-drill the holes. Or tap in nails that are a slightly smaller diameter than the needle of the tack to get a hole started. This is very tedious and time-consuming, but it’s the best fix I’ve found.

We wish you good luck on your upholstery tack and nailhead journey. If all else fails, take a break from your project and have as stiff drink and return to your project with fresh eyes.

And be sure to check out all of these other nailhead trim and upholstery tack projects from my blogger friends below!

1 / 2 / 3 / 4 / 5 / 6 / 7 / 8 / 9 / 10 / 11 / 12
Thank you for pinning!


How can spacing be determined and maintained when applying upholstery tacks, and what tools can aid in this process?
Thank you for sharing
It is really a nice and helpful piece of information. I am glad that you simply shared this helpful
info with us. Please keep us up to date like this. Thanks for sharing.
Very helpful. Thank you.
Great tutorial with helpful tips, Bethany! Thanks for including links to a few of my makeovers too. xo
This looks like a great solution for spacing nailheads but what if your wood furniture frame is so hard that almost every nail you try to nail or gently tap in bends the stem. I have tried using “steel -hardened” nails to create a small starter hole but have even bent the nails!! Every chair I own and my sofa have had the same issue -: incredibly hard wood frames. Have also tried “drilling” a starter hole but the drill bit just grabs/twists the cotton or other padding under the fabric
Hey Linda, we had that happen a few times too, but MOST of our tacks went in straight. I’m not really sure I have a good answer for you. You’ve tried everything I would have suggested. It’s so weird that even the steel-hardened tacks are doing the same thing. So frustrating. Have you tried googling around?
Dear Linda,
I believe Bethany has already suggested this I am unsure only (difficult to read all of her info due tohe size and number of ads) Try using an “awl” or even a short ice pick first to make a little hole. Position the pointof the awl/IP and hit in with a hammer. It should easily pierce the fabric and other materials and go rignt into the wood. See if you can find tackw that are extra long if your upholstery is very thick.
Good Luck! And to everyone out there who might read this, remember we do not “pick” what color to use or wha tool or a mate – we CHOOSE. Those things do not grow on trees, bush es or vines.. Of course, it is possible to pick a tomato, an apple or cucumber but you will do it in an orchard or garden of some kind just not in a grocery store. We do not “pick it out” We choose as in after looking at many different shades of white we choce blah blah blah.
Unfortunately, choice is being lost to us.
Thank you.
Hi there, love the hacks and tutorial. They’re idiot proof which is just what I need with several projects on at once. Can you tell me if the tacks you used are weather proof. I’m steam punking a cupboard and head board, but also doing an outside project. Do these tacks rust without a coating? Cheers, G from NZ
Unfortunately no, we just do it by hand!
I’ve always had trouble with tacks this is totally genius! Thank you so much for the detailed tutorials, I hate when the important part of a tutorial doesn’t have a picture and I have to guess what to do. These are some of the best tutorials I’ve ever seen, keep up the great work I LOVE your site and will definitely be visiting often!
This is exactly what I was looking for! Thank you!
I recently reupholstered a chair and had the same issue with those tacs. I used a nail and hammered in pilot holes to keep them from bending, but your way seems so much less time consuming.
Nice project tip, thank you so much. I’m looking for deco press-on adhesive backed “faux” upholstery tacks. Any ideas? Also, please note that you misspelled “manually” in your website tag line, “…because some things need to be done mannually”. One ‘n’ in manually 🙂
I ‘ve got chairs, tacked the gertie way…. I couldn’t get those nails in straight! Nor tight, it appears, as some have fallen out over the last four years…. This builds up my courage to tackle this job once more, but now the frugal and Dutch way!
thanks!
This was such a great tip! I was starting to get discouraged. Thank you! Now, off to finish my headboard!
So glad i read this BEFORE I started in with the tacks! The cardboard idea is brilliant, thank you! I’ll be finishing up my headboard this week. theyearoflivingfabulously.com
Can you tell me where you found the nail/tacks?
Here is the link for the tacks; be sure to take pictures to send us. We love seeing what you guys are up too.
http://www.kingrichardco.com/dn.htm
I have experience that this blog is really have all those quality that characterize a blog to be a good one.
Thank you, Thank you, Thank you!!!!! I just looked at my box of tacks and my unfinished chair with the very uneven tacks in it and knew I was going to have to get back at it. This is soooo clever and helpful.
Very impressed with the Frugal Dutchman. I believe your wit and your humor are only surpassed by your talents. I will sleep well at night knowing that the Frugal Dutchman is ever standing guard over all old furniture everywhere. Thank you FD!
I hope one day you will do a tutorial on tufting.. I’ve always wondered about that:)
A moment of silence for my husband’s pride.
“Tackity, tackity, tack, tack… I’mmmm Baaack.. ” This made me LOL at work! And I looked up Gallopin’ Gertie. So surreal! Looks like something from a funhouse! Might’ve been cool to be that car… Until you crash into the Sound!