Dear friends, I have such a special treat for you today. So I was cruising Facebook (against my better judgment and time-management), and came across this AMAZING armoire.

I loved it so much and spent the next 30 minutes trying to find the actual creator, and a corresponding website. I wanted to pin it so I could remember and be inspired!
Once I finally found Maria’s Facebook page, I got lost in her extensive furniture portfolio of images. So much talent! Unfortunately, she doesn’t have a website that I could pin from. But I knew that the world needed to see her work! So I reached out to her and asked if she would guest post and share the tutorial with YOU my readers!
You’re welcome!
High Five!
Take it away Maria!!!
~~~~~~~~~~~~~~~~~~~~~~~~~~~~
My signature technique that I created is part of every piece I do, no matter what color/s or brand of paint or stain I’m using!
For the turquoise collection I like to refer to it as the “The Bermuda Blending”. This technique it’s a fun way to play with different colors and textures that gives my pieces life and movement.
Antique Armoire- Dresser-Dining Table & Vanity.

Basically, I chose a variety of 4 shades of blues, using brand names paint colors and also creating my own colors with the help of Pixie Dust Paint Company. Pixie Dust additives allows me to use any paint color I want mixing the liquid or powder with my flat finish latex paint and still maintain that chalk like finish that I need to blend with some of the other premix chalk base paints.
*The Bermuda Blues:
- Annie Sloan Napoleonic Blue
- CeCe Caldwell Santa Fe Turquoise
- Behr Blue Ocean (mixed with Pixie dust for a chalky finish)
- Behr Southern Evening (mixed with Pixie dust for a chalky finish).
Note: Pixie Dust provides the instruction and measurements to mix with your paint, so don’t worry it’s very easy.
Now a contrast color!
- My go to Orange is Barcelona Orange from Annie Sloan.
One of my favorite products to use besides Pixie Dust is another amazing product called Unicorn SPiT Natural Stains. Both of these products allow me to use custom blends of colors I want at a more affordable price and allows me to enhance my projects in a way no other paint or stain allows.
Unicorn SPiT it’s a non-toxic natural water base gel stain and glaze in one with a wonderful aroma (think blooming jasmine on a spring day). I love to use it directly as a stain or to enhance the colors on a chalk paint base surface.
- Unicorn SPiT Navajo Jewel
- Unicorn SPiT Phoenix Fire
- Unicorn SPIT Zia Teal
- Unicorn SPiT Blue Thunder
Antiquing:
To seal and protect:
- Use your trusted brand of sealer, I personally like to use Minwax PolyCrylic Clear Satin finish, but there are several waxes and sealers on the market that will all achieve the same results. Use what you are comfortable with.

Note: Before starting make sure your furniture is clean and degreased.
And now …Let’s start blending!
(Because the armoire it’s already done, I am going to use a small piece to show you step by step how to blend!)

Get one soft paintbrush for the blue colors and one paintbrush for the orange color.
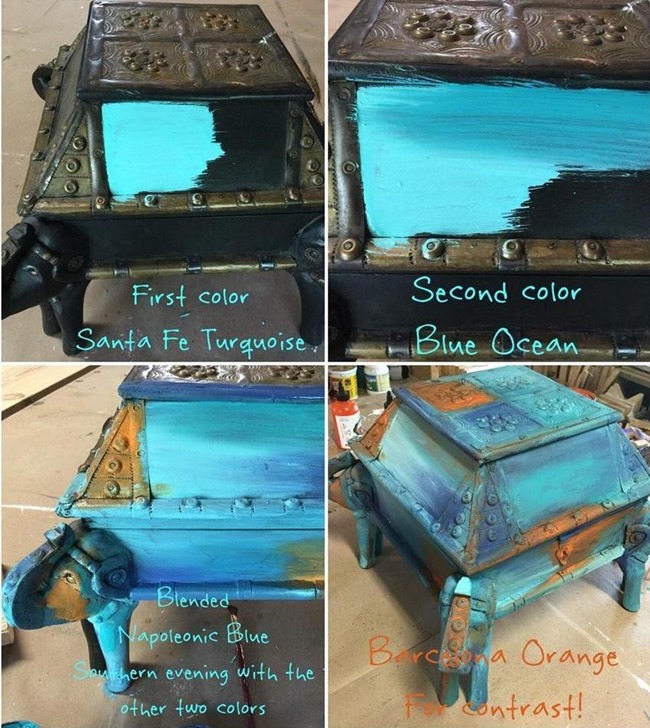
I always like to start with the lighter colors, so let’s start with the Santa Fe Turquoise from CeCe Caldwell. Start painting on the easiest part to get comfortable before you start Blending! The first color should be applied in a long light stroke in a small section, then the second color from the edges so that it starts blending but not covering the first color in its entirety. Even though you are blending colors, each color should have an area where it’s just that color.

Now more Blue…..

Use a dark blue to create drama (AS Napoleonic Blue) as well as “Blue Ocean” and “Southern Evening” colors in different spots, blend with more Santa Fe Turquoise. You will get original shades of blues in every blend, that’s why it is important that you always give the original colors their own spot.
To add the contrast color (Barcelona Orange from AS) choose strategic areas on your furniture, like corners and small areas surrounding the Orange with your favorite Blue combinations.
Keep blending until you have covered the entire piece.

Note: Let it dry for at least an hour.
Now that all the colors are dry, we can appreciated them all together!
To create a brighter and more vibrant effect, we’re now going to SPiT! YES SPiT!!! You just have to try it!!! You can apply SPiT with your hands (fingers) or a brush.
NOTE: I typically use the brush from the paints above. Remember we are “BLENDING” so it’s ok to use one brush for multiple colors as long as they are all in the same family. Blue SPiT with Blue paints and Orange SPiT with Orange paints! I think you get the picture! Randomly, enhance your original colors with the SPiT. For example, in some areas where the orange was applied, brush the “Phoenix Fire” SPiT to get a brighter Orange.

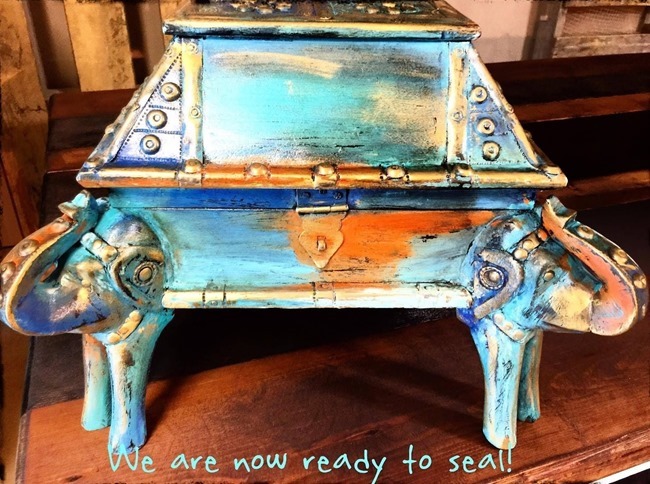
Let it dry again and with a 100 grit sanding block, distress corners, edges and some of flat areas to get the antique look! After distressing get your dark wax to antique the full piece or only some random areas. Apply as little or as much as you would like. After all this is your piece!

Seal with at least two coats of your favorite sealer sanding in between coats and voila your masterpiece is an amazing piece of art!


Please follow us on Facebook https://www.facebook.com/MLFurnitureDecor/
And Pixie Dust and Unicorn SPiT can be found here:
I hope that you all enjoy this tutorial and most of all have fun creating your next piece!
Maria A Revollo
Founder & Designer
ML Furniture Décor LLC.
~~~~~~~~~~~~~~~~~~~~~~~~~~~~~~~~~
Isn’t this technique soooooo AMAZING? Maria is such a wizard with furniture! And you might also love my technique for making new pine boards look like old wood (that’s even tinted whatever shade you want!) >>see video below!
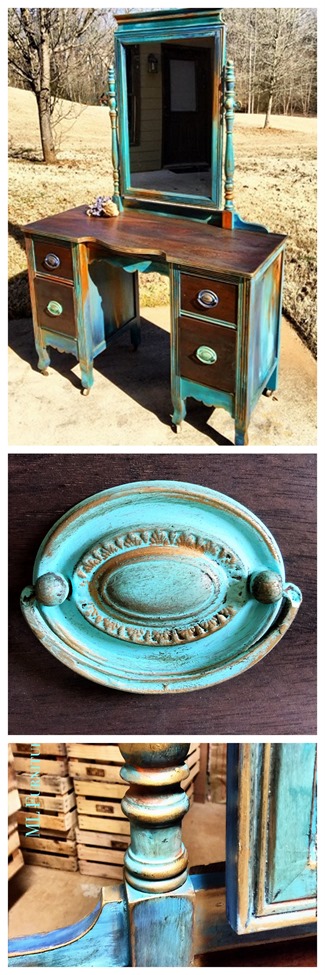
Check out some of the other pieces she’s done using this same technique.


*this post contains affiliate links*

Simply amazing! Thank you SO much for sharing – I can’t wait to try something like this (My Unicorn Spit arrived today! LOL!)
Great guide about the furniture finishing technique . Thanks for sharing it.
It is amazing!!!
When you say blend are you talking about with a paint brush?
This is exquisite! Thanks – I have an old door in my kitchen and am going to paint it thus!
THANKS again!
HI I think this is beautiful. i’m in the UK and am having trouble finding Pixie Dust over here. If i buy theall the colours in a chalk paint do i not need the pixie dust?
Thanks for a great tutorial can’t wait to try this when all the rest arrives
Hey Lorraine! This will absolutely still be amazing without the Pixie Dust. You should go for it!
YIKES!!! ? People really do this??? Great decor for haunted houses maybe??
If we all had the same taste, it would be such a boring world! <3
I think what you do is beautiful. I too use my imagination to paint pieces. LOVE LOVE LOVE! Keep inspiriting !!!
So not nice! My Mom always said if you don’t have something nice to say, then don’t say anything at all. It’s rude and unnecessary and your singular tiny insignificant opinion!
I have been searching for a tutorial on how to do this for weeks, thank you!
Which paint was used on the metal cabinet pulls? My understanding is chalk paint won’t stick to metal? Thanks
I have a question! I’ve always been told that poly sealants cannot be applied over wax, but here you are using sealant over wax? Does poly over wax work?
Thank you
That’s a good question Mylisa! This post was written by a contributor, so I’m not really sure on how to answer your question. But Maria has a Facebook group for Q&A for this technique. You should head over there and ask! Here’s the link: https://www.facebook.com/groups/1086438591404851/
HERMOSO EL DECAPADO. ME GUSTA ESOS AZULES , PERO DESEARÍA SABER LA CERA QUE NOMBRAS CUAL ES O COMO LA CONSIGO . SOY DE COLOMBIA
Wow! 😮 Amazing post! I am so inspired right now. I can’t wait to try this. I LOVE the ‘Bermuda Blending Technique’! Maria is a genius for coming up with this. Thank you for sharing. Pinning! 😀
Thank you so much everyone for supporting and using my Bermuda Blending technique.
https://www.facebook.com/MLFurnitureDecor/
OMG, this is SO gorgeous, and all my favorite colors. Thanks so much!!
Love love love! I’m going to try this out!
Thanks for this article. The Armoire is stunning and I am so glad you mentioned Pixie Dust. I discovered it recently and fell in love. I’ve had a ball using up my ‘stash’ of latex paints (especially all of my sample paints from Home Depot) paints and turning them into chalk paints for fun little projects.
I’ve been admiring Maria’s pieces forever and so appreciate the tutorial!
I love it all!!
Oh my gosh. that armoire is amazing!